Manuals
/
Hughes
/
Computer Equipment
/
Network Router
Hughes
R-BGAN
manual
Connecting Using Ethernet, Connecting Using Bluetooth
Models:
R-BGAN
1
19
68
68
Download
68 pages
6.54 Kb
16
17
18
19
20
21
22
23
Troubleshooting
Error codes
Bluetooth
Controls And Indicators
Connecting devices
Battery Light
Network Settings
Restore Factory Defaults
Safety
Wait - Power light alternating
Page 19
Image 19
Page 18
Page 20
Page 19
Image 19
Page 18
Page 20
Contents
Page
User Manual
Revision K
Satellite IP Modem
Trademarks
Copyright 2005 Hughes Network Systems, LLC
Page
DANGER
SAFETY INFORMATION
WARNING SYMBOLS USED IN THIS MANUAL
WARNINGS FOR THE SATELLITE IP MODEM
General
Qualified service
Batteries and accessories
Connecting devices
Hearing aids
INTRODUCTION
TABLE OF CONTENTS
SAFETY INFORMATION
TABLE OF CONTENTS
Security Management
Page
COVERAGE
INTRODUCTION
Phase 2 Coverage Area with I4 Satellites
UNPACKING
FIRST TIME SET-UP
ƒ Macintosh Safari 1.0 Beta or later
MINIMUM SYSTEM REQUIREMENTS AND SOFTWARE INSTALLATION
ƒ Netscape Communicator version 7.0 or later. Java must be active
ƒ Microsoft Internet Explorer 5 for Macintosh or later
SATELLITE IP MODEM SOFTWARE INSTALLATION
QUICKSTART WIZARD OVERVIEW
LAUNCH PAD -- QUICKSTART WIZARD
STEP 1 UNPACK THE SATELLITE IP MODEM
STEP 2 UNPACK THE SATELLITE IP MODEM - POWER
STEP 4 CONNECTING USING USB
STEP 3 CONNECTING THE SATELLITE IP MODEM TO YOUR PC
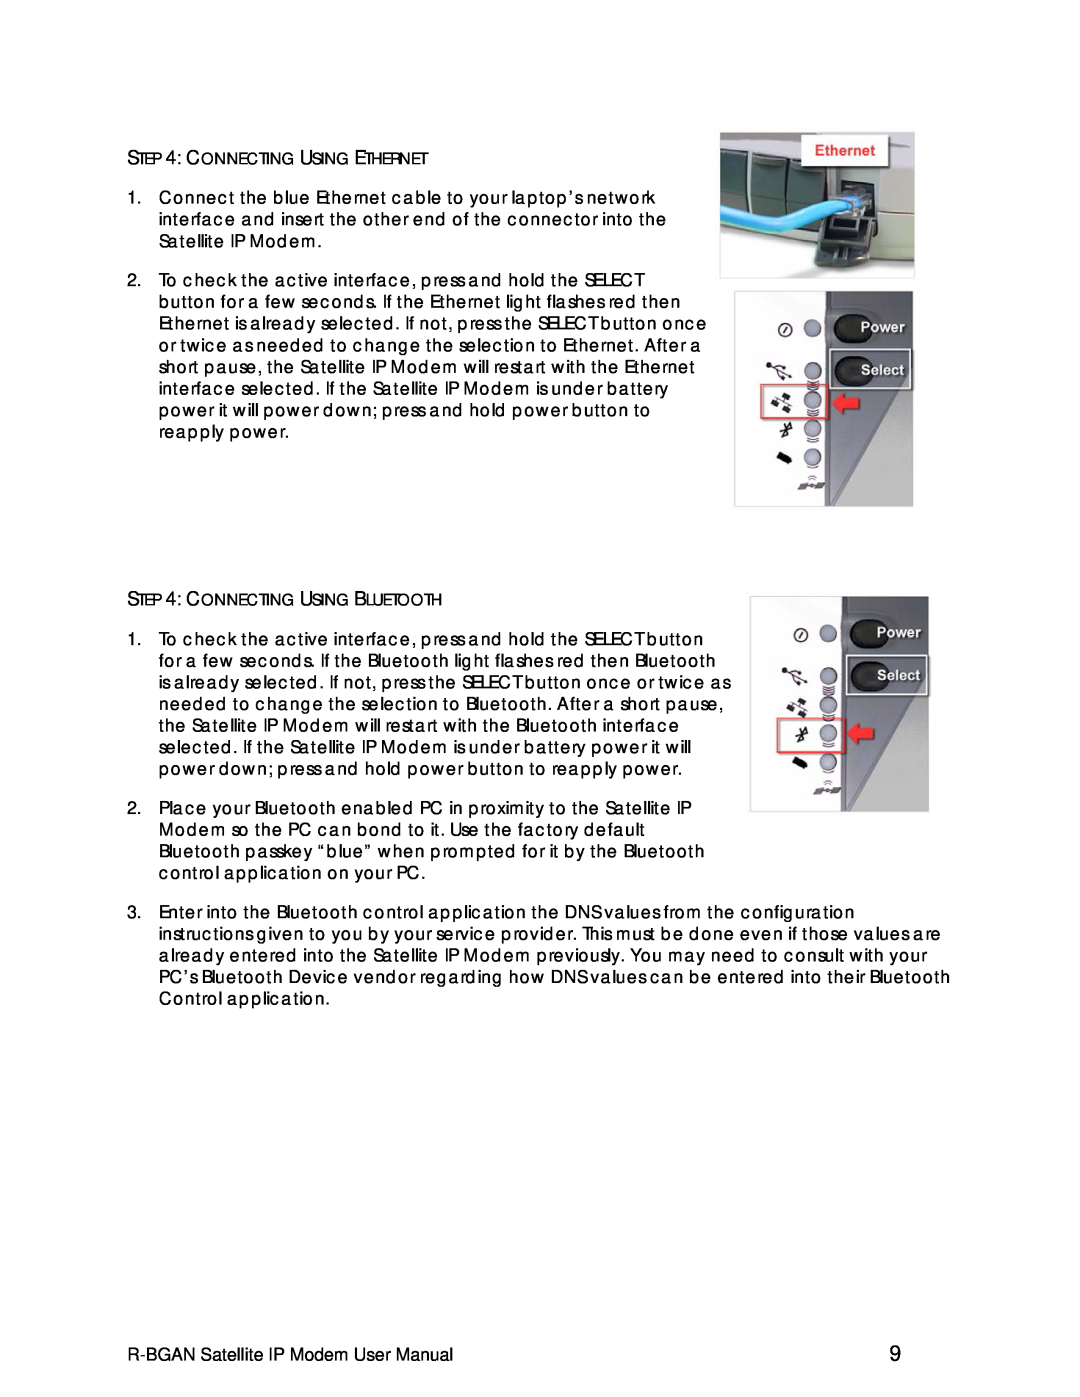
STEP 4 CONNECTING USING BLUETOOTH
STEP 4 CONNECTING USING ETHERNET
Proceed - Power light
red / amber
alternating green / amber
Wait - Power light alternating
Satellite Coverage Maps
STEP 7 ROUGH POINTING TO SATELLITE
Antenna Pointing Screen - Satellite Overlap Region
R-BGAN Satellite IP Modem User Manual
R-BGAN Satellite IP Modem User Manual
STEP 8 FINE POINTING TO THE SATELLITE
Use the following instructions to fine point the antenna
R-BGAN Satellite IP Modem User Manual
STEP 9 EXITING POINTING MODE
GLOBAL POSITIONING SYSTEM OPERATION
QUICK REFERENCE
ANTENNA POINTING
POWER BUTTON
CONTROLS AND INDICATORS
POWER LIGHT
SELECT BUTTON
BATTERY LIGHT
INTERFACE LIGHTS
COMPASS
SATELLITE IP MODEM ANTENNA PROTRACTOR
VIEW QUICKSTART WIZARD
LAUNCH PAD
UPGRADE SATELLITE IP MODEM
UPGRADE SYSTEM INFORMATION
R-BGAN Satellite IP Modem User Manual
POINTING
CONTROL PAD
SECURITY MANAGEMENT
Home Screen
HOME
STATUS WINDOW
Connection Type USB, Ethernet, or Bluetooth
GPS Antenna Internal or External
Fault Status Any current system faults or errors
SATEllite Indicates AOR or IOR satellite
Network Settings Screen
NETWORK SETTINGS
ADVANCED SETTINGS
CHANGE SERVICE PROVIDER LOGIN INFORMATION
Select the Apply button to implement your modifications
NEW FEATURE FIXED INSTALLATION
USER OPTIONS
BLUETOOTH
Data Usage Monitor
BLUETOOTH PASSKEY
UPGRADING SOFTWARE
UPGRADE SATELLITE IP MODEM
RESTORE FACTORY DEFAULTS
PROPERTIES
NO LOCAL COPY PRESENT
UPGRADING SOFTWARE USING A MACINTOSH
LOCAL COPY PRESENT
R-BGAN Satellite IP Modem User Manual
Properties Screen for LUG User
LEASE USER GROUP LUG OPERATION
R-BGAN Satellite IP Modem User Manual
R-BGAN Satellite IP Modem User Manual
Possible Cause
TROUBLESHOOTING
GENERAL TROUBLESHOOTING
Problem
R-BGAN Satellite IP Modem User Manual
Problem
Possible Cause
Action
R-BGAN Satellite IP Modem User Manual
Problem
Possible Cause
Action
R-BGAN Satellite IP Modem User Manual
Cause
FAULT CODES
Solution
Number and Description
R-BGAN Satellite IP Modem User Manual
Solution
Number and Description
Cause
R-BGAN Satellite IP Modem User Manual
Solution
Number and Description
Cause
R-BGAN Satellite IP Modem User Manual
Solution
Number and Description
Cause
R-BGAN Satellite IP Modem User Manual
Solution
Number and Description
Cause
R-BGAN Satellite IP Modem User Manual
Solution
Number and Description
Cause
R-BGAN Satellite IP Modem User Manual
Solution
Number and Description
Cause
R-BGAN Satellite IP Modem User Manual
GLOSSARY
Page
R-BGAN Satellite IP Modem User Manual
R-BGAN Satellite IP Modem User Manual
Top
Page
Image
Contents