2

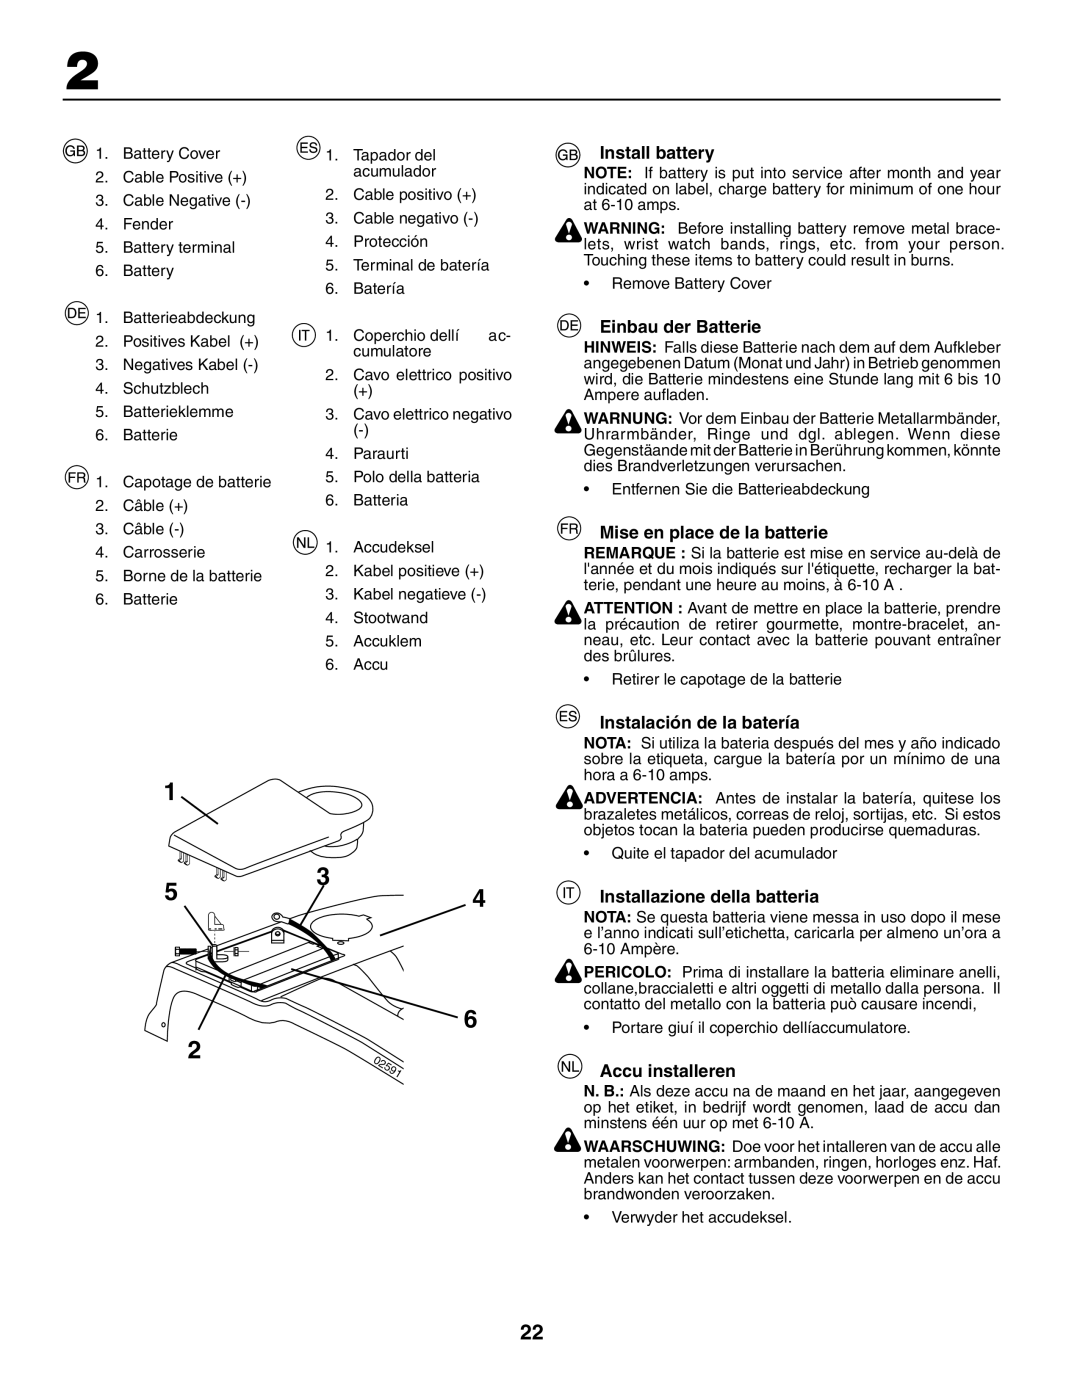
1. Battery Cover

2.Cable Positive (+)

3.Cable Negative (-)

4.Fender

5.Battery terminal

6.Battery

1. Batterieabdeckung

2.Positives Kabel (+)

3.Negatives Kabel (-)

4.Schutzblech

5.Batterieklemme

6.Batterie

1. Capotage de batterie

2.Câble (+)

3.Câble (-)

4.Carrosserie

5.Borne de la batterie

6.Batterie

1. Tapador del acumulador

2.Cable positivo (+)

3.Cable negativo (-)

4.Protección

5.Terminal de batería

6.Batería

1. Coperchio dellí

ac-

cumulatore


2.Cavo elettrico positivo

(+)

3.Cavo elettrico negativo (-)

4.Paraurti

5.Polo della batteria

6.Batteria

1. Accudeksel

2.Kabel positieve (+)

3.Kabel negatieve (-)

4.Stootwand

5.Accuklem

6.Accu

Install battery

NOTE: If battery is put into service after month and year indicated on label, charge battery for minimum of one hour at 6-10 amps.

WARNING: Before installing battery remove metal brace- lets, wrist watch bands, rings, etc. from your person. Touching these items to battery could result in burns.

Remove Battery Cover

Einbau der Batterie

HINWEIS: Falls diese Batterie nach dem auf dem Aufkleber angegebenen Datum (Monat und Jahr) in Betrieb genommen wird, die Batterie mindestens eine Stunde lang mit 6 bis 10 Ampere aufl aden.

WARNUNG: Vor dem Einbau der Batterie Metallarmbänder, Uhrarmbänder, Ringe und dgl. ablegen. Wenn diese Gegenstäande mit der Batterie in Berührung kommen, könnte dies Brandverletzungen verursachen.

Entfernen Sie die Batterieabdeckung

Mise en place de la batterie

REMARQUE : Si la batterie est mise en service au-delà de l'année et du mois indiqués sur l'étiquette, recharger la bat- terie, pendant une heure au moins, à 6-10 A .

ATTENTION : Avant de mettre en place la batterie, prendre la précaution de retirer gourmette, montre-bracelet, an- neau, etc. Leur contact avec la batterie pouvant entraîner des brûlures.

Retirer le capotage de la batterie

1

3

54

6

2

Instalación de la batería

NOTA: Si utiliza la bateria después del mes y año indicado sobre la etiqueta, cargue la batería por un mínimo de una hora a 6-10 amps.

ADVERTENCIA: Antes de instalar la batería, quitese los brazaletes metálicos, correas de reloj, sortijas, etc. Si estos objetos tocan la bateria pueden producirse quemaduras.

Quite el tapador del acumulador

Installazione della batteria

NOTA: Se questa batteria viene messa in uso dopo il mese e l’anno indicati sull’etichetta, caricarla per almeno un’ora a 6-10 Ampère.

PERICOLO: Prima di installare la batteria eliminare anelli, collane,braccialetti e altri oggetti di metallo dalla persona. Il contatto del metallo con la batteria può causare incendi,

Portare giuí il coperchio dellíaccumulatore.

Accu installeren

N. B.: Als deze accu na de maand en het jaar, aangegeven op het etiket, in bedrijf wordt genomen, laad de accu dan minstens één uur op met 6-10 A.

WAARSCHUWING: Doe voor het intalleren van de accu alle

metalen voorwerpen: armbanden, ringen, horloges enz. Haf. Anders kan het contact tussen deze voorwerpen en de accu brandwonden veroorzaken.

Verwyder het accudeksel.

22

Page 22
Image 22
Husqvarna CTH150 XP Install battery, Einbau der Batterie, Mise en place de la batterie, Instalación de la batería

CTH210xp, CTH150 XP specifications

The Husqvarna CTH150 XP and CTH210 XP are exceptional lawn tractors designed for efficient mowing and robust performance, making them ideal choices for homeowners and small property managers. Known for their innovative technologies and user-friendly features, these models stand out in the crowded market of riding mowers.

The CTH150 XP features a powerful 15 HP Kohler engine, providing ample power for tackling various lawn terrains. With its 42-inch cutting deck, this tractor ensures a wide and efficient cutting path, allowing users to cover more ground in less time. The CTH210 XP, on the other hand, is equipped with an even more robust 21 HP engine, paired with a 46-inch cutting deck, making it suitable for larger properties and tougher mowing conditions.

Both models come with Husqvarna's Pedal-operated transmission system, which allows for seamless speed adjustments while keeping hands free for steering. This feature promotes more control and a smoother mowing experience. Additionally, they incorporate a reinforced cutting deck construction that enhances durability and performance, ensuring that users can rely on their mower for years to come.

One of the standout technologies in both the CTH150 XP and CTH210 XP is the ClearCutâ„¢ cutting system. This advanced system delivers superior cutting performance by utilizing a deep deck design that improves grass flow, resulting in a better cut quality and even grass distribution. Users can choose from multiple cutting heights, adjusted easily from the operator's seat, to achieve the desired lawn appearance.

In terms of maintenance, both models are designed with hassle-free access to critical components, making routine checks and servicing straightforward. The large fuel tank allows for extended mowing sessions without frequent refueling stops, a significant advantage for larger lawns.

Comfort is also paramount in the design of the CTH150 XP and CTH210 XP. Featuring ergonomically designed seats, users can enjoy a comfortable ride even during extended mowing sessions. The control panel is strategically placed for easy access to vital functions, and the overall design ensures optimal visibility while mowing, enhancing safety and precision.

In summary, the Husqvarna CTH150 XP and CTH210 XP represent cutting-edge lawn tractor technology, combining powerful engines, durable construction, advanced cutting systems, and user-centric design. These models are perfect for anyone looking to achieve a well-manicured lawn efficiently and comfortably.