1


2


4

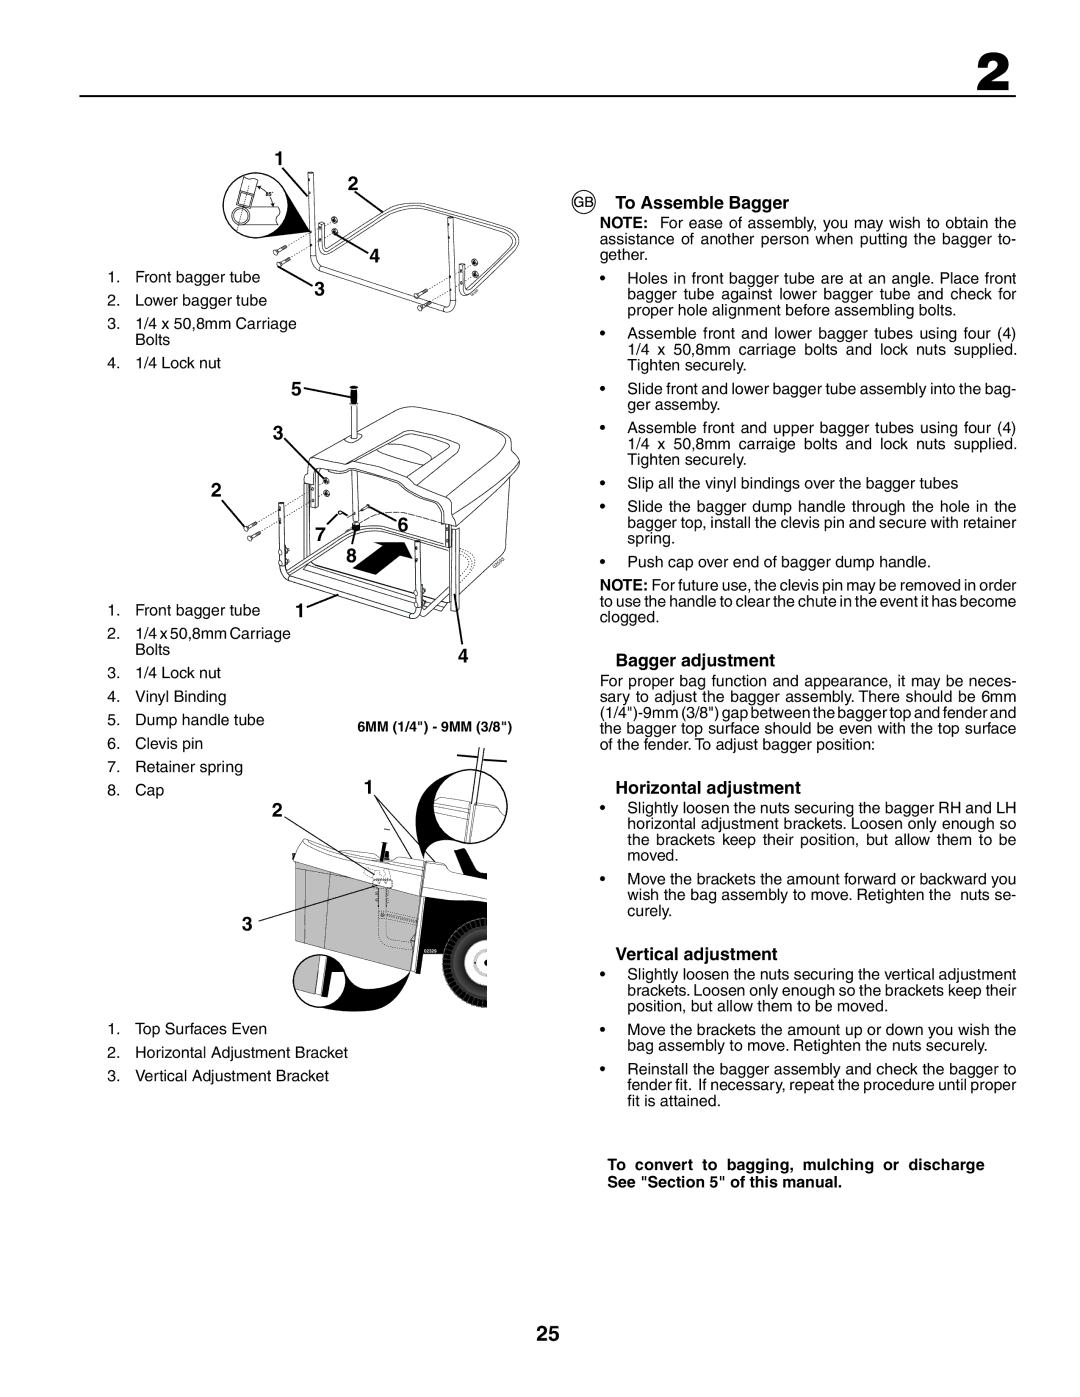
1.

Front bagger tube

3


2

2.

Lower bagger tube

0259


3.

1/4 x 50,8mm Carriage


Bolts


4.

1/4 Lock nut


5

3

2

7 6

8

02593

2

To Assemble Bagger

NOTE: For ease of assembly, you may wish to obtain the assistance of another person when putting the bagger to- gether.

Holes in front bagger tube are at an angle. Place front bagger tube against lower bagger tube and check for proper hole alignment before assembling bolts.

Assemble front and lower bagger tubes using four (4) 1/4 x 50,8mm carriage bolts and lock nuts supplied. Tighten securely.

Slide front and lower bagger tube assembly into the bag- ger assemby.

Assemble front and upper bagger tubes using four (4) 1/4 x 50,8mm carraige bolts and lock nuts supplied. Tighten securely.

Slip all the vinyl bindings over the bagger tubes

Slide the bagger dump handle through the hole in the bagger top, install the clevis pin and secure with retainer spring.

Push cap over end of bagger dump handle.

NOTE: For future use, the clevis pin may be removed in order to use the handle to clear the chute in the event it has become

1. Front bagger tube

1

2.1/4 x 50,8mm Carriage Bolts

3.1/4 Lock nut

4.Vinyl Binding

5.Dump handle tube

6.Clevis pin

7.Retainer spring

8.Cap

2

3

4

6MM (1/4") - 9MM (3/8")

1

02329

clogged.

Bagger adjustment

For proper bag function and appearance, it may be neces- sary to adjust the bagger assembly. There should be 6mm (1/4")-9mm (3/8") gap between the bagger top and fender and the bagger top surface should be even with the top surface of the fender. To adjust bagger position:

Horizontal adjustment

Slightly loosen the nuts securing the bagger RH and LH horizontal adjustment brackets. Loosen only enough so the brackets keep their position, but allow them to be moved.

Move the brackets the amount forward or backward you wish the bag assembly to move. Retighten the nuts se- curely.

Vertical adjustment

1.Top Surfaces Even

2.Horizontal Adjustment Bracket

3.Vertical Adjustment Bracket

Slightly loosen the nuts securing the vertical adjustment brackets. Loosen only enough so the brackets keep their position, but allow them to be moved.

Move the brackets the amount up or down you wish the bag assembly to move. Retighten the nuts securely.

Reinstall the bagger assembly and check the bagger to fender fi t. If necessary, repeat the procedure until proper fi t is attained.

To convert to bagging, mulching or discharge See "Section 5" of this manual.

25

Page 25
Image 25
Husqvarna CTH210xp, CTH150 XP To Assemble Bagger, Bagger adjustment, Horizontal adjustment, Vertical adjustment

CTH210xp, CTH150 XP specifications

The Husqvarna CTH150 XP and CTH210 XP are exceptional lawn tractors designed for efficient mowing and robust performance, making them ideal choices for homeowners and small property managers. Known for their innovative technologies and user-friendly features, these models stand out in the crowded market of riding mowers.

The CTH150 XP features a powerful 15 HP Kohler engine, providing ample power for tackling various lawn terrains. With its 42-inch cutting deck, this tractor ensures a wide and efficient cutting path, allowing users to cover more ground in less time. The CTH210 XP, on the other hand, is equipped with an even more robust 21 HP engine, paired with a 46-inch cutting deck, making it suitable for larger properties and tougher mowing conditions.

Both models come with Husqvarna's Pedal-operated transmission system, which allows for seamless speed adjustments while keeping hands free for steering. This feature promotes more control and a smoother mowing experience. Additionally, they incorporate a reinforced cutting deck construction that enhances durability and performance, ensuring that users can rely on their mower for years to come.

One of the standout technologies in both the CTH150 XP and CTH210 XP is the ClearCutâ„¢ cutting system. This advanced system delivers superior cutting performance by utilizing a deep deck design that improves grass flow, resulting in a better cut quality and even grass distribution. Users can choose from multiple cutting heights, adjusted easily from the operator's seat, to achieve the desired lawn appearance.

In terms of maintenance, both models are designed with hassle-free access to critical components, making routine checks and servicing straightforward. The large fuel tank allows for extended mowing sessions without frequent refueling stops, a significant advantage for larger lawns.

Comfort is also paramount in the design of the CTH150 XP and CTH210 XP. Featuring ergonomically designed seats, users can enjoy a comfortable ride even during extended mowing sessions. The control panel is strategically placed for easy access to vital functions, and the overall design ensures optimal visibility while mowing, enhancing safety and precision.

In summary, the Husqvarna CTH150 XP and CTH210 XP represent cutting-edge lawn tractor technology, combining powerful engines, durable construction, advanced cutting systems, and user-centric design. These models are perfect for anyone looking to achieve a well-manicured lawn efficiently and comfortably.