48![]()
![]()
![]()
![]()
![]()
![]()
![]()
![]()
![]()
![]()
![]()
![]()
![]()
![]()
![]()
![]()
![]()
![]()
![]()
![]()
![]()
![]()
![]()
![]()
![]()
![]()
![]()
![]()
![]()
![]()
![]()
![]()
![]()
![]()
![]()
![]()
![]()
![]()
![]()
![]()
![]()
![]()
![]()
![]()
![]()
![]()
![]()
![]()
![]()
![]()
![]()
![]()
![]()
![]()
![]()
![]()
![]()
![]()
![]()
![]()
![]()
![]()
![]()
![]()
![]()
![]()
![]()
![]()
![]()
![]()
![]()
![]()
![]()
![]()
![]()
![]()
![]()
![]()
![]() EDITING
EDITING![]() (cont.)
(cont.)![]()
![]()
![]()
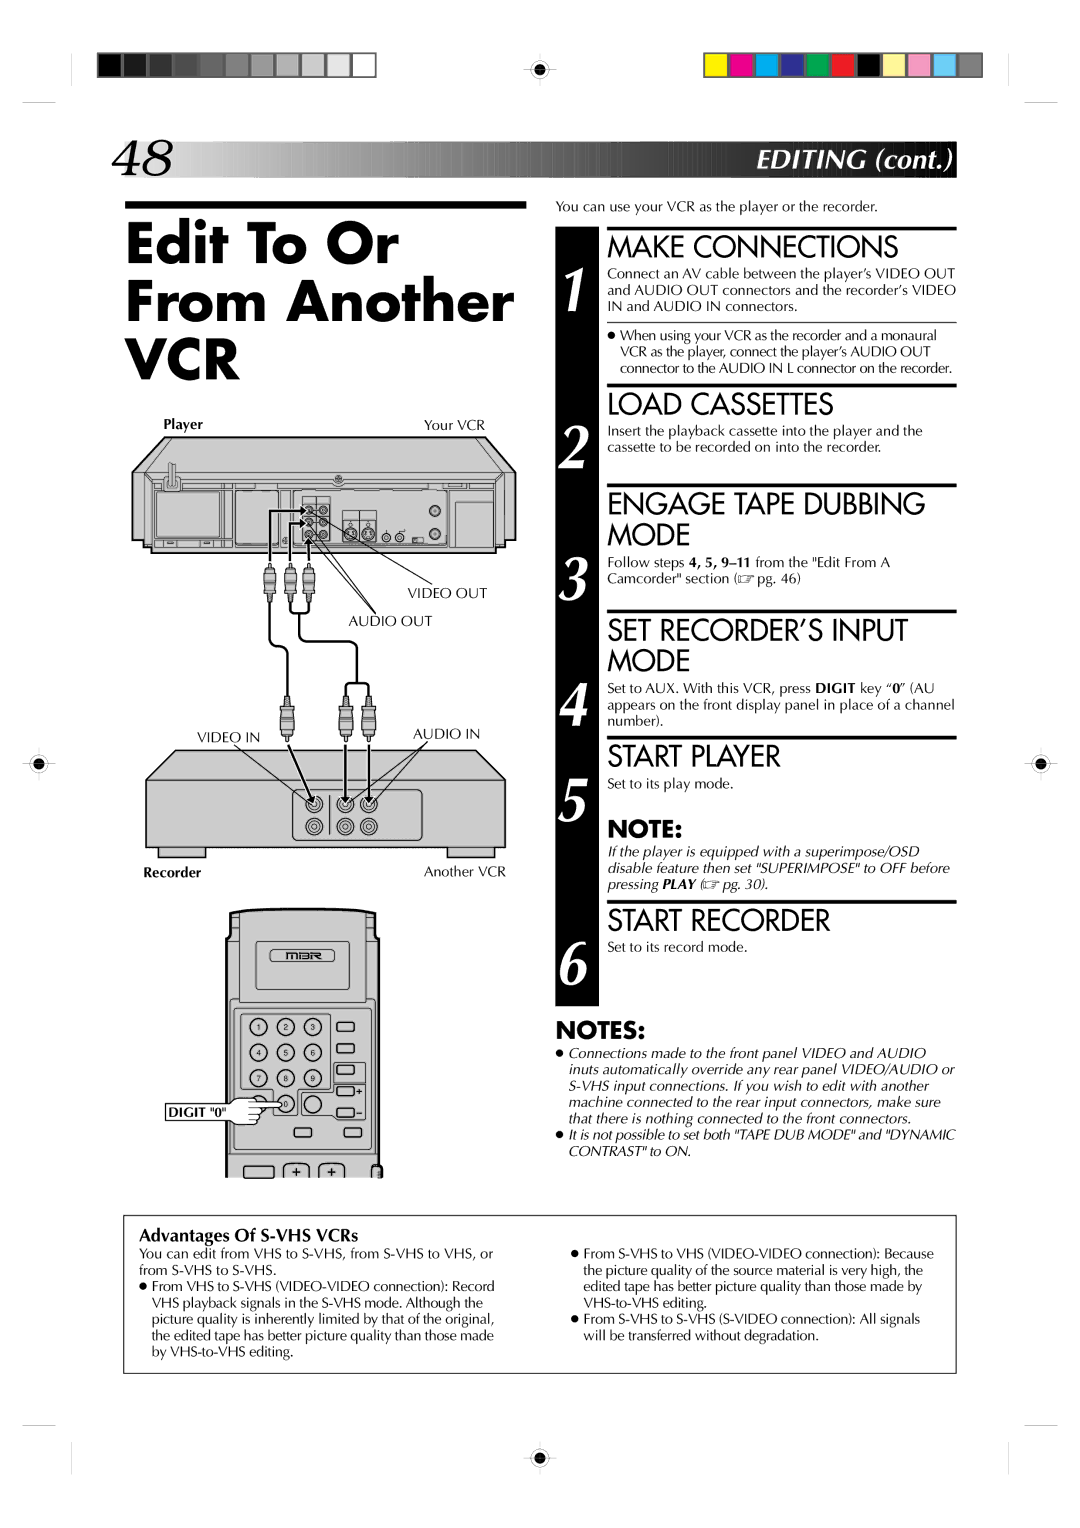
You can use your VCR as the player or the recorder.
Edit To Or
From Another
VCR
|
|
|
| Player |
|
|
|
|
|
|
|
|
|
|
|
|
|
|
|
|
|
|
|
|
| Your VCR | ||||||||||||||||||
|
|
|
|
|
|
|
|
|
|
|
|
|
|
|
|
|
|
|
|
|
|
|
|
|
|
|
|
|
|
|
|
|
|
|
|
|
|
|
|
|
|
|
|
|
|
|
|
|
|
|
|
|
|
|
|
|
|
|
|
|
|
|
|
|
|
|
|
|
|
|
|
|
|
|
|
|
|
|
|
|
|
|
|
|
|
|
|
|
|
|
|
|
|
|
|
|
|
|
|
|
|
|
|
|
|
|
|
|
|
|
|
|
|
|
|
|
|
|
|
|
|
|
|
|
|
|
|
|
|
|
|
|
|
|
|
|
|
|
|
|
|
|
|
|
|
|
|
|
|
|
|
|
|
|
|
|
|
|
|
|
|
|
|
|
|
|
|
|
|
|
|
|
|
|
|
|
|
|
|
|
|
|
|
|
|
|
|
|
|
|
|
|
|
|
|
|
|
|
|
|
|
|
|
|
|
|
|
|
|
|
|
|
|
|
|
|
|
|
|
|
|
|
|
|
|
|
|
|
|
|
|
|
|
|
|
|
|
|
|
|
|
|
|
|
|
|
|
|
|
|
|
|
|
|
|
|
|
|
|
|
|
|
|
|
|
|
|
|
|
|
|
|
|
|
|
|
|
|
|
|
|
|
|
|
|
|
|
|
|
|
|
|
|
|
|
|
|
|
|
|
|
|
|
|
|
|
|
|
|
|
|
|
|
|
|
|
|
|
|
|
|
|
|
|
|
|
|
|
|
|
|
|
|
|
|
|
|
|
|
|
|
|
|
|
|
|
|
|
|
|
|
|
|
|
|
|
|
|
|
|
|
|
|
|
|
|
|
|
|
|
|
|
|
|
|
|
|
|
|
|
|
|
|
|
|
|
|
|
|
|
|
|
|
|
|
|
|
|
|
|
|
|
|
|
VIDEO OUT
AUDIO OUT
VIDEO IN | AUDIO IN |
Recorder |
|
| Another VCR | |||
|
|
|
|
|
|
|
|
|
|
|
|
|
|
|
|
|
|
|
|
|
1 2 3
4 5 6
7 8 9
1 |
| MAKE CONNECTIONS |
| Connect an AV cable between the player’s VIDEO OUT | |
| and AUDIO OUT connectors and the recorder’s VIDEO | |
| IN and AUDIO IN connectors. | |
|
| ● When using your VCR as the recorder and a monaural |
|
| VCR as the player, connect the player’s AUDIO OUT |
|
| connector to the AUDIO IN L connector on the recorder. |
|
|
|
2 |
| LOAD CASSETTES |
| Insert the playback cassette into the player and the | |
| cassette to be recorded on into the recorder. | |
|
| ENGAGE TAPE DUBBING |
3 |
| MODE |
| Follow steps 4, 5, | |
Camcorder" section (☞ pg. 46) | ||
|
| SET RECORDER’S INPUT |
4 |
| MODE |
| Set to AUX. With this VCR, press DIGIT key “0” (AU | |
| appears on the front display panel in place of a channel | |
| number). | |
5 |
| START PLAYER |
| Set to its play mode. | |
| NOTE: | |
|
| If the player is equipped with a superimpose/OSD |
|
| disable feature then set "SUPERIMPOSE" to OFF before |
|
| pressing PLAY (☞ pg. 30). |
|
|
|
6 |
| START RECORDER |
| Set to its record mode. | |
|
|
|
NOTES:
● Connections made to the front panel VIDEO and AUDIO |
inuts automatically override any rear panel VIDEO/AUDIO or |
DIGIT "0"
0
machine connected to the rear input connectors, make sure |
that there is nothing connected to the front connectors. |
● It is not possible to set both "TAPE DUB MODE" and "DYNAMIC |
CONTRAST" to ON. |
Advantages Of S-VHS VCRs
You can edit from VHS to
●From VHS to
●From
●From