Introduction
Precautions
Installation
•Install in a place which is level, dry and neither too hot nor too
•Install the System in a location with adequate ventilation to prevent internal heat buildup in the System.
DO NOT install the System in a location near heat sources, or in a place subject to direct sunlight, excessive dust or vibration.
•Leave sufficient distance between the System and the TV.
•Keep the speakers away from the TV to avoid interference with TV.
Power sources
•When unplugging the System from the wall outlet, always pull on the plug, not the AC power cord.
DO NOT handle the AC power cord with wet hands.
Moisture condensation
Moisture may condense on the lenses inside the System in the following cases:
•After starting to heat the room
•In a damp room
•If the System is brought directly from a cold to a warm place Should this occur, the System may malfunction. In this case, leave the System turned on for a few hours until the moisture evaporates, unplug the AC power cord, then plug it in again.
Internal heat
•A cooling fan is mounted on the rear panel to prevent heat buildup inside the unit.
For safety, observe the following carefully:
•Make sure there is good ventilation around the unit. Poor ventilation could overheat and damage the unit.
• DO NOT block the cooling fan and the ventilation openings or holes. If they are blocked by a newspaper or cloth, etc., the heat may not be able to get out.
Others
•Should any metallic object or liquid fall into the System, unplug the AC power cord and consult your dealer before operating any further.
DO NOT disassemble the System since there are no user serviceable parts inside.
1
•If you are not going to operate the System for an extended period of time, unplug the AC power cord from the wall outlet.
If anything goes wrong, unplug the AC power cord and consult your dealer.
How to Read This Manual
To make the explanations in this manual as simple and
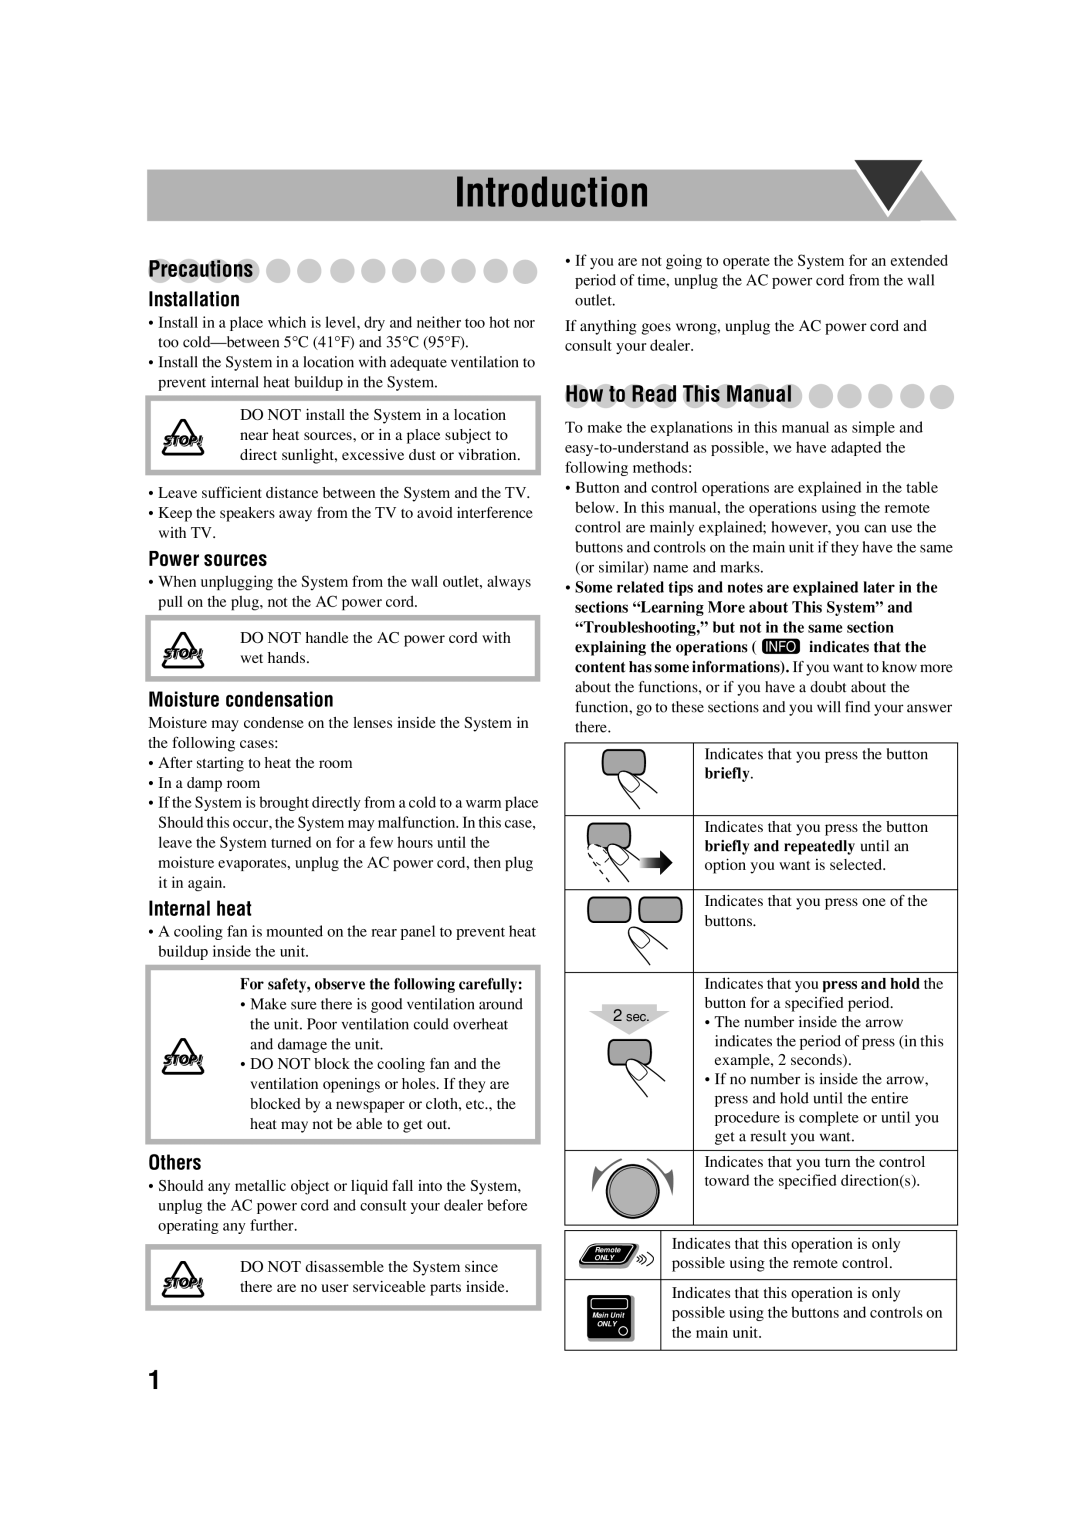
•Button and control operations are explained in the table below. In this manual, the operations using the remote control are mainly explained; however, you can use the buttons and controls on the main unit if they have the same (or similar) name and marks.
•Some related tips and notes are explained later in the sections “Learning More about This System” and
“Troubleshooting,” but not in the same section explaining the operations ( INFO indicates that the content has some informations). If you want to know more about the functions, or if you have a doubt about the function, go to these sections and you will find your answer there.
|
|
|
|
| Indicates that you press the button |
|
|
|
|
| briefly. |
|
|
|
|
|
|
|
|
|
|
|
|
|
|
|
|
| Indicates that you press the button |
|
|
|
| ||
|
|
|
|
| briefly and repeatedly until an |
|
|
|
|
| option you want is selected. |
|
|
|
|
|
|
|
|
|
|
|
|
|
|
|
|
| Indicates that you press one of the |
|
|
|
|
| |
|
|
|
|
| buttons. |
|
|
|
|
|
|
|
|
|
|
|
|
|
|
|
|
| Indicates that you press and hold the |
|
| 2 sec. |
|
| button for a specified period. |
|
|
|
| • The number inside the arrow | |
|
|
|
|
| |
|
|
|
|
| indicates the period of press (in this |
|
|
|
|
| example, 2 seconds). |
•If no number is inside the arrow, press and hold until the entire procedure is complete or until you get a result you want.
|
|
|
|
|
|
| Indicates that you turn the control |
|
|
|
|
|
|
| toward the specified direction(s). |
|
|
|
|
|
|
|
|
|
|
|
|
|
|
|
|
|
|
|
|
|
|
|
|
|
|
|
|
| Indicates that this operation is only | ||
|
|
| Remote |
| |||
|
|
| ONLY |
| possible using the remote control. | ||
|
|
|
|
|
| ||
|
|
|
|
|
|
|
|
|
|
|
|
|
| Indicates that this operation is only | |
|
|
|
|
|
| ||
|
|
| Main Unit |
| possible using the buttons and controls on | ||
|
|
| ONLY |
| the main unit. | ||
|
|
|
|
|
| ||
|
|
|
|
|
|
|
|
|
|
|
|
|
|
|
|