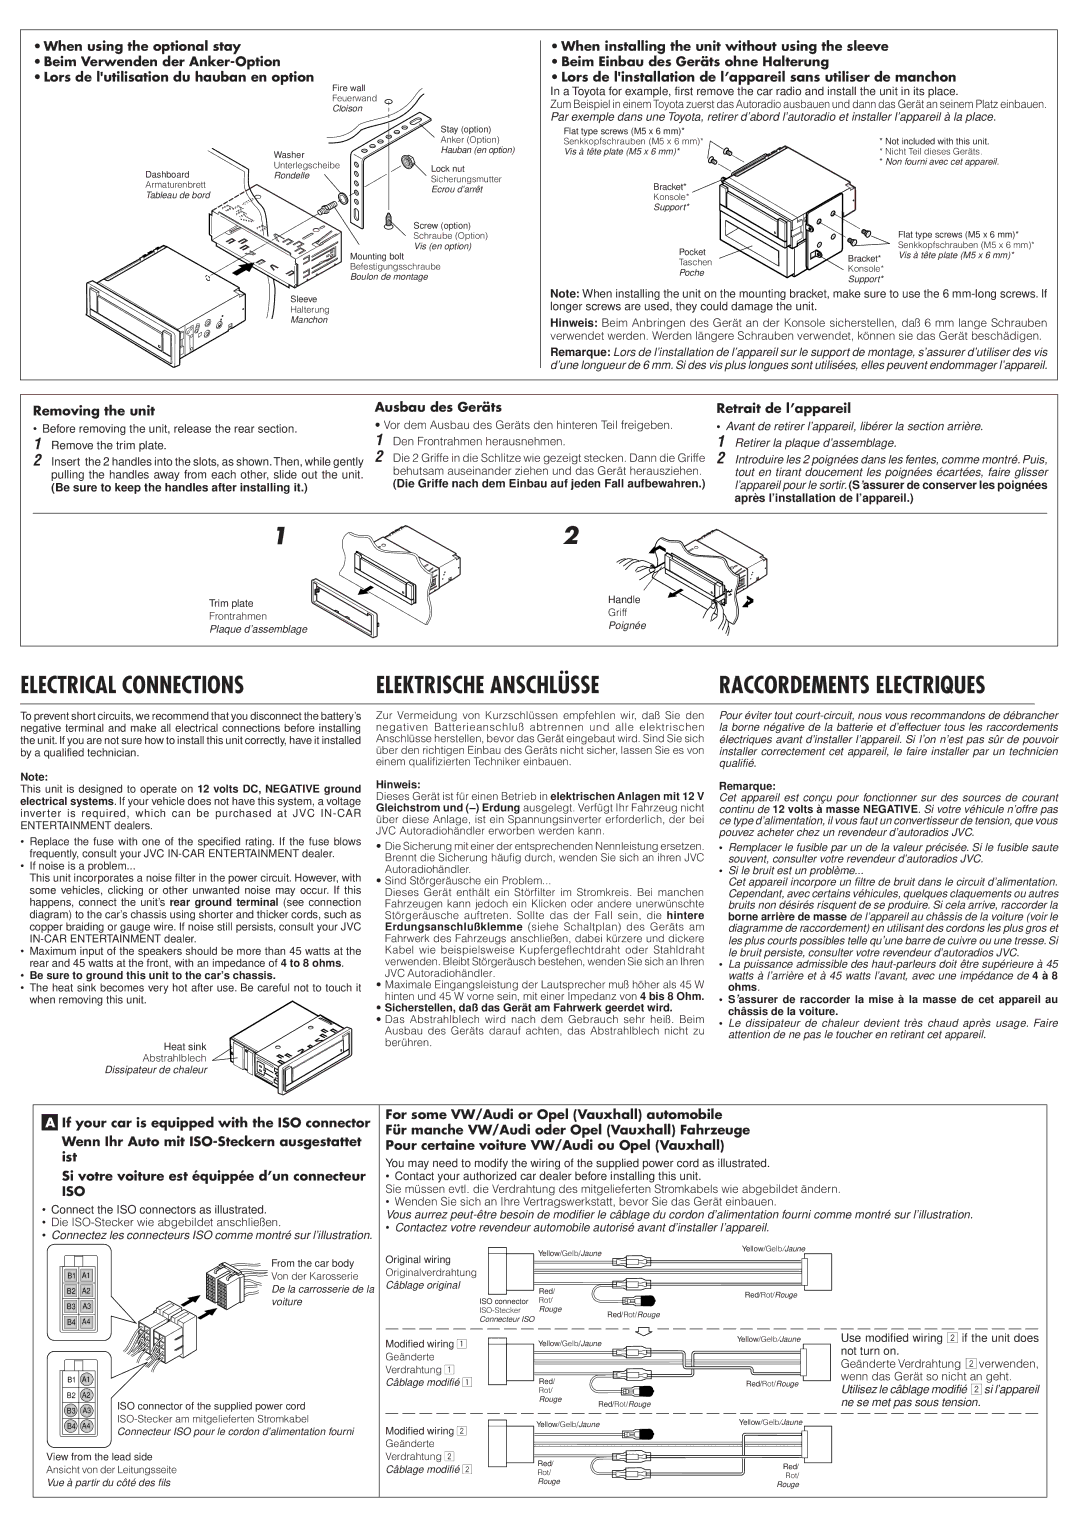
•When using the optional stay •Beim Verwenden der Anker-Option •Lors de l'utilisation du hauban en option

Fire wall

Feuerwand

Cloison

When installing the unit without using the sleeve

Beim Einbau des Geräts ohne Halterung

Lors de l'installation de l’appareil sans utiliser de manchon

In a Toyota for example, first remove the car radio and install the unit in its place.

Zum Beispiel in einem Toyota zuerst das Autoradio ausbauen und dann das Gerät an seinem Platz einbauen. Par exemple dans une Toyota, retirer d’abord l’autoradio et installer l’appareil à la place.


Stay (option)


Anker (Option)


Washer

Hauban (en option)


Dashboard

Unterlegscheibe

Lock nut

Rondelle

Sicherungsmutter

Armaturenbrett


Ecrou d’arrêt

Tableau de bord


Screw (option)

Flat type screws (M5 x 6 mm)* Senkkopfschrauben (M5 x 6 mm)* Vis à tête plate (M5 x 6 mm)*

Bracket*

Konsole*

Support*

*Not included with this unit.

*Nicht Teil dieses Geräts.

*Non fourni avec cet appareil.

Schraube (Option)

Vis (en option)

Mounting bolt

Pocket

Taschen

Bracket*

Flat type screws (M5 x 6 mm)* Senkkopfschrauben (M5 x 6 mm)* Vis à tête plate (M5 x 6 mm)*

Befestigungsschraube

Boulon de montage

Poche

Konsole*

Support*

Sleeve

Halterung

Manchon

Note: When installing the unit on the mounting bracket, make sure to use the 6 mm-long screws. If longer screws are used, they could damage the unit.

Hinweis: Beim Anbringen des Gerät an der Konsole sicherstellen, daß 6 mm lange Schrauben verwendet werden. Werden längere Schrauben verwendet, können sie das Gerät beschädigen.

Remarque: Lors de l’installation de l’appareil sur le support de montage, s’assurer d’utiliser des vis d’une longueur de 6 mm. Si des vis plus longues sont utilisées, elles peuvent endommager l’appareil.

Removing the unit

Before removing the unit, release the rear section. 1 Remove the trim plate.

2Insert the 2 handles into the slots, as shown.Then, while gently pulling the handles away from each other, slide out the unit.

(Be sure to keep the handles after installing it.)

Ausbau des Geräts

Vor dem Ausbau des Geräts den hinteren Teil freigeben. 1 Den Frontrahmen herausnehmen.

2Die 2 Griffe in die Schlitze wie gezeigt stecken. Dann die Griffe behutsam auseinander ziehen und das Gerät herausziehen.

(Die Griffe nach dem Einbau auf jeden Fall aufbewahren.)

Retrait de l’appareil

Avant de retirer l’appareil, libérer la section arrière. 1 Retirer la plaque d’assemblage.

2Introduire les 2 poignées dans les fentes, comme montré. Puis, tout en tirant doucement les poignées écartées, faire glisser l’appareil pour le sortir. (Sassurer de conserver les poignées après l’installation de l’appareil.)

1

Trim plate

Frontrahmen

Plaque d’assemblage

2

Handle

Griff

Poignée

ELECTRICAL CONNECTIONS

ELEKTRISCHE ANSCHLÜSSE

RACCORDEMENTS ELECTRIQUES

To prevent short circuits, we recommend that you disconnect the battery’s negative terminal and make all electrical connections before installing the unit. If you are not sure how to install this unit correctly, have it installed by a qualified technician.

Note:

This unit is designed to operate on 12 volts DC, NEGATIVE ground electrical systems. If your vehicle does not have this system, a voltage inverter is required, which can be purchased at JVC IN-CAR ENTERTAINMENT dealers.

Replace the fuse with one of the specified rating. If the fuse blows frequently, consult your JVC IN-CAR ENTERTAINMENT dealer.

If noise is a problem...

This unit incorporates a noise filter in the power circuit. However, with some vehicles, clicking or other unwanted noise may occur. If this happens, connect the unit’s rear ground terminal (see connection diagram) to the car’s chassis using shorter and thicker cords, such as copper braiding or gauge wire. If noise still persists, consult your JVC IN-CAR ENTERTAINMENT dealer.

Maximum input of the speakers should be more than 45 watts at the rear and 45 watts at the front, with an impedance of 4 to 8 ohms.

Be sure to ground this unit to the car’s chassis.

The heat sink becomes very hot after use. Be careful not to touch it when removing this unit.

Heat sink

Abstrahlblech

Dissipateur de chaleur

Zur Vermeidung von Kurzschlüssen empfehlen wir, daß Sie den negativen Batterieanschluß abtrennen und alle elektrischen Anschlüsse herstellen, bevor das Gerät eingebaut wird. Sind Sie sich über den richtigen Einbau des Geräts nicht sicher, lassen Sie es von einem qualifizierten Techniker einbauen.

Hinweis:

Dieses Gerät ist für einen Betrieb in elektrischen Anlagen mit 12 V Gleichstrom und (–) Erdungausgelegt. Verfügt Ihr Fahrzeug nicht über diese Anlage, ist ein Spannungsinverter erforderlich, der bei JVC Autoradiohändler erworben werden kann.

Die Sicherung mit einer der entsprechenden Nennleistung ersetzen. Brennt die Sicherung häufig durch, wenden Sie sich an ihren JVC Autoradiohändler.

Sind Störgeräusche ein Problem...

Dieses Gerät enthält ein Störfilter im Stromkreis. Bei manchen Fahrzeugen kann jedoch ein Klicken oder andere unerwünschte Störgeräusche auftreten. Sollte das der Fall sein, die hintere Erdungsanschlußklemme (siehe Schaltplan) des Geräts am Fahrwerk des Fahrzeugs anschließen, dabei kürzere und dickere Kabel wie beispielsweise Kupfergeflechtdraht oder Stahldraht verwenden. Bleibt Störgeräusch bestehen, wenden Sie sich an Ihren JVC Autoradiohändler.

Maximale Eingangsleistung der Lautsprecher muß höher als 45 W hinten und 45 W vorne sein, mit einer Impedanz von 4 bis 8 Ohm.

Sicherstellen, daß das Gerät am Fahrwerk geerdet wird.

Das Abstrahlblech wird nach dem Gebrauch sehr heiß. Beim Ausbau des Geräts darauf achten, das Abstrahlblech nicht zu berühren.

Pour éviter tout court-circuit, nous vous recommandons de débrancher la borne négative de la batterie et d’effectuer tous les raccordements électriques avant d’installer l’appareil. Si lon n’est pas sûr de pouvoir installer correctement cet appareil, le faire installer par un technicien qualifié.

Remarque:

Cet appareil est conçu pour fonctionner sur des sources de courant continu de 12 volts à masse NEGATIVE . Si votre véhicule n’offre pas ce type d’alimentation, il vous faut un convertisseur de tension, que vous pouvez acheter chez un revendeur d’autoradios JVC.

Remplacer le fusible par un de la valeur précisée. Si le fusible saute souvent, consulter votre revendeur d’autoradios JVC.

Si le bruit est un problème...

Cet appareil incorpore un filtre de bruit dans le circuit d’alimentation. Cependant, avec certains véhicules, quelques claquements ou autres bruits non désirés risquent de se produire. Si cela arrive, raccorder la borne arrière de masse de l’appareil au châssis de la voiture (voir le diagramme de raccordement) en utilisant des cordons les plus gros et les plus courts possibles telle quune barre de cuivre ou une tresse. Si le bruit persiste, consulter votre revendeur d’autoradios JVC.

La puissance admissible des haut-parleurs doit être supérieure à 45 watts à l’arrière et à 45 watts l’avant, avec une impédance de 4 à 8 ohms.

Sassurer de raccorder la mise à la masse de cet appareil au châssis de la voiture.

Le dissipateur de chaleur devient très chaud après usage. Faire attention de ne pas le toucher en retirant cet appareil.

AIf your car is equipped with the ISO connector

Wenn Ihr Auto mit ISO-Steckern ausgestattet ist

Si votre voiture est équippée d’un connecteur

ISO

Connect the ISO connectors as illustrated.

Die ISO-Stecker wie abgebildet anschließen.

Connectez les connecteurs ISO comme montré sur l’illustration.

For some VW/Audi or Opel (Vauxhall) automobile

Für manche VW/Audi oder Opel (Vauxhall) Fahrzeuge

Pour certaine voiture VW/Audi ou Opel (Vauxhall)

You may need to modify the wiring of the supplied power cord as illustrated.

• Contact your authorized car dealer before installing this unit.

Sie müssen evtl. die Verdrahtung des mitgelieferten Stromkabels wie abgebildet ändern.

Wenden Sie sich an Ihre Vertragswerkstatt, bevor Sie das Gerät einbauen.

Vous aurrez peut-être besoin de modifier le câblage du cordon d’alimentation fourni comme montré sur l’illustration.

Contactez votre revendeur automobile autorisé avant d’installer l’appareil.


From the car body

B1

A1

Von der Karosserie

B2

A2

De la carrosserie de la

B3

A3

voiture


B4

A4


B1

A1


B2

A2


B3

A3

ISO connector of the supplied power cord

ISO-Stecker am mitgelieferten Stromkabel

B4

A4

Connecteur ISO pour le cordon d’alimentation fourni


View from the lead side

Ansicht von der Leitungsseite

Vue à partir du côté des fils


Yellow/Gelb/Jaune

Yellow/Gelb/Jaune

Original wiring


Originalverdrahtung


Câblage original

Red/


Red/Rot/Rouge


ISO connector

Rot/


ISO-Stecker

Rouge

Red/Rot/Rouge


Connecteur ISO


Modified wiring 1

Yellow/Gelb/Jaune

Yellow/Gelb/Jaune


Geänderte


Verdrahtung 1


Câblage modifié 1

Red/


Red/Rot/Rouge


Rot/


Rouge

Red/Rot/Rouge


Modified wiring 2

Yellow/Gelb/Jaune

Yellow/Gelb/Jaune


Geänderte


Verdrahtung 2

Red/


Câblage modifié 2


Red/

Rot/


Rot/

Rouge

Rouge


Use modified wiring 2 if the unit does not turn on.

Geänderte Verdrahtung 2 verwenden, wenn das Gerät so nicht an geht. Utilisez le câblage modifié 2si l’appareil ne se met pas sous tension.

Page 40
Image 40
JVC KS-LX200R manual Be sure to keep the handles after installing it, Die Griffe nach dem Einbau auf jeden Fall aufbewahren

KS-LX200R specifications

The JVC KS-LX200R is a versatile car audio receiver that combines advanced technology with user-friendly features, ensuring an elevated listening experience for audiophiles and casual listeners alike. This model is celebrated for its sleek design and powerful performance, making it an ideal addition to any vehicle.

One of the standout features of the KS-LX200R is its high-performance audio technology. It boasts a built-in amplifier capable of delivering up to 50 watts per channel, producing crystal-clear sound with minimal distortion. The unit supports various digital audio formats, allowing for compatibility with a wide range of media sources. Additionally, the receiver is equipped with a 13-band equalizer, enabling users to fine-tune the audio output to match their personal preferences and optimize sound quality according to the car’s acoustics.

Connectivity is at the forefront of the KS-LX200R's design. It features Bluetooth technology for hands-free calling and seamless wireless audio streaming from smartphones and other Bluetooth-enabled devices. The ability to pair multiple devices ensures that passengers can easily share their favorite music without tedious reconnections. Furthermore, the receiver includes USB and AUX inputs, giving users additional options for connecting their devices.

The KS-LX200R also accommodates various media formats, including CD, MP3, and WMA playback, ensuring that users can enjoy their entire library of audio content. The convenient front-facing USB port supports charging while listening, making it practical for long drives.

In terms of visual appeal, the KS-LX200R features a vibrant LCD display that provides clear visibility of track information and settings, even in bright sunlight. The user interface is intuitively designed, allowing quick access to various functions and settings, enhancing the overall user experience.

Moreover, the JVC KS-LX200R is built with durability in mind. It is designed to withstand the rigors of daily use in a vehicle environment while maintaining optimal performance. The receiver is compatible with steering wheel control interfaces, enabling users to operate the unit without taking their hands off the wheel for added safety.

Overall, the JVC KS-LX200R stands out as a feature-rich car audio receiver that seamlessly blends quality sound, modern convenience, and robust build quality, making it an excellent choice for any automotive sound system upgrade.