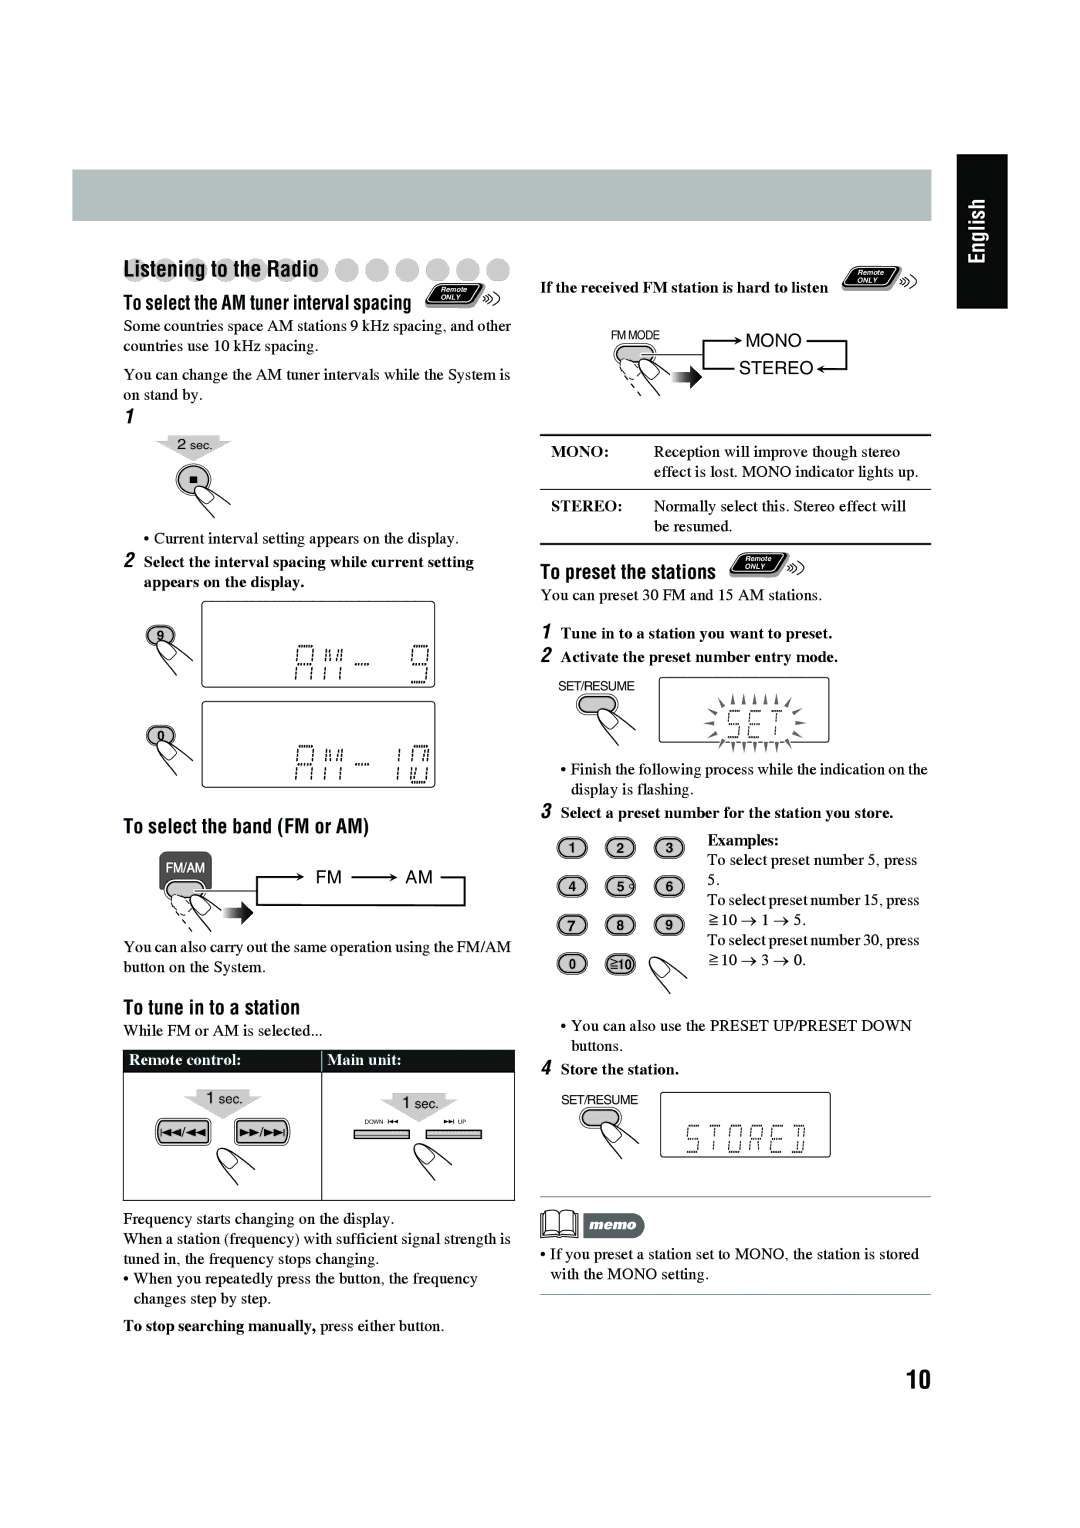
UX-G45 -Consistsof CA-UXG45and SP-UXG45
INSTRUCTIONS
MICRO COMPONENT SYSTEM
CA-UXG45SP-UXG45
Warnings, Cautions and Others
CAUTION-standby/on button
About the cooling fan
IMPORTANT FOR LASER PRODUCTS
Timer Operations
Contents
Other Adjustments
English
Installation
Introduction
Precautions
Power sources
using the buttons and controls on the main
How to Read This Manual
using the remote control
English
English
Getting Started
Step 2 Prepare the Remote Control
Step 1 Unpack
For better FM/AM reception
English
Step 3 Hook Up
To a wall outlet
AM loop antenna supplied
English
FM antenna supplied
Black striped Non-striped
To connect the speaker cords
Adjusting the voltage selector
English
To assemble and connect the AM loop antenna
Indications on the main display
Before Operating the System
English
3Adjust the volume
Daily Operations-Playback
1Turn on the power
English
2Activate the preset number entry mode
To preset the stations
1Tune in to a station you want to preset
3Select a preset number for the station you store
PRESET UP or
To tune in to a preset station
2Select a preset number for the station you store
PRESET DOWN
To connect the USB Memory or DAP
To activate/cancel resume play
English
To select a track/group
Playing Back a Tape
2Adjust the input level
English
Playing Back Other Equipment
English
Canceled
When QP Link is activated
Quick Portable Link QP Link
Adjusting the Sound
Daily Operations-Sound& Other Adjustments
Adjusting the Volume
To adjust the tone-BASS/TREBLE
2Adjust the hour
Setting the ClockRemote
1Activate the clock setting mode
3Adjust the minute
English
Turning Off the Power
Canceled
Automatically ONLY
Programming the Playing Order
Advanced Disc/USB Memory/DAP Operations
English
Program Play
Playing at Random-RandomPlay
To check the programmed contents
English
To modify the program
Canceled
Canceled
Canceled
Canceled
Recording on a Tape
Advanced Tape Operations
English
1 Insert a recordable cassette
To record the entire disc
Synchronized Disc Recording
English
BEAT
How Daily Timer actually works
Timer Operations
Setting the Timer
How Recording Timer actually works
5Set the volume
Daily 1 Timer Daily 2 Timer Daily 3 Timer
For Recording Timer
4Select preset station number
CanceledClock setting Recording Timer
To turn off the Timer after its setting is done
Daily 1 Timer Daily 2 Timer Daily 3 Timer
1 Select the Timer you want to cancel
MP3 groups/tracks configuration
Additional Information
Daily Operations-Sound& Other Adjustments
Adjusting the Volume
Timer Operations see pages 23 to
Troubleshooting
Timer Operations
Operations are disabled
Cleaning the System
Maintenance
Specifications
Supplied Accessories
Parts Index
Remote control
English
10-12,18
English
Main unit
9-13,18
UX-G45MICRO COMPONENT SYSTEM
CAUTION for mains AC line
SISTEMA DE MICRO COMPONENTES
MANUAL DE INSTRUCCIONES INSTRUCOES
SISTEMAS DE MICROCOMPONENTES
INSTRUCTIONS
Advertências, precauções e outras notas
Warnings, Cautions and Others
Avisos, precauciones y otras notas
CAUTION- standby/on button
Fronta
Front
Frontal
Side
PARA PRODUTOS LASER, IMPORTANTE
IMPORTANT FOR LASER PRODUCTS
IMPORTANTE PARA PRODUCTOS LÁSER
Timer Operations
Contents
Other Adjustments
English
Power sources
Precautions
Installation
For safety, observe the following carefully
using the buttons and controls on the main
How to Read This Manual
using the remote control
English
Finally plug the AC power cord
Step 2 Prepare the remote control
Step 2 Prepare the Remote Control
Getting Started
For better FM/AM reception
English
Step3 Hook Up
To a wall outlet
AM loop antenna supplied
English
FM antenna supplied
Black striped Non-striped
To connect the speaker cords
Adjusting the voltage selector
English
To assemble and connect the AM loop antenna
Indications on the main display
Before Operating the System
English
While listening to radio
English
PRESET UP
Daily Operations-Playback
To turn off stand by the System
2Activate the preset number entry mode
To preset the stations
1Tune in to a station you want to preset
3Select a preset number for the station you store
Playing Back a Disc
To tune in to a preset station
English
To select a track/group
To connect the USB Memory or DAP
To activate/cancel resume play
English
To select a track/group
Playing Back a Tape
2Adjust the input level
English
Playing Back Other Equipment
English
Canceled
When QP Link is activated
Quick Portable Link QP Link
Adjusting the Sound
Daily Operations-Sound& Other Adjustments
Adjusting the Volume
To adjust the tone-BASS/TREBLE
2Adjust the hour
Setting the ClockRemote
1Activate the clock setting mode
3Adjust the minute
Automatically ONLY
Turning Off the Power
English
Programming the Playing Order
Advanced Disc/USB Memory/DAP Operations
English
Program Play
Playing at Random-RandomPlay
To check the programmed contents
English
To modify the program
Canceled
Canceled
Canceled
Canceled
Recording on a Tape
Advanced Tape Operations
English
1 Insert a recordable cassette
To record the entire disc
Synchronized Disc Recording
English
BEAT
How Daily Timer actually works
Timer Operations
Setting the Timer
How Recording Timer actually works
5Set the volume
Daily 1 Timer Daily 2 Timer Daily 3 Timer
For Recording Timer
4Select preset station number
CanceledClock setting Recording Timer
To turn off the Timer after its setting is done
Daily 1 Timer Daily 2 Timer Daily 3 Timer
1 Select the Timer you want to cancel
Adjusting the Volume
Daily Operations-Sound& Other Adjustments
MP3 groups/tracks configuration
Adjusting the Sound
Timer Operations see pages 23 to
Troubleshooting
Timer Operations
Operations are disabled
Cleaning the System
Maintenance
Specifications
Supplied Accessories
Parts Index
Remote control
English
9-13,18
English
Main unit
10-12,18
IMPORTANTE para a ligação à tensão da rede CA
CAUTION for mains AC line
IMPORTANTE para la línea de la red CA