Manuals
/
JVC
/
Photography
/
Camcorder
JVC
LYT0002-0N5A
manual
44EN
Models:
LYT0002-0N5A
1
44
52
52
Download
52 pages
28.38 Kb
41
42
43
44
45
46
47
48
Install
Interval Timer Indicator
Tape remaining time indicator
Select Preset Title
Access Menu Screen
Attach Battery Pack
Viewfinder Adjustment
Restore Initial Setting
Clean Exterior
Speaker volume control
Page 44
Image 44
44
EN
I
N
D
E
X
Co
n
tro
l
s
T
3
5 79
r
2
4 6
0
!
8
%
E
u i U Y
O
1
P
g
@ #
$
*
(
)
I
f a
e
q
w
s
h
ty
d
o Q p W
^ &
R
Page 43
Page 45
Page 44
Image 44
Page 43
Page 45
Contents
GR-AXM40
Dear Customer
This unit is produced to comply with Standard IEC Publ
Major Features
Power
Supply Power
Attach Battery Pack
Detach Battery Pack
DC OUT
AA-V11EG
Viewfinder Adjustment
Start Clock Operation
Close Menu
Near Menu FAR
Program AE select dial
EN Getting S Tarted
Loading/Unloading a Cassette
Tripod Mounting
Grip Adjustment
Shoulder Strap Attachment
Enter RECORD-STANDBY Mode
RE Cordi NG Basic Recording
Load a Cassette
Start Shooting
Start/Stop button Display button Tally lamp
Tape remaining time indicator
Stop Recording
Switch
Start/Stop Power indicator
Speaker Tape remaining time indicator
Lens Cover
Brightness control
Journalistic shooting
Self-recording
Feature
EN Recording
Retake R/F
Purpose
Light OFF/AUTO/ON
Video Light
SET Video Light
EN Recording Advanced Features
Second later, the mode is activated
Programme AE With Special Effects
After 1 sec
Captures faster action than Sports mode
Dial
Mode
High shutter speed clearly captures fast-moving action
Focusing
EN Recordi NG
Lock Focus
Release Focus Lock
Power zoom lever Program AE select dial
FAR Near
Restore Initial Setting
Picture Stabilizer
Exposure Control
Brighten Image
Engage FADE- or Wipe Standby Mode
To Cancel FADE- or Wipe Standby Mode
Fade/Wipe
Select Function
Engage Wide Mode
Restore Normal Screen
Select Preset Title
Instant Titles
Menu button
Program AE select dial LCD monitor or viewfinder
Choose Display Mode
Date/Time Character Insert
Select Display
SEL. SET
Adjust Focus
Adjust White Balance
Select White Balance
SET SEL
Using Menu For Detailed Adjustment
Access Menu Screen
Make Setting
Menu
Jlip ID no
Norm
OFF
Interval Timer Indicator
Rec Time Indicator LCD monitor or viewfinder
Menu FAR Near
Program AE select dial Tally lamp
Animation
Time-Lapse
Rewind or Fast-forward the tape
Speaker volume control
EN Playback
FF Stop REW PLAY/PAUSE Counter R/M Feature
Operation
Connect Camcorder to TV
EN Playback Basic Conn ections
Connect Camcorder to VCR
Cassette Adapter
Insert Cassette in Adapter
Play Back on Connected VCR
Remove Cassette from Adapter
PLAY/PAUSE
Power switch
To Audio Video OUT connectors Video in connectors
Random Assemble Editing R.A.Edit
SET Remote to Operate VCR
Operate the VCR
Connect to
Prepare Camcorder
Prepare VCR
Register Beginning of Scene
Register END of Scene
Engage VCR’S RECORD-PAUSE Mode
Begin Automatic Editing
END Automatic Editing
Edited Tape VCR Stop
Installing The Battery
Pull OUT Battery Holder
Replace Battery Holder
Functions
START/STOP Viss INT. Time REC Time
Rec Time Indicator Interval Timer Indicator
Transmitted beam Effective area
START/STOP REW Pause Insert Play
Counter R/M Power
Insert editing indicator
Audio dubbing
To MIC Capped Microphone
DUB
Pause Play
Recording does not start
Tape is running, but there’s no playback picture
Counter Memory Function has been activated
Or rewind
Tape won’t eject Some functions are not available
Rear of the LCD monitor is hot
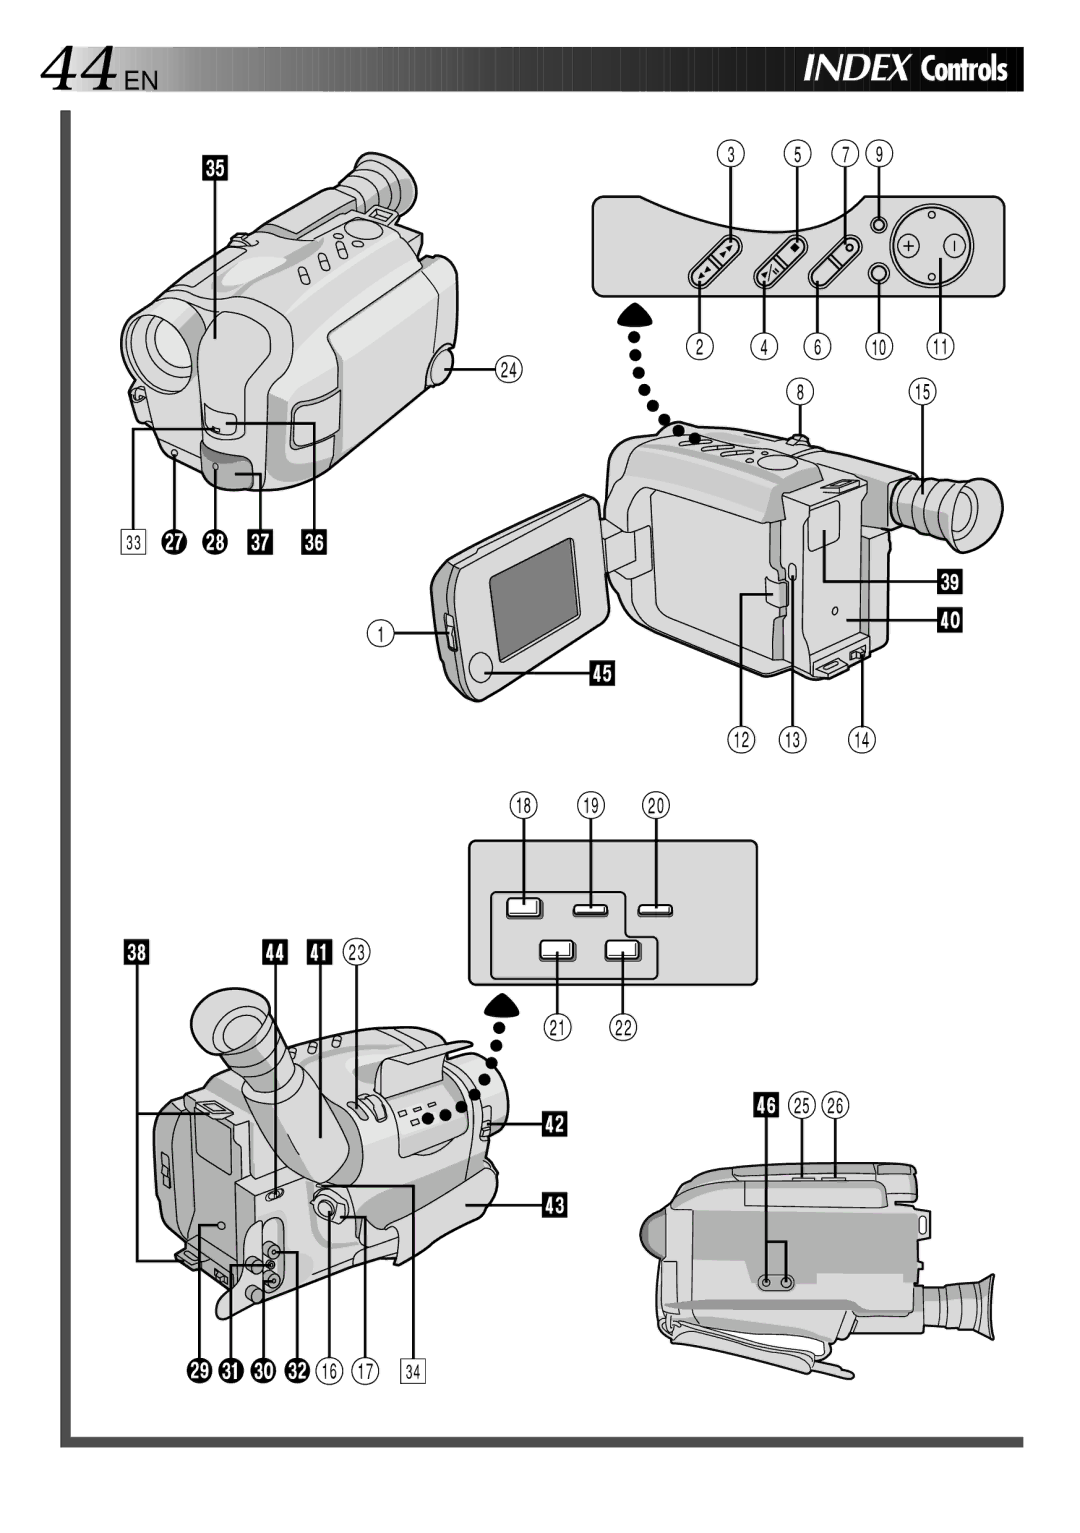
44EN
Power Switch Pg.10
Counter R Reset/M Memory
Tally Lamp Power On Indicator
Multi-Function Control
Tape End Display Tape END ............ pg
Tape Time
@ Instant Title Display # Date/Time Character Display
Do not burn
Do not modify or disassemble Use only specified chargers
Store in a cool, dry place. Extended exposure
Make sure the cassette bears the VHS-C mark
Clean Exterior
Clean LCD Monitor
Clean Lens
Clean Viewfinder
Wireless Remote Control Unit RM-V704U or RM-V700U
EN Memo
Memo EN
GR-AXM40
Top
Page
Image
Contents