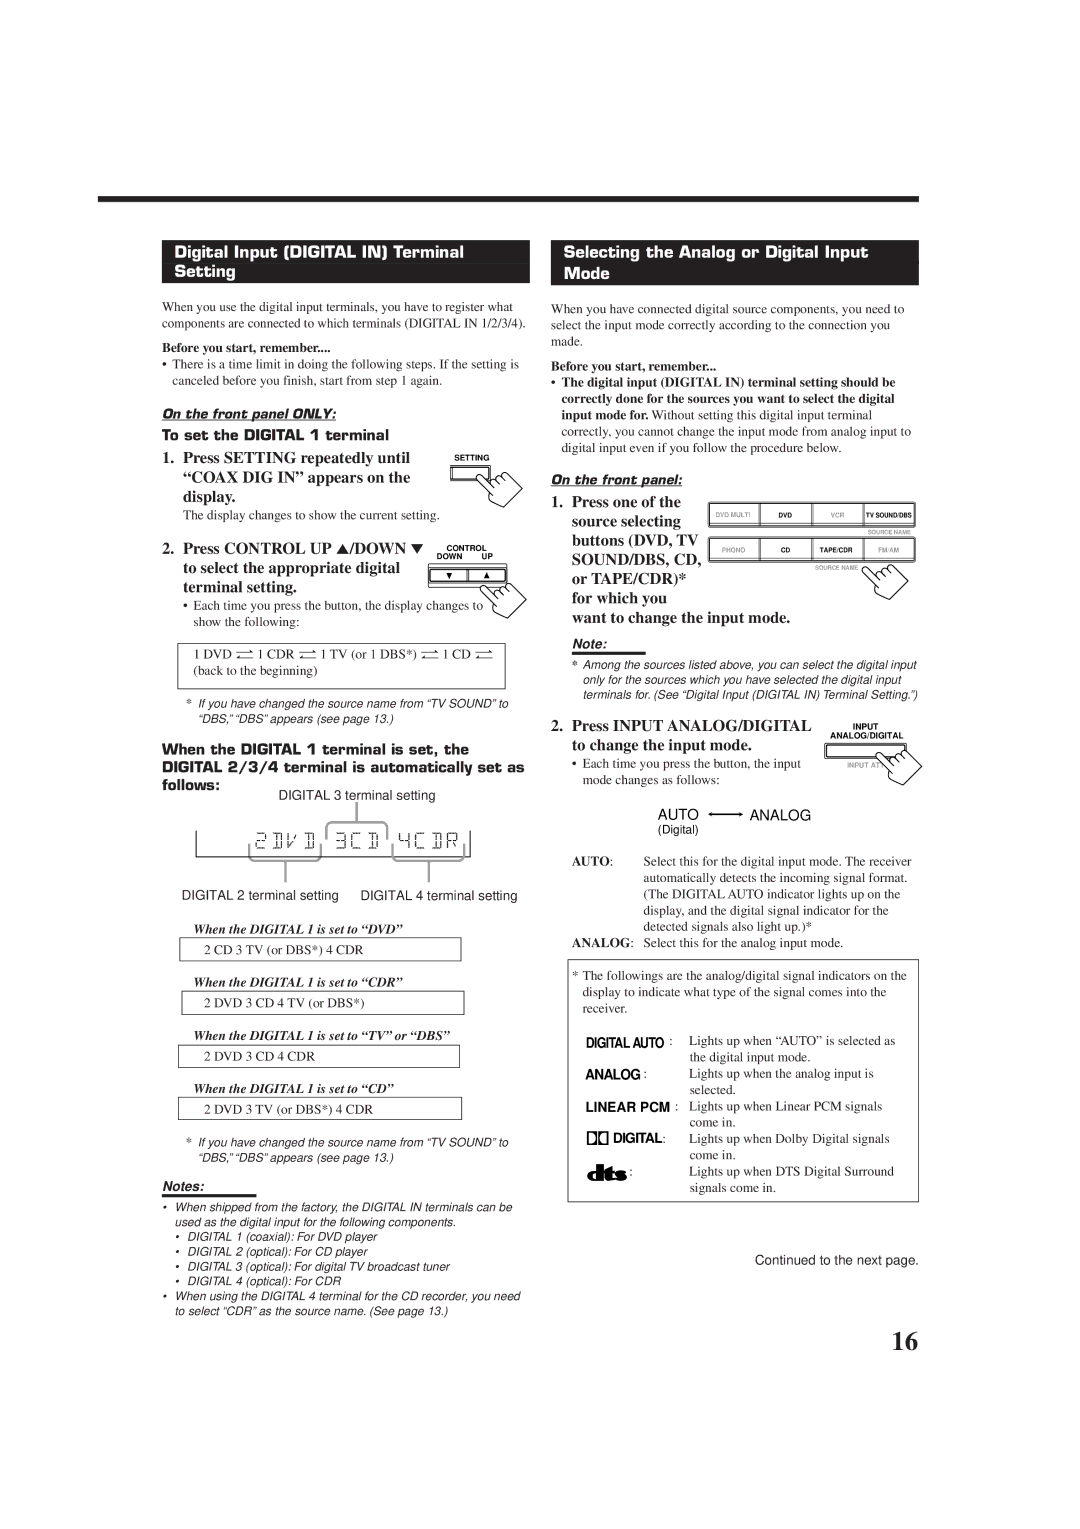
Digital Input (DIGITAL IN) Terminal

Setting

When you use the digital input terminals, you have to register what components are connected to which terminals (DIGITAL IN 1/2/3/4).

Before you start, remember....

There is a time limit in doing the following steps. If the setting is canceled before you finish, start from step 1 again.

On the front panel ONLY:

To set the DIGITAL 1 terminal

1. Press SETTING repeatedly until ST SETTING “COAX DIG IN” appears on the display.

The display changes to show the current setting.

2. Press CONTROL UP 5/DOWN ° CONTROL

DOWN UP

to select the appropriate digital terminal setting.

Each time you press the button, the display changes to show the following:

1 DVD Ò1 CDR Ò1 TV (or 1 DBS*) Ò1 CD Ò (back to the beginning)

*If you have changed the source name from “TV SOUND” to “DBS,” “DBS” appears (see page 13.)

When the DIGITAL 1 terminal is set, the DIGITAL 2/3/4 terminal is automatically set as follows:

DIGITAL 3 terminal setting

DIGITAL 2 terminal setting DIGITAL 4 terminal setting

When the DIGITAL 1 is set to “DVD”

2 CD 3 TV (or DBS*) 4 CDR

When the DIGITAL 1 is set to “CDR”

2 DVD 3 CD 4 TV (or DBS*)

Selecting the Analog or Digital Input

Mode

When you have connected digital source components, you need to select the input mode correctly according to the connection you made.

Before you start, remember...

The digital input (DIGITAL IN) terminal setting should be correctly done for the sources you want to select the digital input mode for. Without setting this digital input terminal correctly, you cannot change the input mode from analog input to digital input even if you follow the procedure below.

On the front panel:

1. Press one of the

DVD MULTI


DVD


VCR


TV SOUND/DBS


source selecting


SOURCE NAME


buttons (DVD, TV


PHONO


CD


TAPE/CDR


FM/AM


SOUND/DBS, CD,


SOURCE NAME


or TAPE/CDR)*


for which you


want to change the input mode.


Note:

*Among the sources listed above, you can select the digital input only for the sources which you have selected the digital input terminals for. (See “Digital Input (DIGITAL IN) Terminal Setting.”)

2. Press INPUT ANALOG/DIGITAL

INPUT

to change the input mode.

ANALOG/DIGITAL


• Each time you press the button, the input

INPUT ATT

mode changes as follows:


AUTO ANALOG

(Digital)

AUTO: Select this for the digital input mode. The receiver automatically detects the incoming signal format. (The DIGITAL AUTO indicator lights up on the display, and the digital signal indicator for the detected signals also light up.)*

ANALOG: Select this for the analog input mode.

*The followings are the analog/digital signal indicators on the display to indicate what type of the signal comes into the receiver.

When the DIGITAL 1 is set to “TV” or “DBS”

2 DVD 3 CD 4 CDR

When the DIGITAL 1 is set to “CD”

2 DVD 3 TV (or DBS*) 4 CDR

*If you have changed the source name from “TV SOUND” to “DBS,” “DBS” appears (see page 13.)

Notes:

DIGITAL AUTO :

ANALOG :

LINEAR PCM :

DIGITAL:

:

Lights up when “AUTO” is selected as the digital input mode.

Lights up when the analog input is selected.

Lights up when Linear PCM signals come in.

Lights up when Dolby Digital signals come in.

Lights up when DTS Digital Surround signals come in.

When shipped from the factory, the DIGITAL IN terminals can be used as the digital input for the following components.

DIGITAL 1 (coaxial): For DVD player

DIGITAL 2 (optical): For CD player

DIGITAL 3 (optical): For digital TV broadcast tuner

DIGITAL 4 (optical): For CDR

When using the DIGITAL 4 terminal for the CD recorder, you need to select “CDR” as the source name. (See page 13.)

Continued to the next page.

16

Page 19
Image 19
JVC RX-7012RSL, RX-7010RBK manual Digital Input Digital in Terminal Setting, Selecting the Analog or Digital Input Mode

RX-7012RSL, RX-7010RBK specifications

JVC has long been a respected name in the audio and video industries, and the RX-7012RSL and RX-7010RBK home theater receivers stand as testaments to the brand’s commitment to high-quality sound and advanced technology. These models are designed to enhance any home theater experience, thanks to their robust feature sets and impressive performance.

The RX-7012RSL offers a powerful 100 watts per channel, making it ideal for even the largest living rooms or media spaces. With a total of five channels, this receiver can seamlessly drive a full surround sound setup, allowing users to immerse themselves in their favorite movies and music. The RX-7010RBK, while slightly lower in power, still delivers exceptional quality at 80 watts per channel, providing ample output for most home theaters.

Both models are equipped with JVC’s proprietary Digital Sound Processing technology, which enhances audio quality by optimizing bass and treble levels, ensuring crystal-clear sound reproduction across all frequencies. This feature is particularly useful for home theater enthusiasts who desire a theater-like experience in the comfort of their living room.

For connectivity, the RX-7012RSL and RX-7010RBK are outfitted with a variety of inputs, including HDMI, optical, and coaxial options. This versatility allows users to connect multiple devices, such as Blu-ray players, gaming consoles, and streaming devices, all while maintaining high-definition audio and video quality. Additionally, both receivers support Dolby Digital and DTS surround sound formats, enabling an immersive listening experience.

In terms of design, these JVC receivers sport a sleek, modern look with an easy-to-read display and intuitive controls. The remote control is user-friendly, giving users quick access to functions like volume control, sound settings, and inputs.

One notable feature of both the RX-7012RSL and RX-7010RBK is their zone control capabilities. This allows users to create separate audio zones in their home, enabling different rooms to enjoy unique audio settings and sources simultaneously.

In summary, the JVC RX-7012RSL and RX-7010RBK home theater receivers combine power, advanced technology, and user-friendly design to deliver exceptional audio performance. With their robust connectivity options and sound processing capabilities, these models are perfect choices for anyone looking to elevate their home entertainment experience.