Basic Settings

Front Panel

Remote Control


Display


SETTING


RX-7020V

AUDIO/VIDEO CONTROL RECEIVER


Source

FM/AM TUNING

FM/AM PRESET

FM MODE


MEMORY

LINEAR PCM S.WFR LFE

PROLOGIC

DSP H.PHONE INPUT ATT

VOLUME

Selecting

STANDBY


ANALOG SPK 1 2


BASS BOOST TUNED STEREO AUTOMUTING SLEEP


DIGITAL AUTO L C

R


ΙΙ


MASTER VOLUME


DIGITAL LS S

RS


Buttons

STANDBY/ON


CH-


SURROUND ON/OFF

INPUT


ANALOG/DIGITAL

BASS BOOST


ADJUST

SETTING


DVD MULTI

DVD

VCR

TV SOUND/DBS


INPUT ATT


SOURCE NAME


SURROUND MODE


CONTROL

SPEAKERS ON/OFF


DOWN

UP


1

2

CD

TAPE/CDR

PHONO

FM/AM


SOURCE NAME


PHONES


INPUT

Source


ANALOG/DIGITAL

Selecting


Buttons

CONTROL


UP 5/DOWN

A/V CONTROL RECEIVER


CATV/DBS

VCR

TV

AUDIO


DVD

DVD MULTI

CD

FM/AM


TV/DBS

VCR

TAPE/CDR

PHONO


BASS +

TREBLE+

ANALOG/

SURROUND

SURROUND

ANALOG/DIGITAL

SLEEP

DIGITAL

BASSBOOST

EFFECT

– CENTER+

ON/OFF

MODE

INPUT


1

2

3

INPUT


4

5

6

SOUND


MENU


TEST

– REAR• L+


ENTER


DIMMER


– REAR• R+


7/P

8

9


MUTING


–SUBWOOFER+


10

0

+10


RETURN

FMMODE

100+


CATV/DBS


CONTROL

+

+

+


TV/VIDEO

CH

TV VOL

VOLUME


+


TUNING

/REW


FF/


REC

PAUSE

CONTROL

RM-SRX7020J REMOTE CONTROL

Setting the Digital Input

Remote

When the DIGITAL 1 terminal is set, the DIGITAL 2/3/4

[DIGITAL IN] Terminals

terminals are set automatically as follows:

NOT


When the DIGITAL 1 is set to “DVD”

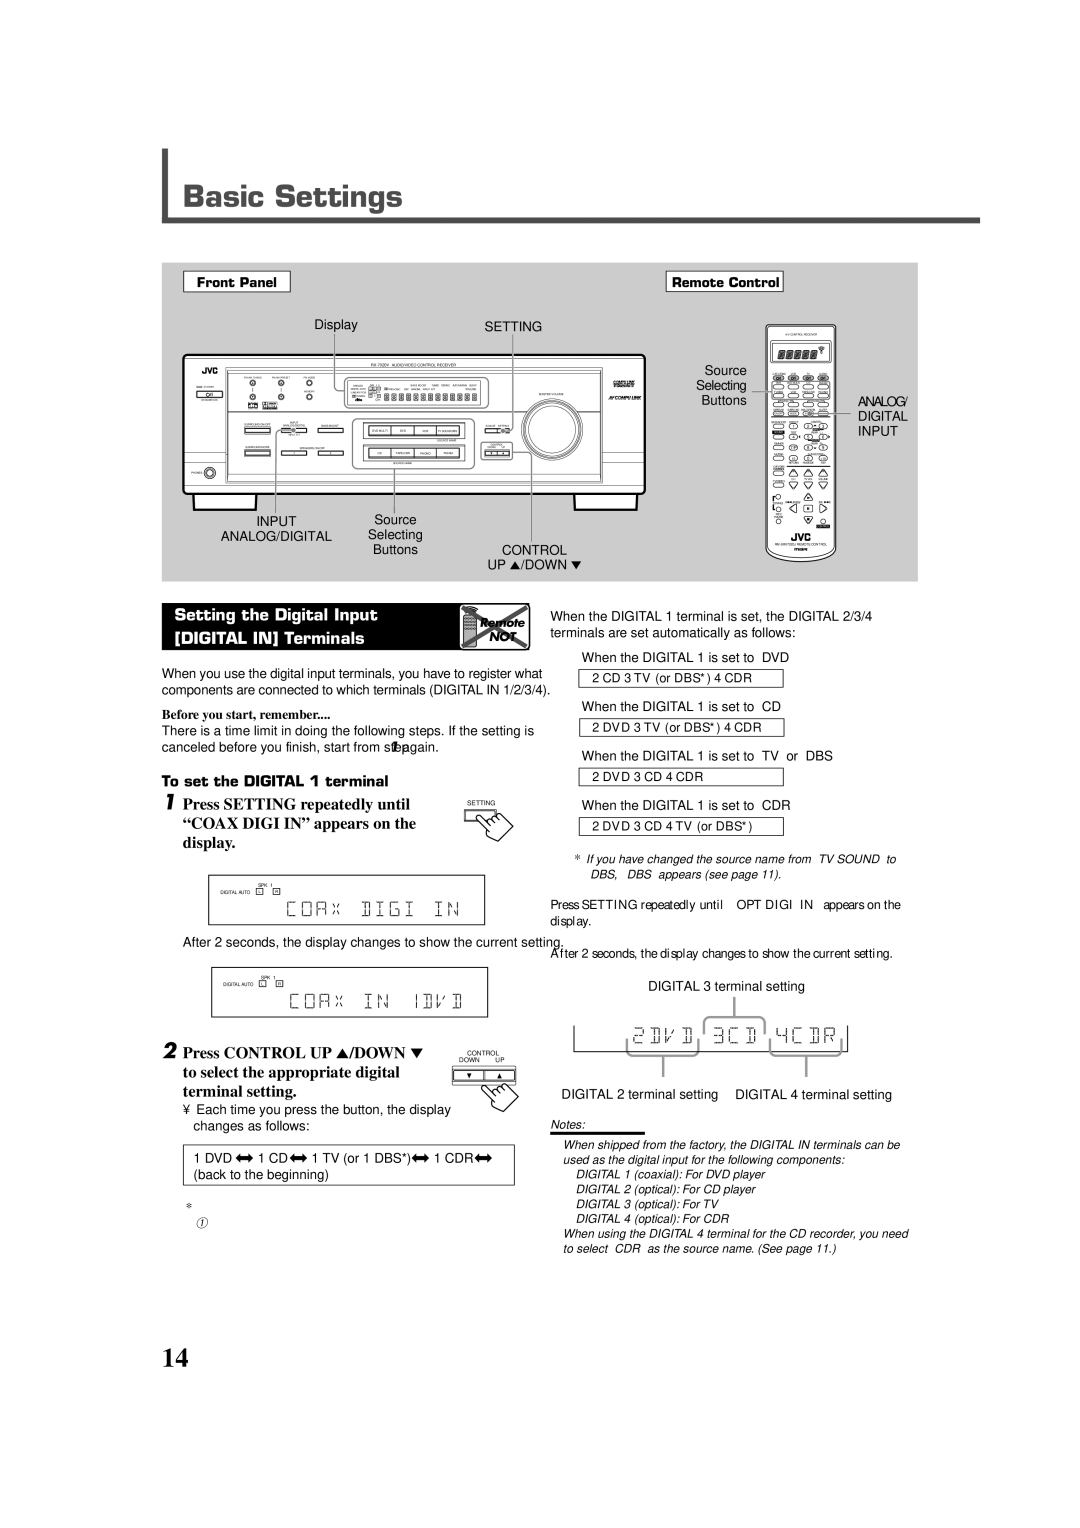
When you use the digital input terminals, you have to register what components are connected to which terminals (DIGITAL IN 1/2/3/4).

2 CD 3 TV (or DBS*) 4 CDR

Before you start, remember....

There is a time limit in doing the following steps. If the setting is canceled before you finish, start from step 1 again.

To set the DIGITAL 1 terminal


1 Press SETTING repeatedly until


T

SETTING


“COAX DIGI IN” appears on the


display.


SPK 1


DIGITAL AUTO L C R


S.WFR LFE


LS S RS


CH-


After 2 seconds, the display changes to show the current setting.

SPK 1

DIGITAL AUTO L

C

R

S.WFR LFE

LS

S

RS


CH-


2 Press CONTROL UP 5/DOWN

DOWN UP


CONTROL

to select the appropriate digital


terminal setting.


Each time you press the button, the display changes as follows:

1 DVD j 1 CD j 1 TV (or 1 DBS*) j 1 CDR j (back to the beginning)

*If you have changed the source name from “TV SOUND” to “DBS,” “DBS” appears (see page 11).

When the DIGITAL 1 is set to “CD”

2 DVD 3 TV (or DBS*) 4 CDR

When the DIGITAL 1 is set to “TV” or “DBS”

2 DVD 3 CD 4 CDR

When the DIGITAL 1 is set to “CDR”

2 DVD 3 CD 4 TV (or DBS*)

*If you have changed the source name from “TV SOUND” to “DBS,” “DBS” appears (see page 11).

Press SETTING repeatedly until “ OPT DIGI IN” appears on the display.

After 2 seconds, the display changes to show the current setting.

DIGITAL 3 terminal setting

DIGITAL 2 terminal setting DIGITAL 4 terminal setting

Notes:

When shipped from the factory, the DIGITAL IN terminals can be used as the digital input for the following components:

DIGITAL 1 (coaxial): For DVD player

DIGITAL 2 (optical): For CD player

DIGITAL 3 (optical): For TV

DIGITAL 4 (optical): For CDR

When using the DIGITAL 4 terminal for the CD recorder, you need to select “CDR” as the source name. (See page 11.)

14

Page 16
Image 16
JVC RX-7020VBK manual Basic Settings, Setting the Digital Input, Digital in Terminals

RX-7020VBK specifications

The JVC RX-7020VBK is a versatile and powerful audio receiver designed to provide an immersive sound experience for home theater enthusiasts and casual listeners alike. This 5.1-channel receiver supports various audio formats and delivers high-quality sound that complements any entertainment setup. One of the standout features of the RX-7020VBK is its impressive power output. With 100 watts per channel, this receiver ensures that your audio fills the room with rich and dynamic sound. It is perfect for movies, music, and gaming, allowing every detail to come to life.

In terms of connectivity, the JVC RX-7020VBK offers multiple input options, including HDMI, digital optical, coaxial, and analog inputs. This wide range of connectivity options allows users to connect various devices such as Blu-ray players, gaming consoles, and streaming devices, making it a versatile choice for any home entertainment system. The receiver also includes AM/FM radio capabilities, giving users access to a variety of listening options.

The RX-7020VBK is equipped with Dolby Digital and DTS surround sound technologies, providing a surround sound experience that enhances movie watching and gaming. These technologies allow for precise sound placement, giving users a realistic audio experience that draws them into the action. Furthermore, the receiver includes a built-in equalizer, offering users the ability to customize their audio settings according to their preferences.

Another noteworthy feature of the JVC RX-7020VBK is its user-friendly interface. The receiver comes with an intuitive remote control that allows for easy navigation through menus and settings, making it accessible for all users, regardless of their technical expertise. Additionally, the receiver has a sleek and modern design that blends seamlessly with any home décor.

The JVC RX-7020VBK also incorporates advanced protection circuits to safeguard against damage from overheating and overloads, ensuring longevity and reliability. With its combination of power, versatility, and user-friendly features, the JVC RX-7020VBK stands out as an excellent choice for those looking to elevate their audio experience at home. Its balance of performance and technological advancements makes it suitable for both dedicated audiophiles and casual users alike.