Cable Box

Control

Suggested Location

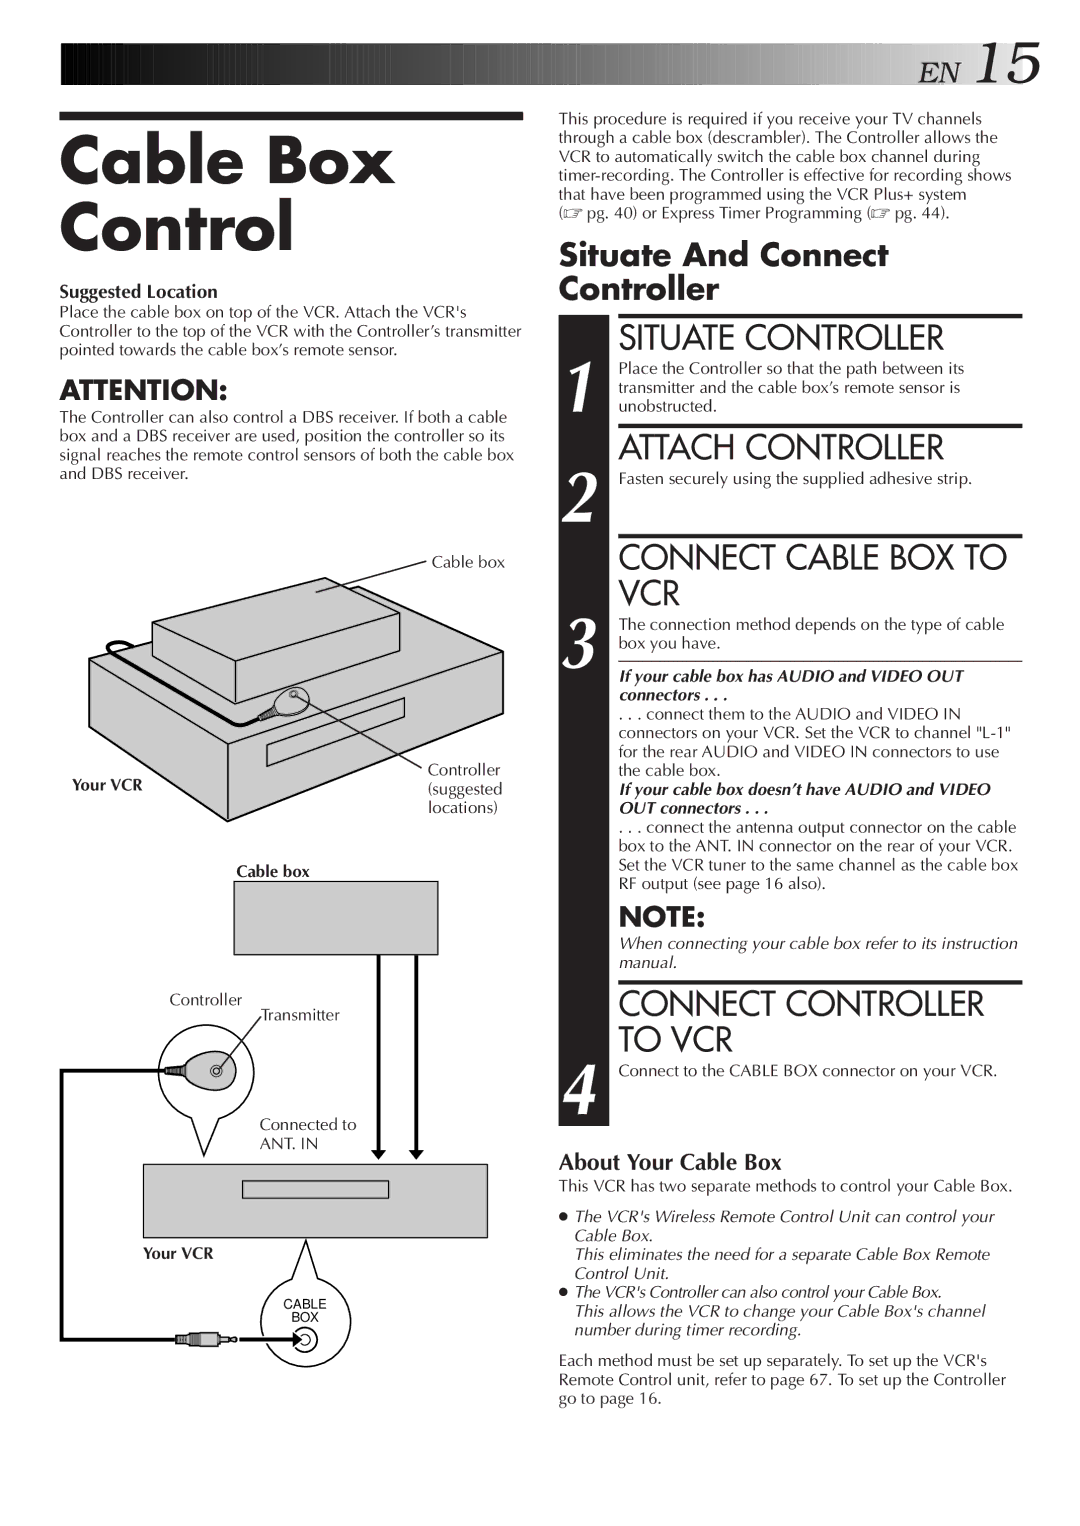
Place the cable box on top of the VCR. Attach the VCR's Controller to the top of the VCR with the Controller’s transmitter pointed towards the cable box’s remote sensor.

ATTENTION:

The Controller can also control a DBS receiver. If both a cable box and a DBS receiver are used, position the controller so its signal reaches the remote control sensors of both the cable box and DBS receiver.

Cable box

Controller

Your VCR(suggested

locations)

Cable box

Controller

Transmitter

Connected to

ANT. IN

Your VCR

CABLE

BOX

EN15

This procedure is required if you receive your TV channels through a cable box (descrambler). The Controller allows the VCR to automatically switch the cable box channel during timer-recording. The Controller is effective for recording shows that have been programmed using the VCR Plus+ system

(pg. 40) or Express Timer Programming (pg. 44).

Situate And Connect

Controller

SITUATE CONTROLLER

1 Place the Controller so that the path between its transmitter and the cable box’s remote sensor is unobstructed.

ATTACH CONTROLLER

2 Fasten securely using the supplied adhesive strip.

CONNECT CABLE BOX TO VCR

3 The connection method depends on the type of cable box you have.

If your cable box has AUDIO and VIDEO OUT connectors . . .

. . . connect them to the AUDIO and VIDEO IN connectors on your VCR. Set the VCR to channel "L-1" for the rear AUDIO and VIDEO IN connectors to use the cable box.

If your cable box doesn’t have AUDIO and VIDEO

OUT connectors . . .

. . . connect the antenna output connector on the cable box to the ANT. IN connector on the rear of your VCR. Set the VCR tuner to the same channel as the cable box RF output (see page 16 also).

NOTE:

When connecting your cable box refer to its instruction manual.

CONNECT CONTROLLER

TO VCR

4 Connect to the CABLE BOX connector on your VCR.

About Your Cable Box

This VCR has two separate methods to control your Cable Box.

The VCR's Wireless Remote Control Unit can control your Cable Box.

This eliminates the need for a separate Cable Box Remote Control Unit.

The VCR's Controller can also control your Cable Box.

This allows the VCR to change your Cable Box's channel number during timer recording.

Each method must be set up separately. To set up the VCR's Remote Control unit, refer to page 67. To set up the Controller go to page 16.

Page 15
Image 15
JVC SR-VS10U Cable Box Control, Situate Controller, Attach Controller, Connect Cable BOX to VCR, Connect Controller To VCR

SR-VS10U specifications

The JVC SR-VS10U is a dual-format video recorder designed for both professional and consumer applications. This versatile device supports various recording formats, making it an appealing choice for filmmakers, educators, and video enthusiasts. One of the standout features of the SR-VS10U is its ability to record and play back in both MiniDV and VHS formats, providing users the flexibility to work with different media types in one convenient unit.

One of the main technologies incorporated into the SR-VS10U is the advanced digital image processing system, which ensures high-quality video output. The recorder utilizes JVC’s proprietary digital video technology to enhance color reproduction, sharpness, and overall image clarity. This makes the SR-VS10U particularly useful for capturing high-quality footage, whether it's for personal projects or professional productions.

The recorder is equipped with a built-in 4-head, multi-functional VHS deck that allows users to play back standard VHS tapes, in addition to recording live video directly to MiniDV. The dual-format capability means that users can easily convert and digitize their existing VHS content, providing a seamless way to preserve and transfer valuable memories. The unit's FireWire (IEEE 1394) connection enables fast and efficient transfer of MiniDV footage to a computer for editing, allowing for an efficient workflow.

In terms of design, the JVC SR-VS10U features a user-friendly interface with intuitive controls that make it easy to operate. It has a clear LCD display that provides real-time information about the status of the recording, playback, and remaining tape or battery life. Additionally, the recorder supports a variety of recording modes, including SP and LP, giving users control over video quality and recording time.

Moreover, the SR-VS10U includes audio and video inputs and outputs, enabling users to connect external devices such as cameras, microphones, or additional storage media. The built-in stereo audio recording ensures high-fidelity sound to complement the visual quality of the captured footage.

In summary, the JVC SR-VS10U stands out with its dual-format recording capability, advanced digital video processing technology, and ease of use. Its combination of features makes it an excellent choice for anyone looking to capture, preserve, and share videos in both MiniDV and VHS formats, maintaining strong performance and reliability in diverse applications.