EN


71


RECORDING


SYMPTOM


POSSIBLE CAUSE


CORRECTIVE ACTION


4. Audio dubbing is not possible.


"SOUND MODE" on the DV Mode

Set "SOUND MODE" to "32kHz" at


Set Menu had been set to "48kHz" at

the original recording (pg. 33).


the original recording.


The tape speed had been set to LP at

Set the tape speed to SP at the


the original recording.

original recording.


5.

Monitoring the audio-dubbed


This is normal.

Monitor the sound using the


sound is not possible during audio


connected devices.


dubbing using the DV deck.


6.

The programmed memory of


The memory backup time has

Perform Random Assemble Editing


Random Assmble Editing is


expired.

again.


disappeared.


7.

When performing Tape Dubbing,


This is normal.


the beginning of the dubbing start


point is not dubbed.


TIMER RECORDING


SYMPTOM


POSSIBLE CAUSE


CORRECTIVE ACTION


1.

Timer recording won’t work.


The clock and/or the timer have

Set the clock and/or timer correctly.


been set incorrectly.


The timer is not engaged.

Press TIMER and check to make sure


that ä appears on the front display


panel.


The VCR has not been set up properly.

Re-perform the set-up procedures.


Make sure you have compensated for


Guide Channel and VCR or cable


box channel number mismatches


(pg. 42).


2.

Timer programming won’t work.


Timer recording is in progress.

Timer programming can’t be performed


when timer recording is in progress.


Wait until it finishes.


3.

ä and ] on the front display


The timer is engaged but there’s no

VHS deck


panel won’t stop blinking.


cassette loaded.

Load a cassette with the Record


Safety tab intact, or cover the hole


using adhesive tape.


DV deck


Load a cassette with the erase


protection switch set to "REC".


4.

The cassette is automatically


VHS deck

Remove the cassette and cover the


ejected, and ä and ] on the


The loaded cassette has had its

hole with adhesive tape, or insert a


front display panel won’t stop


Record Safety tab removed.

cassette with the Record Safety tab


blinking.


intact.


DV deck

Remove the cassette and set the erase


The loaded cassette has had its erase

protection switch to "REC".


protection switch set to "SAVE".


5.

ä blinks for 10 seconds and the


TIMER has been pressed when there

Check the programmed data and re-


timer mode is disengaged.


are no programs in memory, or the

program as necessary, then press


timer record program information

TIMER again.


has not been programmed correctly.


6.

The cassette is automatically


The end of tape was reached during

The program may not have been


ejected, the power shuts off and ä


timer recording.

recorded in its entirety. Next time


and ] won’t stop blinking.


make sure you have enough time on


the tape to record the entire program.


CONTINUED ON NEXT PAGE

Page 71
Image 71
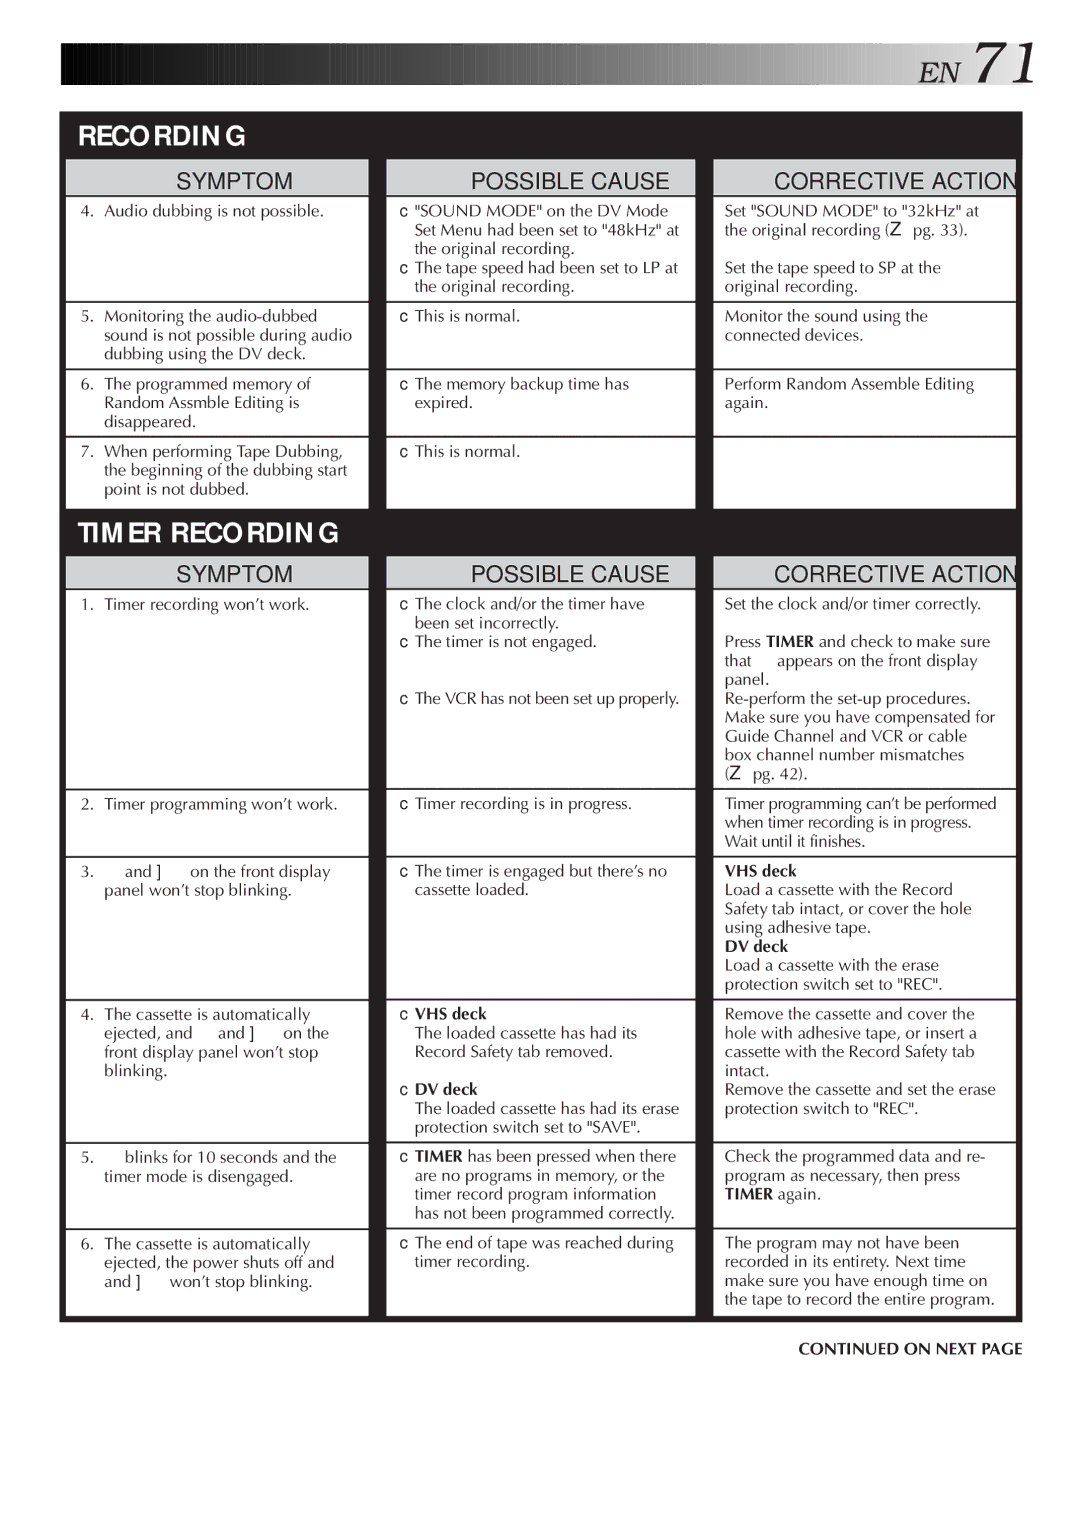
JVC SR-VS10U Point is not dubbed, That ä appears on the front display Panel, Re-perform the set-up procedures, Timer again

SR-VS10U specifications

The JVC SR-VS10U is a dual-format video recorder designed for both professional and consumer applications. This versatile device supports various recording formats, making it an appealing choice for filmmakers, educators, and video enthusiasts. One of the standout features of the SR-VS10U is its ability to record and play back in both MiniDV and VHS formats, providing users the flexibility to work with different media types in one convenient unit.

One of the main technologies incorporated into the SR-VS10U is the advanced digital image processing system, which ensures high-quality video output. The recorder utilizes JVC’s proprietary digital video technology to enhance color reproduction, sharpness, and overall image clarity. This makes the SR-VS10U particularly useful for capturing high-quality footage, whether it's for personal projects or professional productions.

The recorder is equipped with a built-in 4-head, multi-functional VHS deck that allows users to play back standard VHS tapes, in addition to recording live video directly to MiniDV. The dual-format capability means that users can easily convert and digitize their existing VHS content, providing a seamless way to preserve and transfer valuable memories. The unit's FireWire (IEEE 1394) connection enables fast and efficient transfer of MiniDV footage to a computer for editing, allowing for an efficient workflow.

In terms of design, the JVC SR-VS10U features a user-friendly interface with intuitive controls that make it easy to operate. It has a clear LCD display that provides real-time information about the status of the recording, playback, and remaining tape or battery life. Additionally, the recorder supports a variety of recording modes, including SP and LP, giving users control over video quality and recording time.

Moreover, the SR-VS10U includes audio and video inputs and outputs, enabling users to connect external devices such as cameras, microphones, or additional storage media. The built-in stereo audio recording ensures high-fidelity sound to complement the visual quality of the captured footage.

In summary, the JVC SR-VS10U stands out with its dual-format recording capability, advanced digital video processing technology, and ease of use. Its combination of features makes it an excellent choice for anyone looking to capture, preserve, and share videos in both MiniDV and VHS formats, maintaining strong performance and reliability in diverse applications.