Before Setting Surface Controls

Assembly of the Surface Burner Heads, Burner Caps and Burner Grates (Porcelain Cooktop

models)

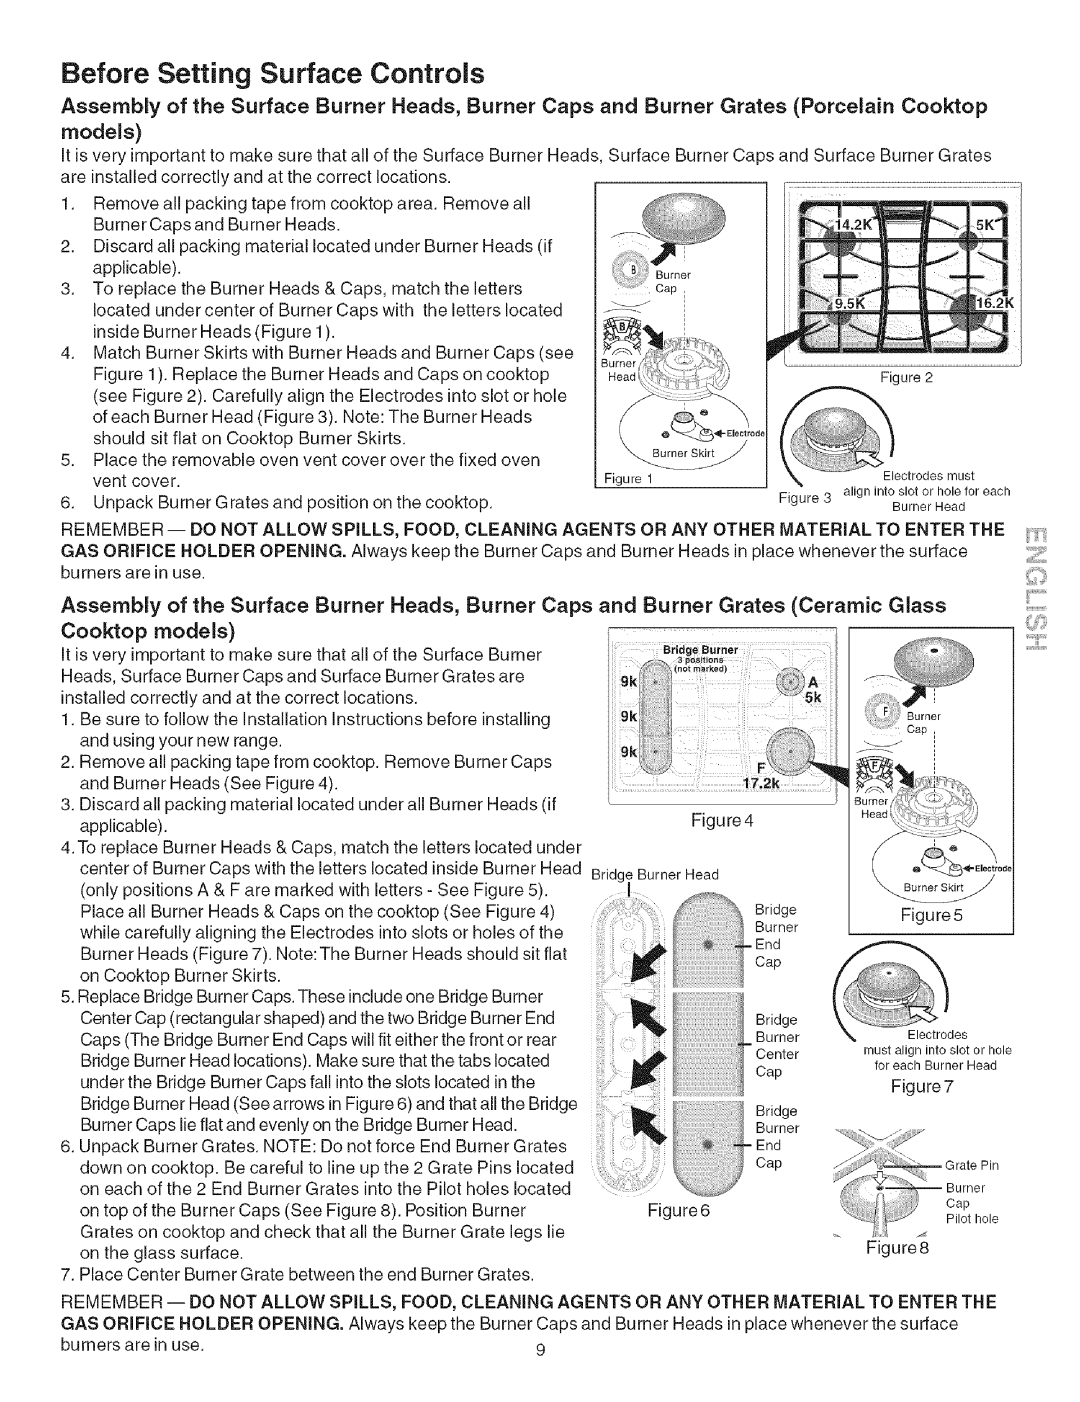
It is very important to make sure that all of the Surface Burner Heads, Surface Burner Caps and Surface Burner Grates are installed correctly and at the correct locations.

1.Remove all packing tape from cooktop area. Remove all Burner Caps and Burner Heads.

2.Discard all packing material located under Burner Heads (if applicable).

3.To replace the Burner Heads & Caps, match the letters located under center of Burner Caps with the letters located inside Burner Heads (Figure 1).

4.Match Burner Skirts with Burner Heads and Burner Caps (see Figure 1). Replace the Burner Heads and Caps on cooktop (see Figure 2). Carefully align the Electrodes into slot or hole of each Burner Head (Figure 3). Note: The Burner Heads should sit flat on Cooktop Burner Skirts.

5.Place the removable oven vent cover over the fixed oven vent cover.

6.Unpack Burner Grates and position on the cooktop.

_14.2K

_

5K"

:_::

//j

Figure 2

6

"_"

Elect rode

_ectrodesmust

Figure 1

_i,_ure 3 align into slot or hole for each

Burner Head

REMEMBER-- DO NOT ALLOW SPILLS, FOOD, CLEANING AGENTS OR ANY OTHER MATERIAL TO ENTER THE

GAS ORIFICE HOLDER OPENING. Always keep the Burner Caps and Burner Heads in place whenever the surface burners are in use.

Assembly of the Surface Burner Heads, Burner Caps and Burner Grates (Ceramic Glass Cooktop models)

It is very important to make sure that all of the Surface Burner Heads, Surface Burner Caps and Surface Burner Grates are installed correctly and at the correct locations.

1.Be sure to follow the installation instructions before installing and using your new range.

2.Remove all packing tape from cooktop. Remove Burner Caps and Burner Heads (See Figure 4).

3.Discard all packing material located under all Burner Heads (if applicable).

4.To replace Burner Heads & Caps, match the letters located under

center of Burner Caps with the letters located inside Burner Head (only positions A & F are marked with letters - See Figure 5).

Place all Burner Heads & Caps on the cooktop (See Figure 4) while carefully aligning the Electrodes into slots or holes of the Burner Heads (Figure 7). Note: The Burner Heads should sit flat on Cooktop Burner Skirts.

5.Replace Bridge Burner Caps. These include one Bridge Burner

Center Cap (rectangular shaped) and the two Bridge Burner End Caps (The Bridge Burner End Caps will fit either the front or rear Bridge Burner Head locations). Make sure that the tabs located

under the Bridge Burner Caps fall into the slots located in the

Bridge Burner

3 positions


=J.

9k

_t

................. .....

17.2k

Figure4

BridgeBurnerHead

L Bridge

Burner

Center

Cap

/

Figure5

Electrodes

must align into slot or hole for each Burner Head

Figure 7

Burner Caps lie flat and evenly on the Bridge Burner Head.

i

Burner

._:

6. Unpack Burner Grates. NOTE: Do not force End Burner Grates

i i i

Bridge


Bridge Burner Head (See arrows in Figure 6)and that all the Bridge


End


down on cooktop. Be careful

to line

up the 2

Grate Pins located


Grate

Pin

on each of the 2 End Burner

Grates

into the

Pilot holes located

.............

_

_

Burner

on top of the Burner Caps (See Figure 8). Position Burner


Cap


Fig


Pilot

hole


Grates on cooktop and check that all the Burner Grate legs lie

on the glass surface.

Figure8


7. Place Center Burner Grate between the end Burner Grates.


REMEMBER -- DO NOT ALLOW SPILLS, FOOD, CLEANING AGENTS OR ANY OTHER MATERIAL TO ENTER THE GAS ORIFICE HOLDER OPENING. Always keep the Burner Caps and Burner Heads in place whenever the surface

burners are in use.

9

Page 9
Image 9
Kenmore 790.3671 manual Before Setting Surface Controls, Burner

790.3671, 790.367 specifications

The Kenmore 790.367 and 790.3671 models represent a versatile line of gas ranges engineered for both amateur cooks and culinary enthusiasts. With their combination of sleek design and advanced features, these appliances stand out in any kitchen setting.

One of the hallmark characteristics of the Kenmore 790.367 series is its robust construction. The stainless steel finish not only enhances the visual appeal of the range but also ensures durability and ease of cleaning. This model incorporates a spacious oven capacity, allowing users to prepare large meals or multiple dishes at once, a desirable trait for family gatherings or dinner parties.

The cooking surface of the Kenmore 790.367 features sealed burners that provide even heat distribution, reducing the risk of hot spots and ensuring more consistent cooking results. With various burner sizes, including a powerful high-heat burner ideal for boiling water quickly, home chefs have the flexibility to choose the right burner for their culinary needs.

In addition to its physical features, the Kenmore 790.367 series is equipped with advanced cooking technologies. One notable feature is the Smart Oven technology, which includes an electronic control panel that simplifies temperature adjustments and cooking time settings. The oven also features multiple cooking modes, including bake, broil, and convection, allowing users to achieve their preferred cooking style effortlessly.

Safety is a priority in the design of these ranges as well. The Kenmore 790.367 series includes a built-in oven light that illuminates the cooking chamber, so users can keep an eye on their dishes without opening the oven door. Additionally, the range comes with an automatic shut-off feature, providing peace of mind for those who may forget to turn off the stove after cooking.

Furthermore, the self-cleaning option allows for hassle-free maintenance, making it easier for users to keep their range looking as good as new with minimal effort. Overall, the Kenmore 790.367 and 790.3671 are designed to combine convenience, safety, and performance, making them an excellent choice for modern kitchens. With their impressive features and user-friendly technologies, these ranges are sure to meet the demands of today's home cooks, offering both functionality and style.