Connecting the Refrigerator

to a Water Source

Read all directions carefully before you begin.

IMPORTANT:

If operating the refrigerator before installing the water connection, turn ice maker to the OFF position to prevent operation without water.

All installations must be in accordance with local plumbing code requirements.

Use copper tubing and check for leaks.

Install copper tubing only in areas where temperatures will remain above freezing.

It may take up to 24 hours for your ice maker to begin producing ice.

Tools required:

Standard screwdriver

⁷⁄₁₆-inch and ¹⁄₂-inch open-end wrenches or two adjustable wrenches

¹⁄₄-inch nut driver

¹⁄₄-inch drill bit

Hand drill or electric drill (properly grounded)

NOTE: Your refrigerator dealer has a kit available with a ¹⁄₄-inch saddle-type shut-off valve, a union, and copper tubing. Before purchasing, make sure a saddle-type valve complies with your local plumbing codes. Do not use a piercing-type or ³⁄₁₆-inch saddle valve which reduces water flow and clogs more easily.

Cold Water Supply

The ice maker water valve contains a flow washer which is used as a water pressure regulator. The ice maker needs to be connected to a cold water line with water pressure between 30 and 120 psi. If a problem occurs, call your utility company.

Connecting to water line:

1.Unplug refrigerator or disconnect power.

2.Turn OFF main water supply. Turn ON nearest faucet long enough to clear line of water.

3.Find a ¹⁄₂-inch to 1¹⁄₄-inch vertical COLD water pipe near the refrigerator.

NOTE: Horizontal pipe will work, but the following

procedure must be followed: Drill on the top side of the pipe, not the bottom. This will help keep water away from the drill. This also keeps normal sediment from collecting in the valve.

4.To determine the length of copper tubing you will need, measure from connection on lower left rear of refrigerator to water pipe. Add 7 feet (2.1 m) to allow for moving refrigerator for cleaning. Use ¹⁄₄-inch O.D. (outside diameter) copper tubing. Be sure both ends of copper tubing are cut square.

5.Using a grounded drill, drill a ¹⁄₄-inch hole in the cold water pipe you have selected.

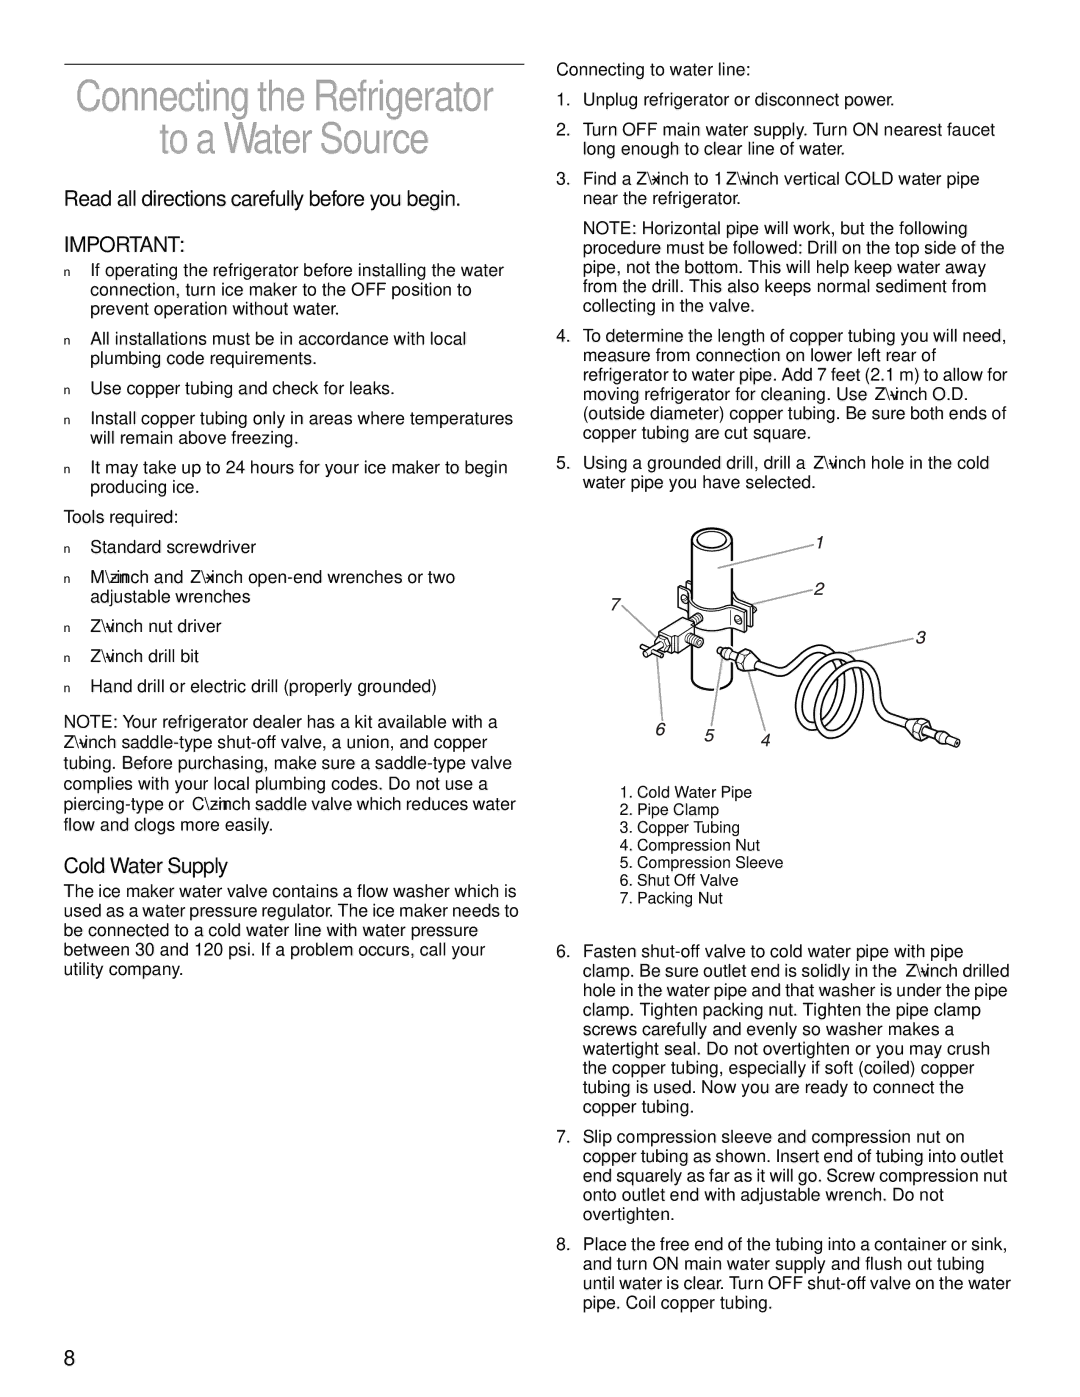
1.Cold Water Pipe

2.Pipe Clamp

3.Copper Tubing

4.Compression Nut

5.Compression Sleeve

6.Shut Off Valve

7.Packing Nut

6.Fasten shut-off valve to cold water pipe with pipe clamp. Be sure outlet end is solidly in the ¹⁄₄-inch drilled hole in the water pipe and that washer is under the pipe clamp. Tighten packing nut. Tighten the pipe clamp screws carefully and evenly so washer makes a watertight seal. Do not overtighten or you may crush the copper tubing, especially if soft (coiled) copper tubing is used. Now you are ready to connect the copper tubing.

7.Slip compression sleeve and compression nut on copper tubing as shown. Insert end of tubing into outlet end squarely as far as it will go. Screw compression nut onto outlet end with adjustable wrench. Do not overtighten.

8.Place the free end of the tubing into a container or sink, and turn ON main water supply and flush out tubing until water is clear. Turn OFF shut-off valve on the water pipe. Coil copper tubing.

8

Page 8
Image 8
KitchenAid 2200139A To a Water Source, Read all directions carefully before you begin, Cold Water Supply, Tools required

2200139A specifications

The KitchenAid 2200139A is an indispensable appliance for home cooks and culinary enthusiasts who seek reliability and performance in their kitchen. This stand mixer is designed to streamline food preparation tasks, making it a go-to solution for those who frequently whip up doughs, batters, and a variety of other ingredients.

One of the main features of the KitchenAid 2200139A is its powerful 300-watt motor, designed to handle tough ingredients with ease. The tilt-head design allows for easy access to the bowl and attachments, ensuring convenience during food preparation. The mixer comes equipped with a 4.5-quart stainless steel bowl, providing ample capacity for mixing larger batches without compromising on stability or performance. The bowl is also dishwasher-safe, making cleanup a breeze.

The KitchenAid 2200139A offers ten different speed settings. This versatility allows users to mix at a slow stir to a fast whip, accommodating a wide range of tasks from kneading bread dough to whipping cream. This precision ensures that ingredients are combined perfectly, resulting in superior textures and flavors in every dish.

In addition to its powerful motor and variable speeds, this stand mixer comes with several essential attachments, including a flat beater, dough hook, and wire whip. These attachments help expand culinary possibilities, enabling users to tackle virtually any recipe. The power hub on the stand mixer allows for the connection of various optional attachments, such as pasta makers and food grinders, transforming the unit into a multifunctional culinary tool.

Another standout characteristic of the KitchenAid 2200139A is its robust construction. Built with high-quality materials, this appliance promises durability, making it suitable for everyday use. Its classic design also fits seamlessly into any kitchen decor, available in a variety of colors to match personal style preferences.

The KitchenAid 2200139A is not just about performance; it also emphasizes ease of use. The ergonomic handle and control dial are designed for comfortable operation, while the unit’s stability and low center of gravity minimize movement during mixing, providing a safe and worry-free cooking experience.

In summary, the KitchenAid 2200139A stand mixer stands out for its powerful motor, versatile speed settings, generous bowl capacity, and accessory compatibility. Its thoughtful design and durable construction make it a reliable addition to any kitchen, helping home cooks explore their culinary creativity with ease.