D

Water and electrical


connection

Raccordement à la

canalisation d’eau

et au circuit électrique

B

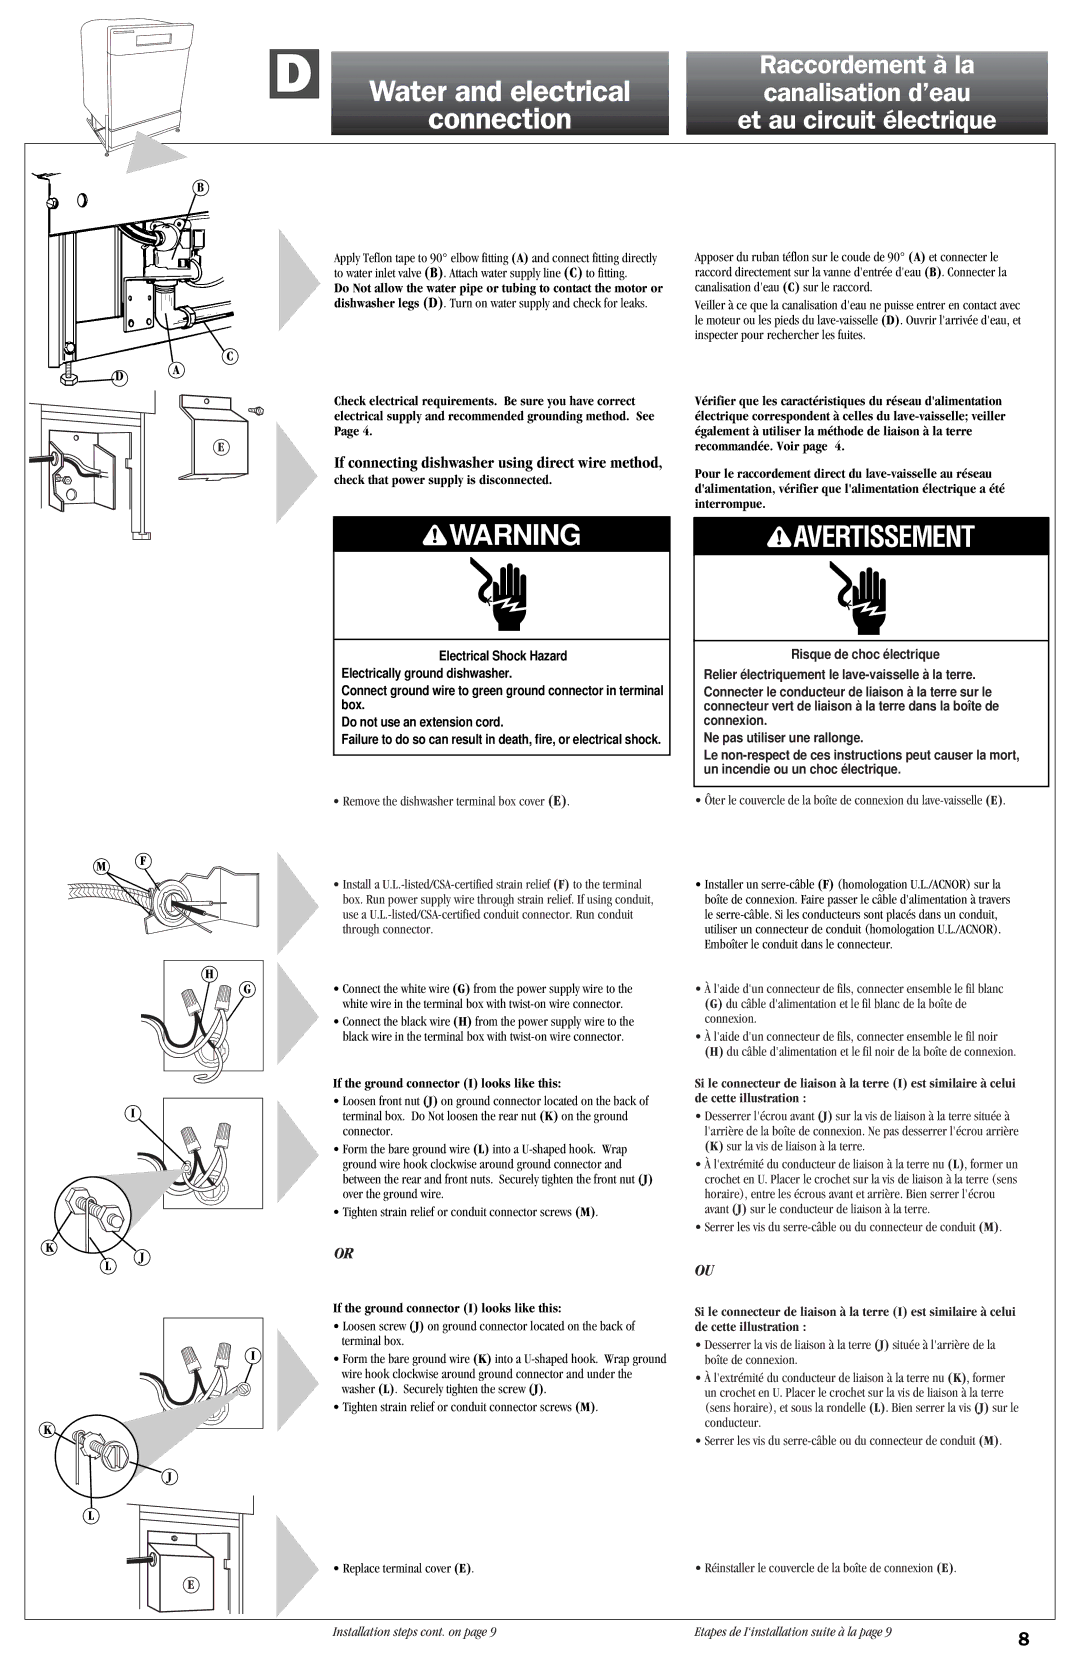
Apply Teflon tape to 90° elbow fitting (A) and connect fitting directly to water inlet valve (B). Attach water supply line (C) to fitting.

Do Not allow the water pipe or tubing to contact the motor or dishwasher legs (D). Turn on water supply and check for leaks.

C

D A

Check electrical requirements. Be sure you have correct

electrical supply and recommended grounding method. See

Page 4.

E

If connecting dishwasher using direct wire method,

check that power supply is disconnected.

WARNING

Electrical Shock Hazard

Electrically ground dishwasher.

Connect ground wire to green ground connector in terminal box.

Do not use an extension cord.

Failure to do so can result in death, fire, or electrical shock.

Apposer du ruban téflon sur le coude de 90° (A) et connecter le raccord directement sur la vanne d'entrée d'eau (B). Connecter la canalisation d'eau (C) sur le raccord.

Veiller à ce que la canalisation d'eau ne puisse entrer en contact avec le moteur ou les pieds du lave-vaisselle (D). Ouvrir l'arrivée d'eau, et inspecter pour rechercher les fuites.

Vérifier que les caractéristiques du réseau d'alimentation électrique correspondent à celles du lave-vaisselle; veiller également à utiliser la méthode de liaison à la terre recommandée. Voir page 4.

Pour le raccordement direct du lave-vaisselle au réseau d'alimentation, vérifier que l'alimentation électrique a été interrompue.

AVERTISSEMENT

Risque de choc électrique

Relier électriquement le lave-vaisselle à la terre.

Connecter le conducteur de liaison à la terre sur le connecteur vert de liaison à la terre dans la boîte de connexion.

Ne pas utiliser une rallonge.

Le non-respect de ces instructions peut causer la mort, un incendie ou un choc électrique.

M F

H

G

I

Remove the dishwasher terminal box cover (E).

Install a U.L.-listed/CSA-certified strain relief (F) to the terminal box. Run power supply wire through strain relief. If using conduit, use a U.L.-listed/CSA-certified conduit connector. Run conduit through connector.

Connect the white wire (G) from the power supply wire to the white wire in the terminal box with twist-on wire connector.

Connect the black wire (H) from the power supply wire to the black wire in the terminal box with twist-on wire connector.

If the ground connector (I) looks like this:

Loosen front nut (J) on ground connector located on the back of terminal box. Do Not loosen the rear nut (K) on the ground connector.

Form the bare ground wire (L) into a U-shaped hook. Wrap ground wire hook clockwise around ground connector and between the rear and front nuts. Securely tighten the front nut (J) over the ground wire.

Tighten strain relief or conduit connector screws (M).

Ôter le couvercle de la boîte de connexion du lave-vaisselle (E).

Installer un serre-câble (F) (homologation U.L./ACNOR) sur la boîte de connexion. Faire passer le câble d'alimentation à travers le serre-câble. Si les conducteurs sont placés dans un conduit, utiliser un connecteur de conduit (homologation U.L./ACNOR). Emboîter le conduit dans le connecteur.

À l'aide d'un connecteur de fils, connecter ensemble le fil blanc

(G)du câble d'alimentation et le fil blanc de la boîte de connexion.

À l'aide d'un connecteur de fils, connecter ensemble le fil noir

(H)du câble d'alimentation et le fil noir de la boîte de connexion.

Si le connecteur de liaison à la terre (I) est similaire à celui de cette illustration :

Desserrer l'écrou avant (J) sur la vis de liaison à la terre située à l'arrière de la boîte de connexion. Ne pas desserrer l'écrou arrière

(K) sur la vis de liaison à la terre.

À l'extrémité du conducteur de liaison à la terre nu (L), former un crochet en U. Placer le crochet sur la vis de liaison à la terre (sens horaire), entre les écrous avant et arrière. Bien serrer l'écrou avant (J) sur le conducteur de liaison à la terre.

Serrer les vis du serre-câble ou du connecteur de conduit (M).

K

J

L

K

L

I

J

E

OR

If the ground connector (I) looks like this:

Loosen screw (J) on ground connector located on the back of terminal box.

Form the bare ground wire (K) into a U-shaped hook. Wrap ground wire hook clockwise around ground connector and under the washer (L). Securely tighten the screw (J).

Tighten strain relief or conduit connector screws (M).

• Replace terminal cover (E).

OU

Si le connecteur de liaison à la terre (I) est similaire à celui de cette illustration :

Desserrer la vis de liaison à la terre (J) située à l'arrière de la boîte de connexion.

À l'extrémité du conducteur de liaison à la terre nu (K), former un crochet en U. Placer le crochet sur la vis de liaison à la terre (sens horaire), et sous la rondelle (L). Bien serrer la vis (J) sur le conducteur.

Serrer les vis du serre-câble ou du connecteur de conduit (M).

• Réinstaller le couvercle de la boîte de connexion (E).

Installation steps cont. on page 9

Etapes de I‘installation suite à la page 9

8


Page 8
Image 8
KitchenAid 9743822 dimensions Water and electrical, Connection, Check that power supply is disconnected

9743822 specifications

The KitchenAid 9743822 is an innovative kitchen appliance designed to elevate both culinary experiences and efficiency in meal preparation. This versatile tool is a must-have for home cooks and professional chefs alike, thanks to its robust features and cutting-edge technologies.

One of the standout characteristics of the KitchenAid 9743822 is its powerful motor, which boasts impressive torque and speed settings. This allows users to handle a variety of tasks, from mixing doughs of varying densities to whipping cream and blending ingredients seamlessly. The motor is designed to operate quietly while still delivering exceptional performance, making it perfect for both bustling kitchens and quieter home environments.

The KitchenAid 9743822 also features a variety of attachment options, which expand its functionality beyond traditional mixing. Users can easily attach a range of accessories, such as pasta makers, food grinders, and spiralizers. This adaptability allows for creative culinary exploration, enabling users to prepare everything from fresh pasta to homemade sausages.

In addition to its versatility, the KitchenAid 9743822 showcases a user-friendly design. The tilt-head feature provides easy access to the mixing bowl, facilitating convenient ingredient addition and bowl removal. The dishwasher-safe components simplify cleanup, ensuring that users can focus more on cooking and less on tedious chores.

Another significant aspect of this model is its durable construction. Made with high-quality materials, the KitchenAid 9743822 is built to withstand the rigors of daily use, ensuring longevity and reliability. The stylish design and various color options also mean it can easily blend in with any kitchen décor.

Moreover, the KitchenAid 9743822 offers a range of speed settings, allowing users to tailor their mixing speed to the specific task at hand. From slow stirring to fast whipping, the user has complete control over the mixing process. This precision is enhanced by a built-in sensor that automatically adjusts power based on the load, ensuring consistent results with every use.

In summary, the KitchenAid 9743822 is more than just a stand mixer. Its powerful motor, wide range of attachments, user-friendly design, and durable construction make it an essential tool in any kitchen. Whether you’re baking, cooking, or experimenting with new recipes, the KitchenAid 9743822 stands ready to take your culinary skills to the next level.