8.Once the oven door is closed, the oven timer will begin to count down from the set time and the display will alternate the set temperature and the remaining time.
9.When the cooking time ends, “0:00” will appear on the display and 4 tones will sound.
The oven will remain on. Four reminder tones will sound every minute, and the time will count up in 1-minute increments. The display will alternate between “0:00” and the count-up time until you reset or turn off the oven.
10.Turn the SELECTOR knob to the RESET position when finished cooking.
WaterReservoirDrain Operation
The reservoir will not drain if the oven is on, if the door is closed, or if the water temperature is too hot to drain.
■If the drain button is pressed when the oven is off and the oven door is closed, “OPEn” will appear in the display. Open the door to drain the reservoir.
■If the drain button is depressed while the oven is on 3 tones will sound, “rUn” will appear in the display and the reservoir will not drain.
■If the water temperature is too hot to drain, 3 tones will sound, “Hot” will show in the display and the reservoir will not drain.
■If you will be on vacation or not using your range for an extended period of time, you should drain the water from the reservoir.
■If you plan to winterize your home, you should drain the water from the reservoir.
To drain water from the reservoir:
1.Open oven door and pull oven rack out to stop position. Place a 2 qt (2 L) container under the drain outlet located directly below drain button.
2.Press and hold the DRAIN button. After a 1-second pause, water will begin to flow from the drain outlet. Pressure must be applied continuously to the drain button to continue draining the reservoir.
3.Once the water stops flowing from the drain outlet the reservoir is empty. Release the drain button.
Keep Warm
IMPORTANT: Food must be at serving temperature before placing it in the warmed oven.
The steam-assisted Keep Warm function adds moisture into the oven to keep food from drying out, keeping food warm and moist before serving.
■Do not use Keep Warm to heat cold food. Use only cooked, hot foods with Keep Warm.
■Follow manufacturer’s recommendations when warming empty serving bowls and plates.
■For best results, do not cover food with foil or lids.
■Use rack positions 1-4. Do not place food on top rack.
■Check food occasionally if left in the oven for more than
1hour.
■For best results, hold food in Keep Warm for no longer than
4hours.
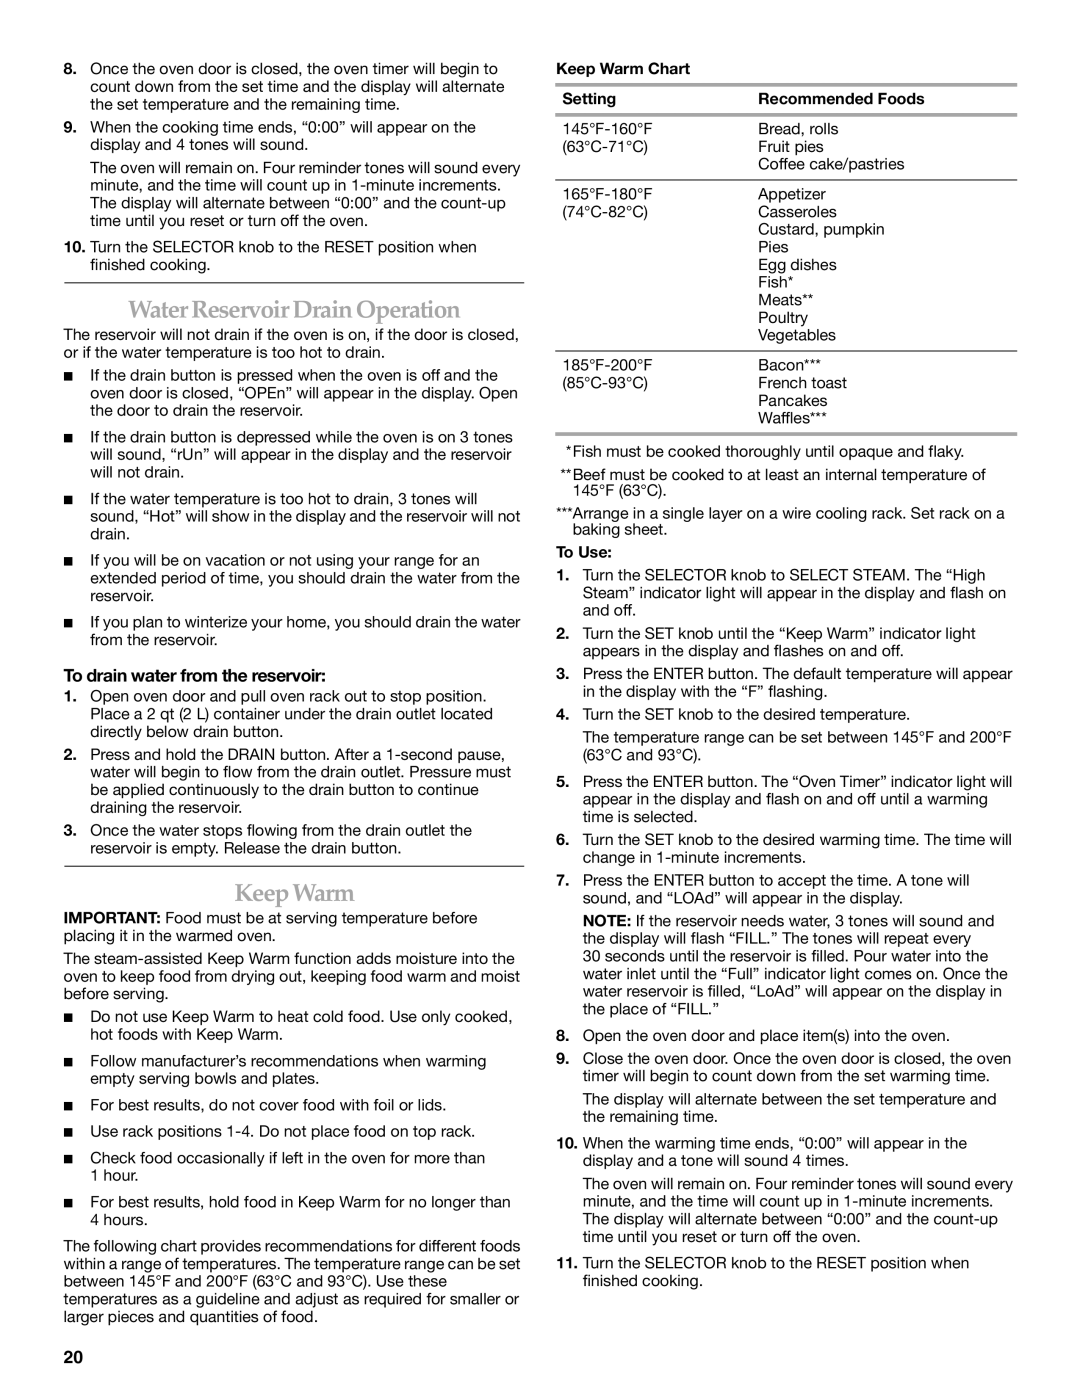
The following chart provides recommendations for different foods within a range of temperatures. The temperature range can be set between 145°F and 200°F (63°C and 93°C). Use these temperatures as a guideline and adjust as required for smaller or larger pieces and quantities of food.
Keep Warm Chart
Setting | Recommended Foods |
145°F-160°F | Bread, rolls |
(63°C-71°C) | Fruit pies |
| Coffee cake/pastries |
| |
165°F-180°F | Appetizer |
(74°C-82°C) | Casseroles |
| Custard, pumpkin |
| Pies |
| Egg dishes |
| Fish* |
| Meats** |
| Poultry |
| Vegetables |
| |
185°F-200°F | Bacon*** |
(85°C-93°C) | French toast |
| Pancakes |
| Waffles*** |
| |
*Fish must be cooked thoroughly until opaque and flaky.
**Beef must be cooked to at least an internal temperature of 145°F (63°C).
***Arrange in a single layer on a wire cooling rack. Set rack on a baking sheet.
To Use:
1.Turn the SELECTOR knob to SELECT STEAM. The “High Steam” indicator light will appear in the display and flash on and off.
2.Turn the SET knob until the “Keep Warm” indicator light appears in the display and flashes on and off.
3.Press the ENTER button. The default temperature will appear in the display with the “F” flashing.
4.Turn the SET knob to the desired temperature.
The temperature range can be set between 145°F and 200°F (63°C and 93°C).
5.Press the ENTER button. The “Oven Timer” indicator light will appear in the display and flash on and off until a warming time is selected.
6.Turn the SET knob to the desired warming time. The time will change in 1-minute increments.
7.Press the ENTER button to accept the time. A tone will sound, and “LOAd” will appear in the display.
NOTE: If the reservoir needs water, 3 tones will sound and the display will flash “FILL.” The tones will repeat every
30 seconds until the reservoir is filled. Pour water into the water inlet until the “Full” indicator light comes on. Once the water reservoir is filled, “LoAd” will appear on the display in the place of “FILL.”
8.Open the oven door and place item(s) into the oven.
9.Close the oven door. Once the oven door is closed, the oven timer will begin to count down from the set warming time.
The display will alternate between the set temperature and the remaining time.
10.When the warming time ends, “0:00” will appear in the display and a tone will sound 4 times.
The oven will remain on. Four reminder tones will sound every minute, and the time will count up in 1-minute increments. The display will alternate between “0:00” and the count-up time until you reset or turn off the oven.
11.Turn the SELECTOR knob to the RESET position when finished cooking.