UsingYourRotisserie

(Optional Accessory)

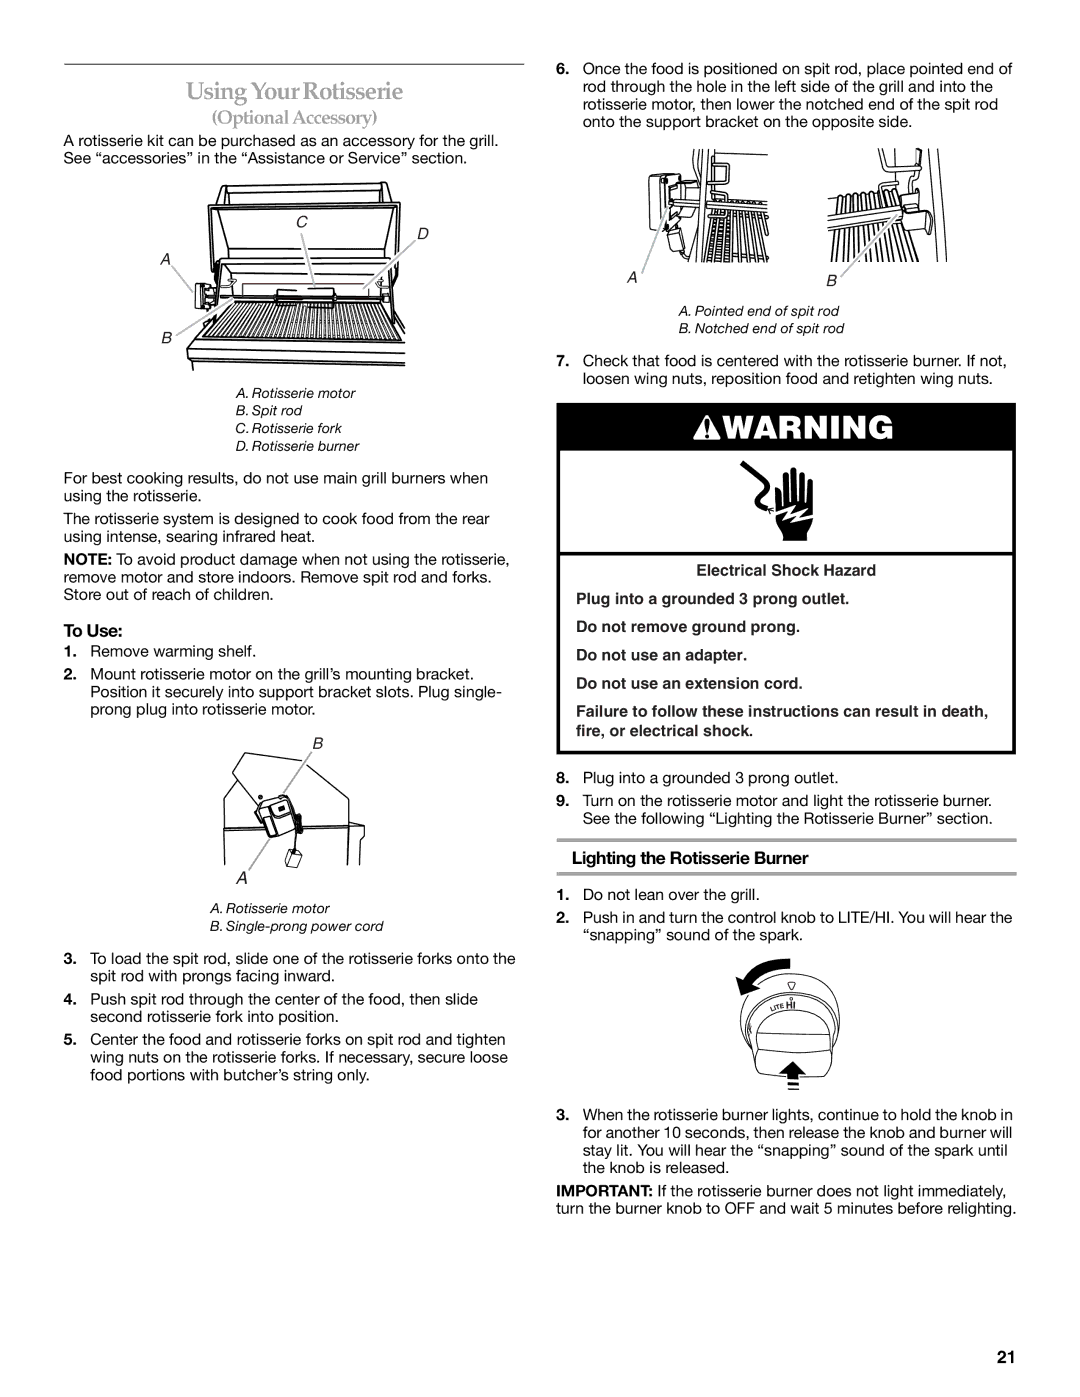
A rotisserie kit can be purchased as an accessory for the grill. See “accessories” in the “Assistance or Service” section.

C

D

A

B

A.Rotisserie motor

B.Spit rod

C.Rotisserie fork

D.Rotisserie burner

For best cooking results, do not use main grill burners when using the rotisserie.

The rotisserie system is designed to cook food from the rear using intense, searing infrared heat.

NOTE: To avoid product damage when not using the rotisserie, remove motor and store indoors. Remove spit rod and forks. Store out of reach of children.

To Use:

1.Remove warming shelf.

2.Mount rotisserie motor on the grill’s mounting bracket. Position it securely into support bracket slots. Plug single- prong plug into rotisserie motor.

B

A

A. Rotisserie motor

B.Single-prong power cord

3.To load the spit rod, slide one of the rotisserie forks onto the spit rod with prongs facing inward.

4.Push spit rod through the center of the food, then slide second rotisserie fork into position.

5.Center the food and rotisserie forks on spit rod and tighten wing nuts on the rotisserie forks. If necessary, secure loose food portions with butcher’s string only.

6.Once the food is positioned on spit rod, place pointed end of rod through the hole in the left side of the grill and into the rotisserie motor, then lower the notched end of the spit rod onto the support bracket on the opposite side.

AB

A. Pointed end of spit rod

B. Notched end of spit rod

7.Check that food is centered with the rotisserie burner. If not, loosen wing nuts, reposition food and retighten wing nuts.

WARNING

Electrical Shock Hazard

Plug into a grounded 3 prong outlet.

Do not remove ground prong.

Do not use an adapter.

Do not use an extension cord.

Failure to follow these instructions can result in death, fire, or electrical shock.

8.Plug into a grounded 3 prong outlet.

9.Turn on the rotisserie motor and light the rotisserie burner. See the following “Lighting the Rotisserie Burner” section.

Lighting the Rotisserie Burner

1.Do not lean over the grill.

2.Push in and turn the control knob to LITE/HI. You will hear the “snapping” sound of the spark.

3.When the rotisserie burner lights, continue to hold the knob in for another 10 seconds, then release the knob and burner will stay lit. You will hear the “snapping” sound of the spark until the knob is released.

IMPORTANT: If the rotisserie burner does not light immediately, turn the burner knob to OFF and wait 5 minutes before relighting.

21

Page 21
Image 21
KitchenAid KFRS365T, KFRS271T, KFRS361T UsingYourRotisserie, Optional Accessory, To Use, Lighting the Rotisserie Burner

KBNS271T, KFRS365T, KFRS271T, KBNS361T, KFRS361T specifications

The KitchenAid KFRS361T, KBNS361T, KFRS271T, KFRS365T, and KBNS271T models offer a blend of performance, style, and innovative features ideal for any modern kitchen. These refrigerator models exemplify KitchenAid's commitment to quality and user-friendly design, making them popular choices for home chefs and families alike.

One standout feature across these models is their advanced cooling technologies. With the Preserva Food Care System, each of these refrigerators ensures optimal freshness for your food by utilizing two distinct cooling systems that maintain ideal humidity levels and temperatures. This minimizes the mixing of odors and prolongs the shelf life of your ingredients.

The interior layout is designed for both function and convenience. Each model includes adjustable shelves, allowing users to customize their storage space according to their needs. The Slide-Away shelves offer added versatility, enabling users to make room for tall items with ease. Additionally, the Clear Humidity-Controlled Crispers help preserve fruits and vegetables by providing a climate-controlled environment.

Energy efficiency is another highlight, as these refrigerators are ENERGY STAR certified, meaning they consume less energy, which translates into lower utility bills. The integrated LED lighting illuminates the fridge’s interior excellently and is more energy-efficient than traditional lighting options.

Style is equally prioritized in these models. With a sleek stainless steel finish, they fit seamlessly into any kitchen decor, providing a modern aesthetic. The PrintShield Finish helps to resist fingerprints and smudges, keeping the exterior looking pristine with minimal effort.

The models also feature an In-Door-Ice System, which maximizes usable space inside the refrigerator by freeing up shelf space. The ice maker is conveniently located in the door, making it easy to access while ensuring more room for food storage.

Smart technology is also an option in some models, allowing for remote monitoring and temperature adjustments through smartphone applications. This feature promotes convenience and ensures food safety by alerting users to any temperature changes.

Overall, the KitchenAid KFRS361T, KBNS361T, KFRS271T, KFRS365T, and KBNS271T models combine innovative technology with stylish design, making them a perfect addition to any kitchen looking for enhanced functionality and modern elegance. These refrigerators epitomize KitchenAid's focus on quality and reliability, catering to the needs of discerning home cooks.