ELECTRONIC OVEN CONTROL
Style 1 (Models KGRA806, KGRK806 and KGSA906)
|
|
| C | D |
|
| Bake |
| Bread |
| 325˚ | Broil | Proof | |
|
|
|
| |
| 350˚ |
|
|
|
B | 400˚ |
|
|
|
425˚ |
|
|
| |
|
|
| Full | |
| Bake | Broil | Roast | |
| Meal |
CONVECT
A![]()
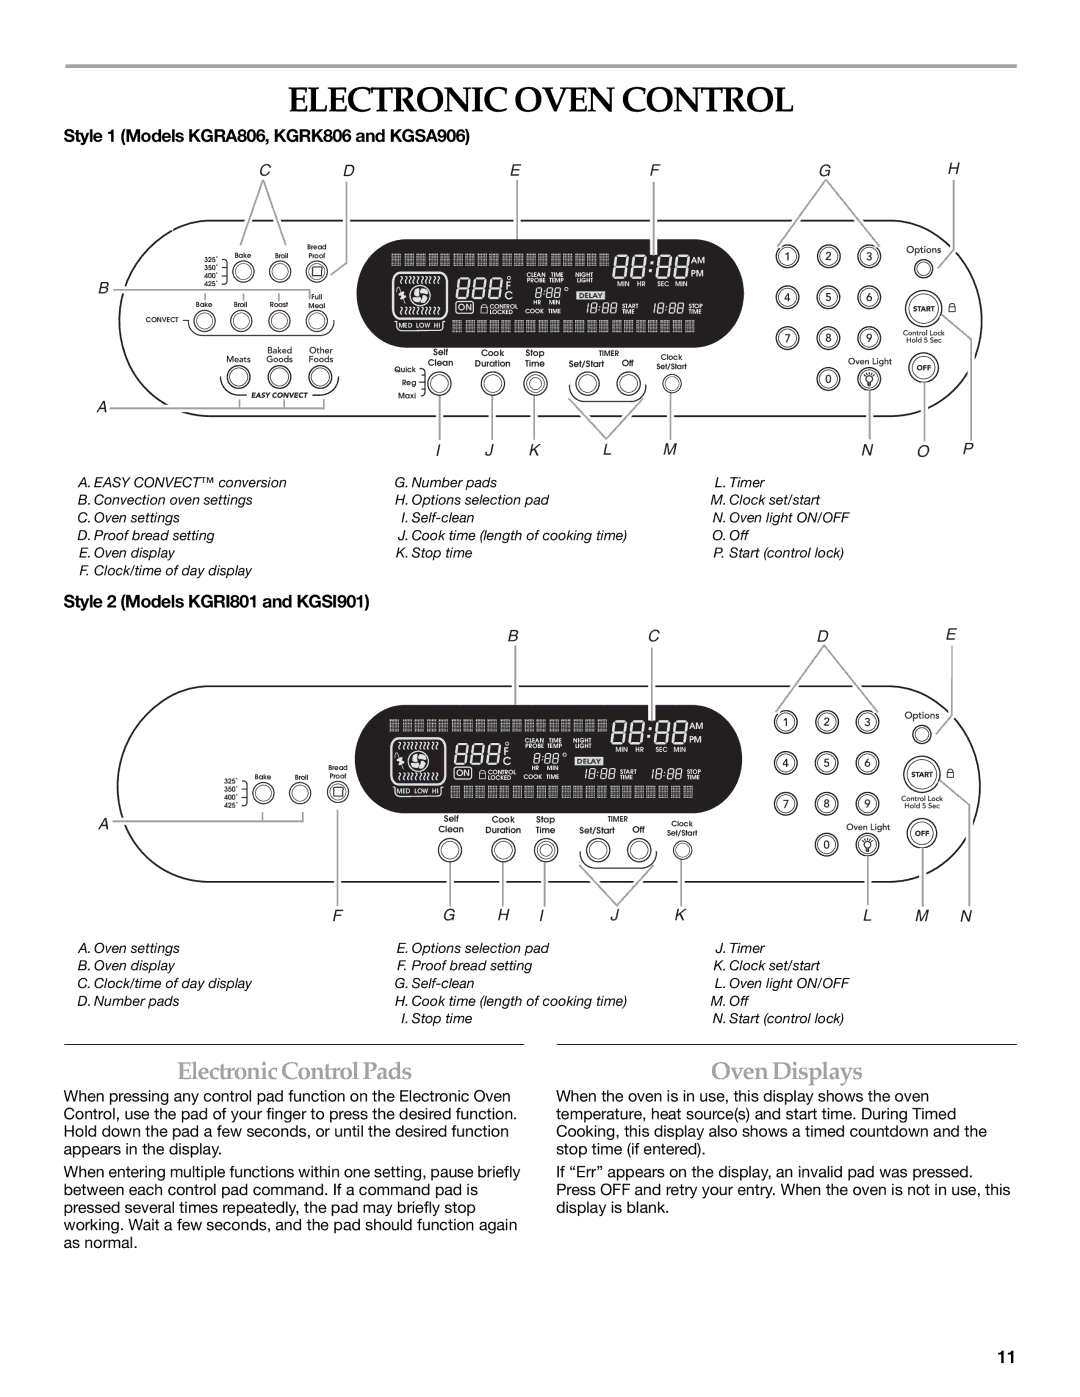
A. EASY CONVECT™ conversion B. Convection oven settings
C. Oven settings
D. Proof bread setting E. Oven display
F. Clock/time of day display
EFGH
|
|
|
|
|
| AM |
|
| CLEAN | TIME | NIGHT |
| PM |
| F | PROBE TEMP | LIGHT | MIN HR | SEC MIN | |
|
|
|
|
| ||
ON | C | HR | MIN | DELAY | START | STOP |
CONTROL |
| |||||
COOK | TIME |
| ||||
| LOCKED |
| TIME | TIME | ||
MED LOW HI |
|
|
|
|
|
|
Self | Cook | Stop |
| TIMER | Clock | |
Clean | Duration | Time |
| Set/Start | Off | |
| Set/Start | |||||
Quick |
|
|
|
|
|
|
Reg
Maxi
I | J | K | L | M | N | O | P |
G. Number pads |
|
|
| L. Timer |
|
| |
H. Options selection pad |
|
| M. Clock set/start |
|
| ||
I. |
|
|
|
| N. Oven light ON/OFF |
|
|
J. Cook time (length of cooking time) |
| O. Off |
|
| |||
K. Stop time |
|
|
|
| P. Start (control lock) |
|
|
Style 2 (Models KGRI801 and KGSI901)
BCDE
|
|
| Bread |
325˚ | Bake | Broil | Proof |
|
|
| |
350˚ |
|
|
|
400˚ |
|
|
|
425˚ |
|
|
|
A
F
A. Oven settings
B. Oven display
C. Clock/time of day display
D. Number pads
|
|
|
|
|
|
| AM | |
|
| CLEAN | TIME | NIGHT |
|
| PM | |
| F | PROBE TEMP | LIGHT | MIN | HR | SEC MIN | ||
|
|
|
|
| ||||
ON | C | HR | MIN | DELAY | START | STOP | ||
CONTROL |
| |||||||
COOK | TIME |
| ||||||
| LOCKED |
| TIME | TIME | ||||
MED LOW HI |
|
|
|
|
|
|
| |
Self | Cook | Stop |
| TIMER |
| Clock | ||
Clean | Duration | Time | Set/Start | Off | ||||
Set/Start | ||||||||
G | H | I | J | K | L | M | N |
E. Options selection pad |
|
| J. Timer |
|
| ||
F. Proof bread setting |
|
|
| K. Clock set/start |
|
| |
G. |
|
|
|
| L. Oven light ON/OFF |
|
|
H. Cook time (length of cooking time) |
| M. Off |
|
| |||
I. Stop time |
|
|
|
| N. Start (control lock) |
|
|
ElectronicControlPads
When pressing any control pad function on the Electronic Oven Control, use the pad of your finger to press the desired function. Hold down the pad a few seconds, or until the desired function appears in the display.
When entering multiple functions within one setting, pause briefly between each control pad command. If a command pad is pressed several times repeatedly, the pad may briefly stop working. Wait a few seconds, and the pad should function again as normal.
Oven Displays
When the oven is in use, this display shows the oven temperature, heat source(s) and start time. During Timed Cooking, this display also shows a timed countdown and the stop time (if entered).
If “Err” appears on the display, an invalid pad was pressed. Press OFF and retry your entry. When the oven is not in use, this display is blank.
11
