Page
User Guide for the Kyocera KX9a Phone
Page
Fueling areas such as gas stations Below deck on boats
Extended Battery
Table of Contents
Page
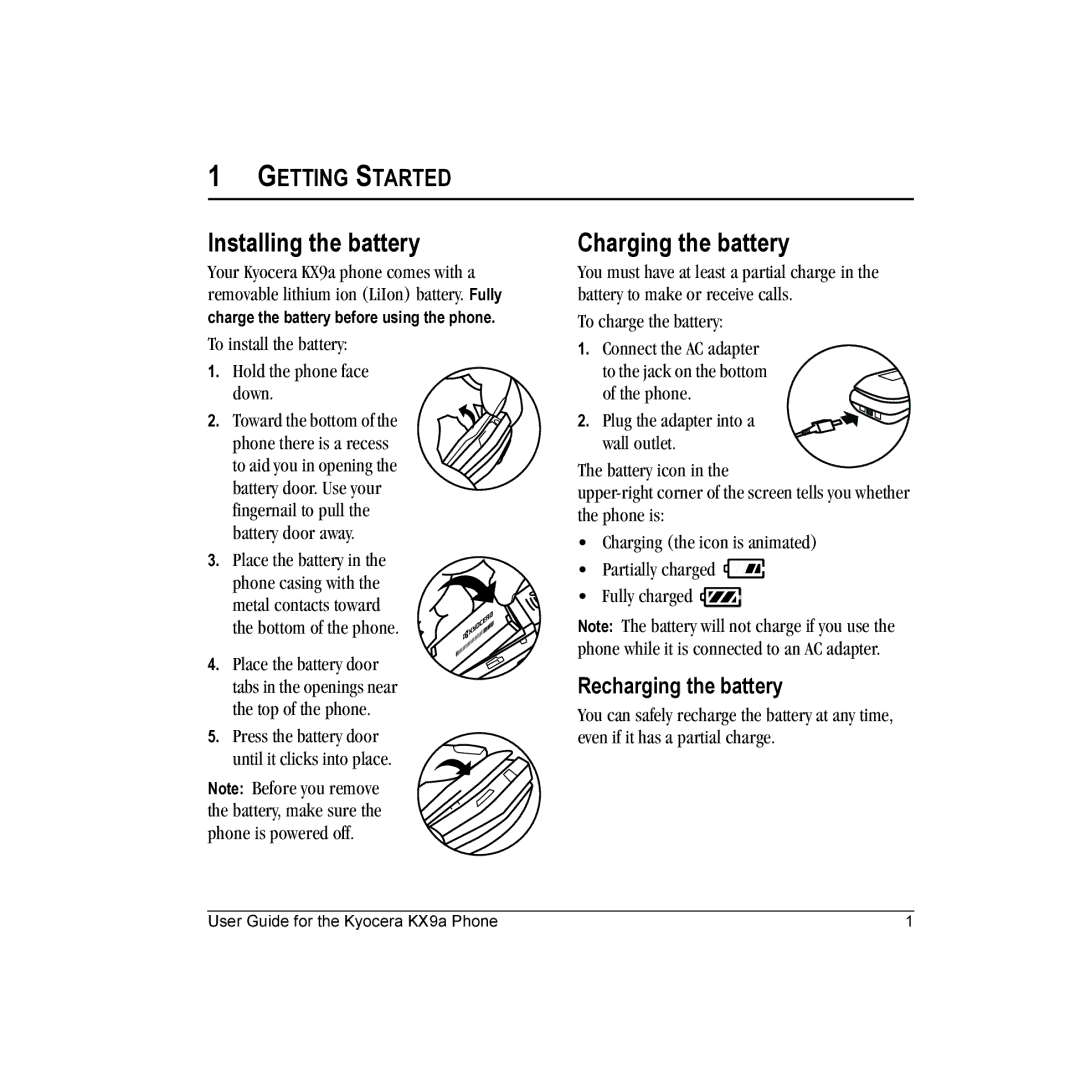
Installing the battery
Charging the battery
Recharging the battery
To install the battery Hold the phone face down
Caring for the battery
Do not take apart, puncture, or short-circuit the battery
Performing basic functions
Make a call Enter the number and press
Left softkey accesses menus and functions
Getting to know your phone
Navigating through menus
Using menus
Contents of the main menu are as follows
Alarm clock is set
Understanding screen icons
Call is in progress
Speakerphone is on Auto-Answer is on DRM protected
Making a call
Redialing a number
Calling a saved number
Answering a call
Using the speakerphone
Setting the phone to hold calls
Adjusting the volume during a call
Placing a call on hold
Speed dialing
Dealing with missed calls
Viewing recent call details
Touch dialing
Setting up voicemail
Calling emergency services
Using your phone in an airplane
To exit Emergency mode
Setting Airplane mode
Tracking calls
Timing your calls
Understanding roaming
Creating a new contact
Adding a code or extension
Customizing your contacts
Assigning ringers
Assigning number types
Assigning pictures
Classifying contacts as Personal or Business
Editing a contact
Erasing a contact
Sending a vCard
Customizing a phone number
Setting Fast Find
Finding contact information
Checking the Frequent List
Searching the Contacts directory
Understanding text entry screens
Text entry modes
Entering numbers
Entering words letter by letter
Capitalization settings
Entering symbols
Switching default text entry modes
Entering smileys
Quick reference to text entry
Including prewritten text and symbols
Sending text messages
Creating a text message
Enter a recipient’s phone number or email address
Setting sending options
Adding a signature
If you cannot send messages
Understanding appended messages
Receiving incoming calls while creating messages
Viewing your sent messages
Retrieving text messages
Reading the message
To view successfully sent messages
Message has been received
Customizing message settings
Erasing messages
When finished, select Done
Creating group lists
Contacts List to select numbers from your phone book
To create a new pre-written message, select New Msg
Contents of the Settings menu are as follows
Customizing Your Phone
Silencing all sounds
Choosing ringers
Setting sounds for your phone
Adjusting volume
Choosing a different language
Setting message alerts
Using shortcuts
Adjusting the backlighting
Setting power backlighting
Personalizing the screen
Changing your banner
Creating a secure environment
Locking your phone
Designating emergency numbers
Limiting calls
Erasing all contacts
Network settings
Setting position location
Switching between phone lines
Connecting to a TTY/TDD device
Voice Memo
Scheduler
Editing, erasing, or sending an event
Alarm Clock
Setting an alarm clock
Calculator
Setting the QuickAlarm
Tip Calculator
Timer
Stopwatch
Games
Brick Attack
Race
Browsing sounds
Accessing files
Browsing images
Creating free space
Customer support
Qualified service
Phone accessories Become a product evaluator
Games Brick Attack, 36 Race 21
Erasing
Fast find
Volume Earpiece, 7, 27 key beep, 27 ringer Wallpaper, 30
Unlocking the phone VCard