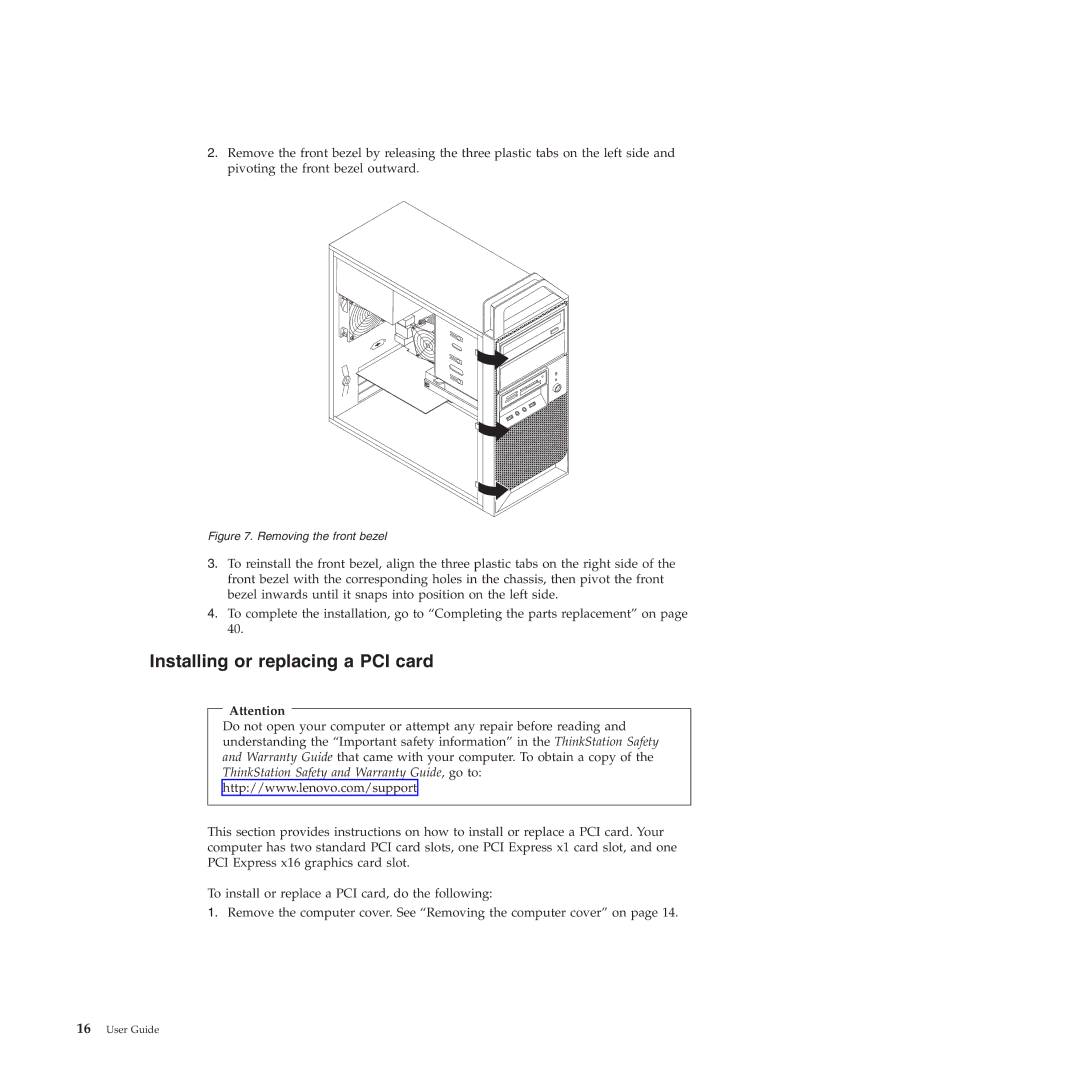
ThinkStation User Guide
Machine Types: 4215, 4219, 4220, 4221, and
Page
ThinkStation User Guide
First Edition February Copyright Lenovo
Contents
Appendix. Notices . . . . . . . . . .
Index
Important safety information
viUser Guide
Features
Chapter 1. Product overview
System information
Microprocessor
System management features
Input/Output I/O features
Power supply
Expansion
Security features
Software programs, preinstalled
Operating system, preinstalled
Specifications
Dimensions
Weight
Environment
ThinkVantage Rescue and Recovery
Product Recovery
Software overview
Software provided by Lenovo
PC-Doctorfor Rescue and Recovery
Adobe Reader
Antivirus software
Lenovo System Toolbox
Locating connectors on the front of your computer
Locations
Figure 1. Front connector locations
1 USB connector
Locating connectors on the rear of your computer
Figure 2. Rear connector locations
Connector
Description
Locating components
Figure 3. Component locations
Locating parts on the system board
Locating internal drives
1 Bay 1 - Maximum height: 43.0 mm 1.7 inches
Chapter 2. Installing or replacing hardware
Installing or replacing hardware
Handling static-sensitivedevices
Notes
Installing external options
Removing the computer cover
Removing and reinstalling the front bezel
Figure 6. Removing the computer cover
Installing or replacing a PCI card
Figure 7. Removing the front bezel
Figure 8. Opening the PCI card latch
Figure 9. Removing a PCI card
18User Guide
Installing or replacing a memory module
What to do next
4.Open the retaining clips
Installing or replacing the optical drive
Figure 13. Installing a memory module
What to do next
Figure 15. Installing the optical drive retainer
Figure 14. Removing the optical drive
22User Guide
Figure 16. Installing the optical drive
Figure 17. Connecting the optical drive
What to do next
Replacing the power supply assembly
24User Guide
Replacing the heat sink and fan assembly
What to do next
Notes
26User Guide
Replacing the primary hard disk drive
What to do next
Figure 20. Removing the primary hard disk drive
28User Guide
Replacing the secondary hard disk drive
Figure 22. Installing the primary hard disk drive
What to do next
Figure 23. Removing the secondary hard disk drive
30User Guide
7.To install a new hard disk drive into the blue bracket, flex the bracket and align pin 1, pin 2, pin 3, and pin 4 on the bracket with the corresponding holes in the hard disk drive. Do not touch the circuit board 5 on the bottom of the hard disk drive
Replacing the card reader
What to do next
Figure 27. Installing the card reader retainer
What to do next
Figure 26. Removing the card reader
Replacing the front fan assembly
34User Guide
Figure 28. Removing the front fan assembly
Figure 29. Installing the front fan assembly
What to do next
36User Guide
Replacing the rear fan assembly
Figure 30. Removing the rear fan assembly
Replacing the keyboard
Figure 31. Installing the rear fan assembly
What to do next
Replacing the mouse
What to do next
Completing the parts replacement
Figure 33. Mouse connectors
What to do next
Installing security features
Obtaining device drivers
Integrated cable lock
Password protection
Erasing lost or forgotten passwords clearing CMOS
Padlock
Figure 36. Installing a padlock
7.Repeat step 1 and step
Chapter 3. Recovery information
Creating and using recovery media
Creating recovery media
Notes
Using recovery media
Performing backup and recovery operations
Performing a backup operation
Performing a recovery operation
Using the Rescue and Recovery workspace
Creating and using rescue media
Creating rescue media
Notes
Notes
Using rescue media
Creating and using a recovery repair diskette
50User Guide
Creating a recovery repair diskette
Using a recovery repair diskette
Installing or reinstalling device drivers
Notes
Setting a rescue device in the startup sequence
Solving recovery problems
Chapter 4. Using the Setup Utility program
Starting the Setup Utility program
Viewing and changing settings
Using passwords
Password considerations
Power-OnPassword
Administrator Password
Hard Disk Password
Enabling or disabling a device
Selecting a startup device
Selecting a temporary startup device
Advanced settings
Exiting from the Setup Utility program
Selecting or changing the startup device sequence
56User Guide
Chapter 5. Configuring RAID
Creating RAID volumes
RAID Level
2.Select Devices → ATA Drives Setup
Deleting RAID volumes
Using system programs
Updating flashing BIOS from a disc
Chapter 6. Updating system programs
Updating flashing BIOS from your operating system
Recovering from a POST/BIOS update failure
b.Click Downloads and drivers
12.Repeat step 2 through step
62User Guide
Chapter 7. Troubleshooting and diagnostics
Basic troubleshooting
Diagnostic programs
Lenovo ThinkVantage Toolbox
Lenovo System Toolbox
Notes
PC-Doctorfor Rescue and Recovery
Creating a diagnostic disc
PC-Doctorfor DOS
Cleaning the mouse
Optical mouse
Non-opticalmouse
11.Reconnect the mouse cable to the computer
Chapter 8. Getting information, help, and service
Information resources
Online Books folder
Lenovo ThinkVantage Tools
Safety and Warranty
Help and service
Using the documentation and diagnostic programs
Calling for service
Using other services
Purchasing additional services
72User Guide
Appendix. Notices
Lenovo United States, Inc
1009 Think Place - Building One Morrisville, NC
U.S.A Attention: Lenovo Director of Licensing
Television output notice
European conformance CE mark Trademarks
Index A
Page
Page
78User Guide
Page
Part Number: 71Y8009 Printed in USA
1P P/N: 71Y8009