CONNECTING SPEAKER WIRE

1. Strip away approx. 10 mm of wire insulation.

2. Twist the bared wire ends tight to prevent short circuits.

3. Loosen the knob by turning counterclockwise.

4. Insert the bare part of the wire into the hole in

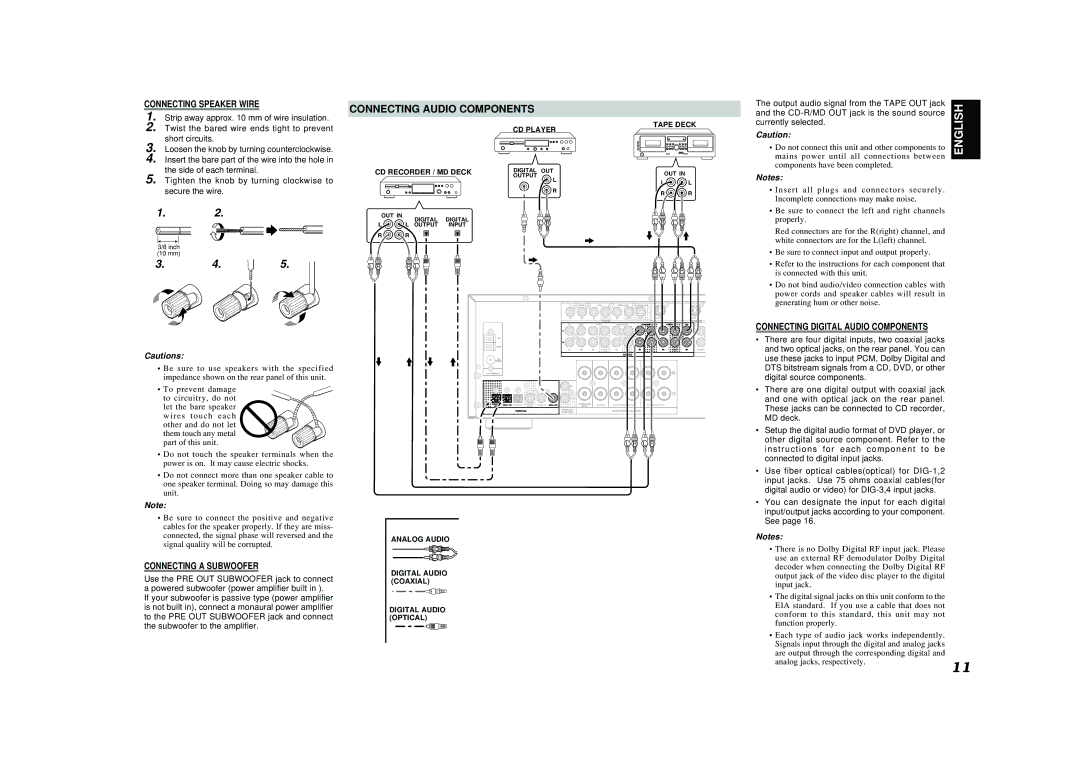
CONNECTING AUDIO COMPONENTS

The output audio signal from the TAPE OUT jack

ENGLISH

and the CD-R/MD OUT jack is the sound source


TAPE DECK

currently selected.


CD PLAYER

Caution:


• Do not connect this unit and other components to mains power until all connections between components have been completed.

the side of each terminal.

5. Tighten the knob by turning clockwise to secure the wire.

1.2.

3/8 inch (10 mm)

3. 4.5.

Cautions:

Be sure to use speakers with the specified impedance shown on the rear panel of this unit.

To prevent damage

to circuitry, do not let the bare speaker wires touch each other and do not let them touch any metal part of this unit.

• Do not touch the speaker terminals when the

power is on. It may cause electric shocks.


CD RECORDER / MD DECK

DIGITAL

OUT


OUT IN


OUTPUT


L


L


L


R


R


R


OUT IN

DIGITAL

DIGITAL


L

R


L


L

R


L

R


L OUTPUT

INPUT


R

R


L

R

R L


R L

L

R

L

R


TV

DVD


VCR1


DSS/VCR2


MONITOR


IN

IN


OUT

IN

OUT


OUT

DVD IN


VCR1 IN


MONITOR


IN


VCR1 OUT OUT


VIDEO


S-VIDEO


TV

DVD


VCR1

DSS/VCR2


CDR/MDCDR/MD


TAPETAPE

CDCD


CENTER

SUB

CE


WOOFER


L


AM


R


GND


IN

IN

IN

OUT

IN


OUT


ININ

OUTOUT

ININ

OUTOUT

ININ


FRONT SURROUND

SURR.

SUB

SU


BACK

WOOFER

B


AUDIOAUDIO


6.1CH INPUT


FM


(75)


ANTENNA


IN


OUT


DIG.OUT

DIG.OUT


SURROUND


CENTER

R

SURROUND

L

R

FRONT

L


SWITCHED 100W MAX


OPT

DIG-1 IN DIG-2 IN COAX

DIG-3 IN

DIG-4 IN

BACK


DIGITAL


REMOTE


SPEAKER SYSTEMS


AC OUTLET


CONTROL


L R

L R


Notes:

Insert all plugs and connectors securely. Incomplete connections may make noise.

Be sure to connect the left and right channels properly.

Red connectors are for the R(right) channel, and white connectors are for the L(left) channel.

Be sure to connect input and output properly.

Refer to the instructions for each component that is connected with this unit.

Do not bind audio/video connection cables with power cords and speaker cables will result in generating hum or other noise.

CONNECTING DIGITAL AUDIO COMPONENTS

There are four digital inputs, two coaxial jacks and two optical jacks, on the rear panel. You can use these jacks to input PCM, Dolby Digital and DTS bitstream signals from a CD, DVD, or other digital source components.

There are one digital output with coaxial jack and one with optical jack on the rear panel. These jacks can be connected to CD recorder, MD deck.

Setup the digital audio format of DVD player, or other digital source component. Refer to the instructions for each component to be connected to digital input jacks.

• Do not connect more than one speaker cable to

one speaker terminal. Doing so may damage this

unit.

Note:

Be sure to connect the positive and negative cables for the speaker properly. If they are miss- connected, the signal phase will reversed and the signal quality will be corrupted.

CONNECTING A SUBWOOFER

Use the PRE OUT SUBWOOFER jack to connect a powered subwoofer (power amplifier built in ).

If your subwoofer is passive type (power amplifier is not built in), connect a monaural power amplifier to the PRE OUT SUBWOOFER jack and connect the subwoofer to the amplifier.


Use fiber optical cables(optical) for DIG-1,2


input jacks. Use 75 ohms coaxial cables(for


digital audio or video) for DIG-3,4 input jacks.


You can designate the input for each digital


input/output jacks according to your component.


See page 16.


ANALOG AUDIO

Notes:


R


• There is no Dolby Digital RF input jack. Please


L


use an external RF demodulator Dolby Digital


DIGITAL AUDIO


decoder when connecting the Dolby Digital RF


output jack of the video disc player to the digital


(COAXIAL)


input jack.


• The digital signal jacks on this unit conform to the


DIGITAL AUDIO


EIA standard. If you use a cable that does not


conform to this standard, this unit may not


(OPTICAL)


function properly.


• Each type of audio jack works independently.


Signals input through the digital and analog jacks


are output through the corresponding digital and


analog jacks, respectively.

11


Page 13
Image 13
Marantz SR4400 manual Connecting Audio Components, Output audio signal from the Tape OUT jack, Currently selected

SR4400 specifications

The Marantz SR4400 is a standout piece of audio equipment that epitomizes high-performance home theater receivers. Renowned for its exceptional sound quality and user-friendly features, the SR4400 has won the hearts of audio enthusiasts and casual listeners alike. This receiver is a perfect blend of advanced technology and classic Marantz aesthetics, which makes it a timeless addition to any home theater setup.

One of the standout features of the SR4400 is its multichannel processing capability, supporting both Dolby Digital and DTS formats. This enables users to enjoy a full cinematic experience right in their living rooms, as the receiver can decode up to 6.1 channels, providing rich and immersive surround sound. The SR4400 boasts a power output of 80 watts per channel, ensuring that it can drive a variety of speakers with clarity and authority, making it suitable for both music and movie playback.

The SR4400 also comes equipped with a range of input options, including multiple HDMI ports. This ensures seamless connectivity with modern devices such as Blu-ray players, gaming consoles, and streaming devices. Additionally, the receiver features composite, component, and optical connections, catering to older technology as well. An important aspect of the SR4400 is the built-in AM/FM tuner, allowing users to enjoy their favorite radio stations without the need for additional equipment.

Marantz has always emphasized quality components, and the SR4400 is no exception. It features high-quality capacitors and a robust power supply, contributing to its low distortion and high signal-to-noise ratio. The receiver also includes advanced digital signal processing (DSP) which enhances audio playback by allowing users to select various sound modes, tailoring the listening experience to individual preferences.

One of the user-friendly aspects of the SR4400 is its intuitive on-screen setup menu, which makes it accessible even for those new to home theater systems. The remote control is also thoughtfully designed, offering easy access to all essential functions.

In conclusion, the Marantz SR4400 is a versatile and powerful home theater receiver that combines advanced technology with exceptional sound quality. Its rich feature set and robust build make it a worthy investment for anyone looking to elevate their audio experience. Whether for music or movies, the SR4400 stands out as a reliable and high-performance choice in the competitive receiver market.