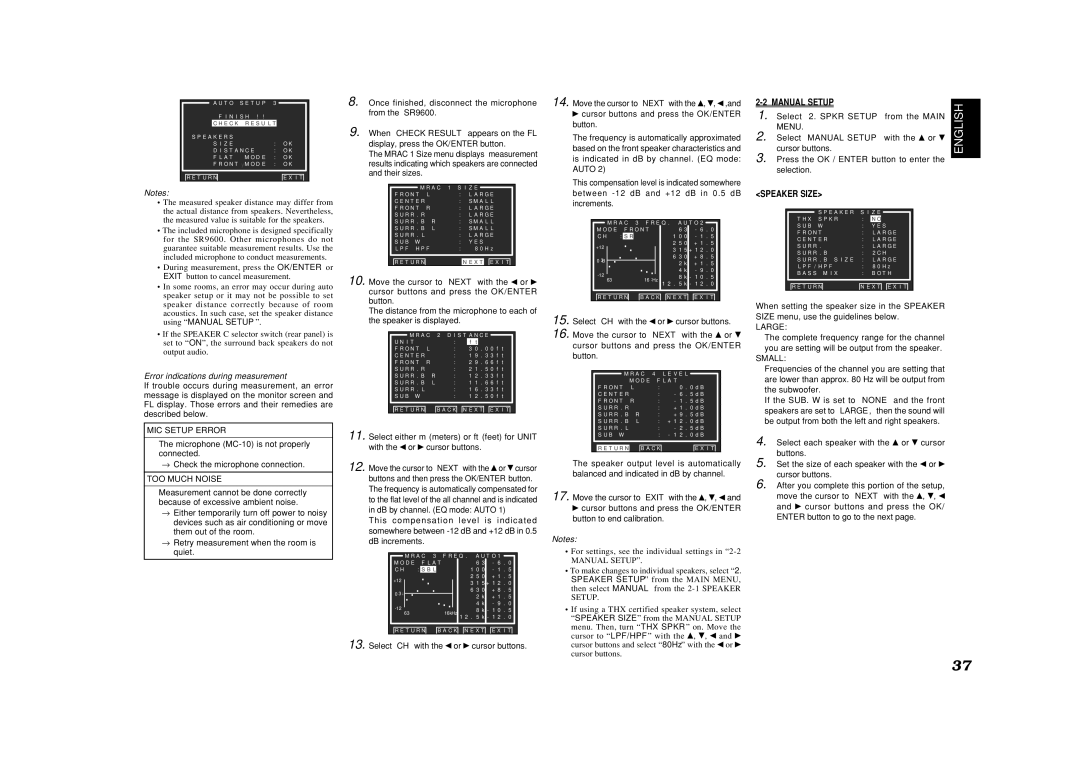
| A U T O | S E T U P | 3 | |
| F I N | I S H ! ! | | |
| C H E C K R E S U L T | |
S P E A K E R S | | | |
| S I Z E | | : O K |
| D I S T A N C E | : O K |
| F L A T | M O D E : O K |
| F R O N T M�O D E : O K |
R E T U R N | | | E X I T |
Notes:
•The measured speaker distance may differ from the actual distance from speakers. Nevertheless, the measured value is suitable for the speakers.
•The included microphone is designed specifically for the SR9600. Other microphones do not guarantee suitable measurement results. Use the included microphone to conduct measurements.
•During measurement, press the OK/ENTER or EXIT button to cancel measurement.
•In some rooms, an error may occur during auto speaker setup or it may not be possible to set speaker distance correctly because of room acoustics. In such case, set the speaker distance using “MANUAL SETUP”.
•If the SPEAKER C selector switch (rear panel) is set to “ON”, the surround back speakers do not output audio.
Error indications during measurement
If trouble occurs during measurement, an error message is displayed on the monitor screen and FL display. Those errors and their remedies are described below.
MIC SETUP ERROR
The microphone (MC-10) is not properly connected.
→Check the microphone connection.
TOO MUCH NOISE
Measurement cannot be done correctly because of excessive ambient noise.
→Either temporarily turn off power to noisy devices such as air conditioning or move them out of the room.
→Retry measurement when the room is quiet.
8. Once finished, disconnect the microphone from the SR9600.
9. When “CHECK RESULT” appears on the FL display, press the OK/ENTER button.
The MRAC 1 Size menu displays measurement results indicating which speakers are connected and their sizes.
M R A C | 1 S I Z E |
F R O N T L | : L A R G E |
C E N T E R | : S M A L L |
F R O N T R | : L A R G E |
S U R R . R | : L A R G E |
S U R R . B R | : S M A L L |
S U R R . B L | : S M A L L |
S U R R . L | : L A R G E |
S U B W | : | Y E S |
L P F / H P F | : | 8 0 H z |
| | | |
R E T U R N | | N E X T | E X I T |
10. Move the cursor to “NEXT” with the or  cursor buttons and press the OK/ENTER button.
The distance from the microphone to each of the speaker is displayed.
M R A C 2 D I S T A N C E | |
U N I T | : | f | t | | |
F R O N T L | : | 3 0 | . 0 0 f | t |
C E N T E R | : | 1 9 . 3 3 f | t |
F R O N T R | : | 2 9 . 6 6 f | t |
S U R R . R | : | 2 | 1 | . 5 0 f | t |
S U R R . B R | : | 1 2 . 3 3 f | t |
S U R R . B L | : | 1 | 1 | . 6 6 f | t |
S U R R . L | : | 1 | 6 | . 3 3 f | t |
S U B W | : | 1 2 . 5 0 f | t |
R E T U R N | B A C K N E X T E X I T |
11. Select either m (meters) or ft (feet) for UNIT with the or  cursor buttons.
12. Move the cursor to “NEXT” with the  or
or  cursor buttons and then press the OK/ENTER button. The frequency is automatically compensated for to the flat level of the all channel and is indicated in dB by channel. (EQ mode: AUTO 1)
This compensation level is indicated somewhere between -12 dB and +12 dB in 0.5 dB increments.
| | M R A C 3 F R E Q . A U T O 1 | | |
| M O D E → F L A T | | 6 3 - | 6 . 0 | |
| C H | : | S B L | | 1 0 0 - | 1 . 5 | |
| +12 | | | | 2 | 5 | 0 | + | 1 . | 5 | |
| | | | 3 | 1 | 5 + 1 | 2 . | 0 | |
| | | | | |
| 0dB | | | | 6 | 3 | 0 | + | 8 . | 5 | |
| | | | | 2 | k | + | 1 . | 5 | |
| | | | | | |
| -12 | | | | | 4 | k | - | 9 . | 0 | |
| | | | | 8 | k - | 1 | 0 . | 5 | |
| 63 | | | 16kHz | |
| | | 5 | k - | 1 | 2 . | 0 | |
| | | | | 1 2 . | |
| R E T U R N | B A C K N E X T E X I T | |
13. Select “CH” with the | or cursor buttons. |
14. Move the cursor to “NEXT” with the  ,
,  , ,and
  cursor buttons and press the OK/ENTER
button.
The frequency is automatically approximated based on the front speaker characteristics and is indicated in dB by channel. (EQ mode: AUTO 2)
This compensation level is indicated somewhere between -12 dB and +12 dB in 0.5 dB increments.
| M R A C 3 F R E Q . A U T O 2 | |
M O D E → F R O N T | 6 3 | | - 6 . 0 |
C H | : | S R | 1 0 0 | | - | 1 . 5 |
+12 | | | 2 | 5 | 0 | | + | 1 . | 5 |
| | 3 | 1 | 5 | + 1 | 2 . | 0 |
| | |
0dB� | | | 6 | 3 | 0 | | + | 8 . | 5 |
| | | 2 | k | | + | 1 . | 5 |
| | | | |
-12 | | | | 4 | k | | - | 9 . | 0 |
| | 16kHz� | 8 | k - | 1 | 0 . | 5 |
63 | |
| 5 | k - | 1 | 2 . | 0 |
| | | 1 2 . |
R E T U R N | B A C K N E X T E X I T |
15. Select “CH” with the or  cursor buttons.
16. Move the cursor to “NEXT” with the  or
or 
cursor buttons and press the OK/ENTER button.
| M R A C 4 | | L E V E L |
| | M O D E - | F L A T | |
| F R O N T L | | : | | 0 . 0 d B |
| C E N T E R | | : | - 6 . 5 d B |
| F R O N T R | | : | - | 1 . 5 d B |
| S U R R . R | | : | + 1 . 0 d B |
| S U R R . B R | | : | + 9 . 5 d B |
| S U R R . B L | | : + 1 2 . 0 d B |
| S U R R . L | | : | - 2 . 5 d B |
| S U B W | | : - 1 2 . 0 d B |
| | | | | |
| R E T U R N | | B A C K | | E X I T |
The speaker output level is automatically balanced and indicated in dB by channel.
17. Move the cursor to “EXIT” with the  ,
,  , and
, and  cursor buttons and press the OK/ENTER
button to end calibration.
Notes:
•For settings, see the individual settings in “2-2
MANUAL SETUP”.
•To make changes to individual speakers, select “2. SPEAKER SETUP” from the MAIN MENU, then select MANUAL from the 2-1 SPEAKER SETUP.
•If using a THX certified speaker system, select “SPEAKER SIZE” from the MANUAL SETUP
menu. Then, turn “THX SPKR” on. Move the
cursor to “LPF/HPF” with the , , | and |
cursor buttons and select “80Hz” with the | or |
cursor buttons. | |
2-2 MANUAL SETUP
1. Select “2. SPKR SETUP” from the MAIN MENU.
2. Select “MANUAL SETUP” with the  or
or 
cursor buttons.
3. Press the OK / ENTER button to enter the selection.
<SPEAKER SIZE>
| | | | | |
| S P E A K E R S I Z E |
T H X | S P K R | : | N O | |
|
S U B | W | : | Y E | S |
F R O N T | : L A R G E |
C E N T E R | : L A R G E |
S U R R . | : L A R G E |
S U R R . B | : | 2 | C H |
S U R R . B S I Z E : L A R G E |
L P F / H P F | : | 8 0 H z |
B A S S M I X | : B O T H |
R E T U R N | N E X T E X I T |
When setting the speaker size in the SPEAKER SIZE menu, use the guidelines below.
LARGE:
The complete frequency range for the channel you are setting will be output from the speaker.
SMALL:
Frequencies of the channel you are setting that are lower than approx. 80 Hz will be output from the subwoofer.
If the SUB. W is set to “NONE” and the front speakers are set to “LARGE,” then the sound will be output from both the left and right speakers.
4. Select each speaker with the  or
or  cursor buttons.
5. Set the size of each speaker with the or cursor buttons.
6. After you complete this portion of the setup, move the cursor to “NEXT” with the , , and  cursor buttons and press the OK/ ENTER button to go to the next page.
ENGLISH