ENGLISH
1-3 i. LINK SETUP
This menu sets communication between i.LINK- connected components and the SR9600.
1. Select “i.LINK SETUP” from the 1.INPUT SETUP menu with the or
or cursor buttons and press the OK/ENTER button.
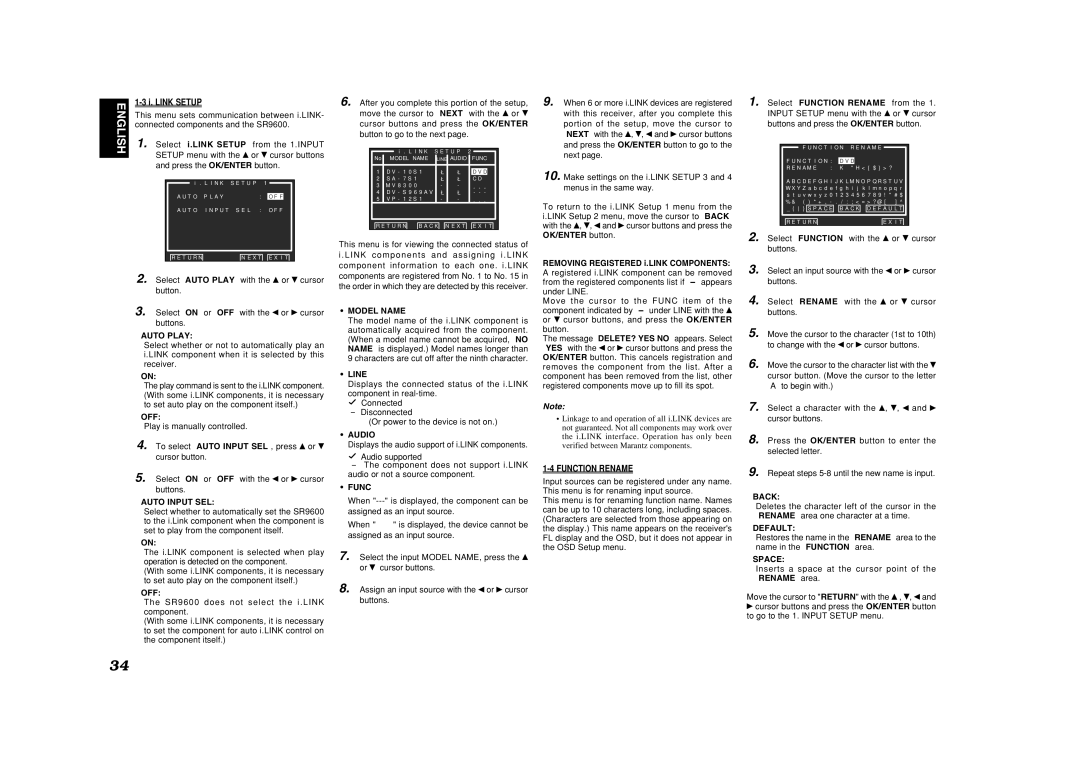
| | i . L I N K S E T U P 1 | | | |
| | | | | | |
| | A U T O P L A Y | : | O F F | | |
| | A U T O I N P U T S E L : O F F | |
| | R E T U R N | N E X T E X I T | |
2. | Select “AUTO PLAY” with the | or | cursor |
| button. | | | | | |
3. | Select “ON” or “OFF” with the | or | cursor |
| buttons. | | | | | |
AUTO PLAY:
Select whether or not to automatically play an i.LINK component when it is selected by this receiver.
ON:
The play command is sent to the i.LINK component. (With some i.LINK components, it is necessary to set auto play on the component itself.)
OFF:
Play is manually controlled.
4. To select “AUTO INPUT SEL”, press or
or cursor button.
5. Select “ON” or “OFF” with the or
or cursor
buttons.
AUTO INPUT SEL:
Select whether to automatically set the SR9600 to the i.Link component when the component is set to play from the component itself.
ON:
The i.LINK component is selected when play operation is detected on the component.
(With some i.LINK components, it is necessary to set auto play on the component itself.)
OFF:
The SR9600 does not select the i . LINK component.
(With some i.LINK components, it is necessary to set the component for auto i.LINK control on the component itself.)
6. After you complete this portion of the setup, move the cursor to “NEXT” with the  or
or  cursor buttons and press the OK/ENTER button to go to the next page.
| i . L I N K S E T U P 2 | | |
No | MODEL NAME | LINE AUDIO | FUNC |
| | | | | |
1 | D V - 1 0 S 1 | レ | レ | D V D | |
2 | S A - | 7 S 1 | レ | レ | C D | |
3 | M V 8 | 3 | 0 0 | - | - | ***� |
4 | D V - S 9 6 9 A V レ | レ - - - |
5 | V P - | 1 | 2 S 1 | - | - | ***� |
R E T U R N | B A C K N E X T E X I T |
This menu is for viewing the connected status of
i . LINK components and assigning i . LINK component information to each one. i.LINK
components are registered from No. 1 to No. 15 in the order in which they are detected by this receiver.
•MODEL NAME
The model name of the i.LINK component is automatically acquired from the component. (When a model name cannot be acquired, “NO NAME” is displayed.) Model names longer than 9 characters are cut off after the ninth character.
•LINE
Displays the connected status of the i.LINK
component in real-time.
 Connected
-Disconnected
(Or power to the device is not on.)
•AUDIO
Displays the audio support of i.LINK components.
Audio supported
-The component does not support i.LINK audio or not a source component.
•FUNC
When "---" is displayed, the component can be assigned as an input source.
When "✽✽✽" is displayed, the device cannot be assigned as an input source.
7. Select the input MODEL NAME, press the 
or  cursor buttons.
8. Assign an input source with the or  cursor buttons.
9. When 6 or more i.LINK devices are registered with this receiver, after you complete this portion of the setup, move the cursor to “NEXT” with the  ,
,  , and
, and  cursor buttons
and press the OK/ENTER button to go to the
next page.
10. Make settings on the i.LINK SETUP 3 and 4
menus in the same way.
To return to the i.LINK Setup 1 menu from the i.LINK Setup 2 menu, move the cursor to “BACK” with the  ,
,  , and
, and  cursor buttons and press the OK/ENTER button.
REMOVING REGISTERED i.LINK COMPONENTS: A registered i.LINK component can be removed from the registered components list if “-” appears under LINE.
Move the cursor to the FUNC item of the component indicated by “-” under LINE with the  or
or  cursor buttons, and press the OK/ENTER button.
The message “DELETE? YES NO” appears. Select “YES” with the or  cursor buttons and press the OK/ENTER button. This cancels registration and removes the component from the list. After a component has been removed from the list, other registered components move up to fill its spot.
Note:
•Linkage to and operation of all i.LINK devices are not guaranteed. Not all components may work over the i.LINK interface. Operation has only been verified between Marantz components.
1-4 FUNCTION RENAME
Input sources can be registered under any name. This menu is for renaming input source.
This menu is for renaming function name. Names can be up to 10 characters long, including spaces. (Characters are selected from those appearing on the display.) This name appears on the receiver's FL display and the OSD, but it does not appear in the OSD Setup menu.
1. Select “FUNCTION RENAME” from the 1. INPUT SETUP menu with the  or
or  cursor buttons and press the OK/ENTER button.
| | F U N C T I O N R E N A M E | | |
| | | | | | |
| | F U N C T I O N : | D V D | | | |
| | R E N A M E : | K " | H < { $ } > ? | |
| | | ‾‾‾‾‾ ‾‾‾‾‾� | |
| | A B C D E F G H I J K L M N O P Q R S T U V | |
| | W X Y Z a b c d e f g h i j k l m n o p q r | |
| | s t u v w x y z 0 1 2 3 4 5 6 7 8 9 ! " # $ | |
| | % & í ( ) * + , - . / : ; < = > ? @ [ \ ] ^ | |
| | _ { } S P A C E B A C K D E F A U L T | |
| | R E T U R N | E X I T | |
2. | Select “FUNCTION” with the | or | cursor |
| buttons. | | |
3. | Select an input source with the | or | cursor |
| buttons. | | |
4. | Select “RENAME” with the | or | cursor |
| buttons. | | |
5. | Move the cursor to the character (1st to 10th) |
| to change with the or cursor buttons. |
6. | Move the cursor to the character list with the |
| cursor button. (Move the cursor to the letter |
| “A” to begin with.) | | |
7. | Select a character with the | , , | and |
| cursor buttons. | | |
8. | Press the OK/ENTER button to enter the |
| selected letter. | | |
9. | Repeat steps 5-8 until the new name is input. |
BACK:
Deletes the character left of the cursor in the “RENAME” area one character at a time.
DEFAULT:
Restores the name in the “RENAME” area to the name in the “FUNCTION” area.
SPACE:
Inserts a space at the cursor point of the “RENAME” area.
Move the cursor to "RETURN" with the  ,
,  , and
, and
 cursor buttons and press the OK/ENTER button to go to the 1. INPUT SETUP menu.