ENGLISH

2-1 MRAC (Marantz Room Acoustic Calibration)

Speaker settings that would be difficult to configure using manual setup can now be performed by automatically measuring speaker characteristics using the microphone.

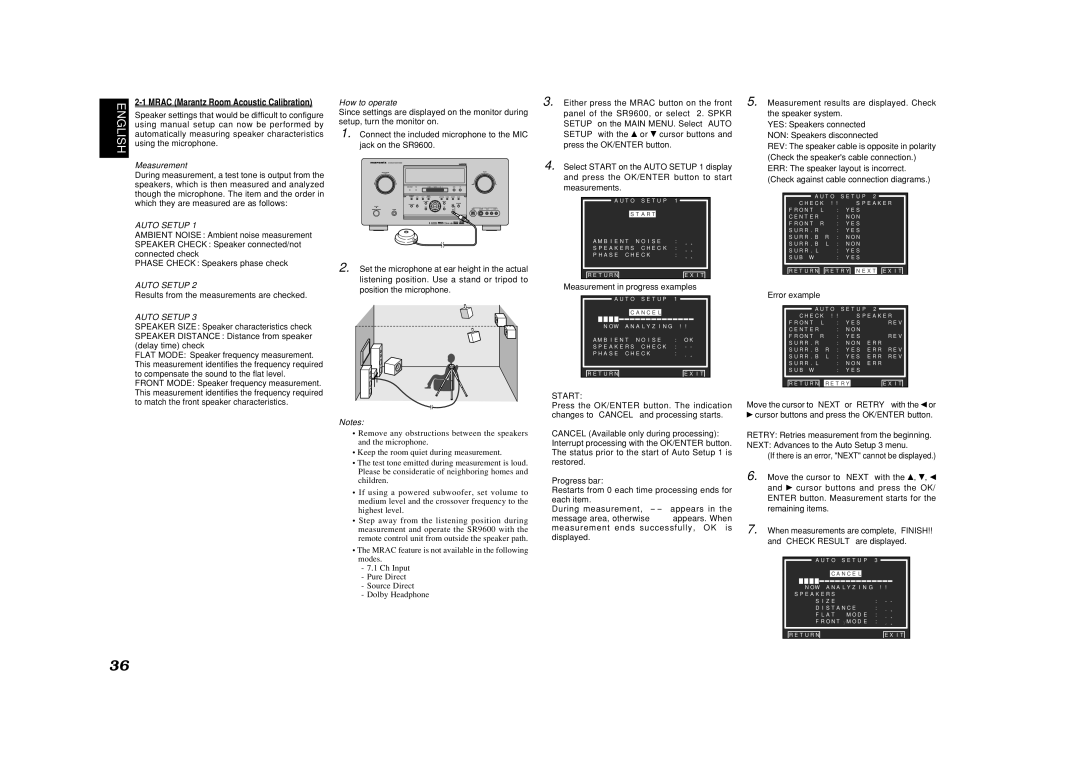
Measurement

During measurement, a test tone is output from the speakers, which is then measured and analyzed though the microphone. The item and the order in which they are measured are as follows:

AUTO SETUP 1

AMBIENT NOISE: Ambient noise measurement

SPEAKER CHECK: Speaker connected/not connected check

PHASE CHECK: Speakers phase check

AUTO SETUP 2

Results from the measurements are checked.

AUTO SETUP 3

SPEAKER SIZE: Speaker characteristics check

SPEAKER DISTANCE: Distance from speaker (delay time) check

FLAT MODE: Speaker frequency measurement. This measurement identifies the frequency required to compensate the sound to the flat level.

FRONT MODE: Speaker frequency measurement. This measurement identifies the frequency required to match the front speaker characteristics.

How to operate

Since settings are displayed on the monitor during setup, turn the monitor on.

1. Connect the included microphone to the MIC jack on the SR9600.

2. Set the microphone at ear height in the actual listening position. Use a stand or tripod to position the microphone.

Notes:

Remove any obstructions between the speakers and the microphone.

Keep the room quiet during measurement.

The test tone emitted during measurement is loud. Please be consideratie of neighboring homes and children.

If using a powered subwoofer, set volume to medium level and the crossover frequency to the highest level.

Step away from the listening position during measurement and operate the SR9600 with the remote control unit from outside the speaker path.

The MRAC feature is not available in the following modes.

-7.1 Ch Input

-Pure Direct

-Source Direct

-Dolby Headphone

3. Either press the MRAC button on the front panel of the SR9600, or select “2. SPKR SETUP” on the MAIN MENU. Select “AUTO SETUP” with the or cursor buttons and press the OK/ENTER button.

4. Select START on the AUTO SETUP 1 display and press the OK/ENTER button to start measurements.

A U T O

S E T U P

1


S T A R T


A M B I E N T N O I S E

: **

S P E A K E R S C H E C K : **

P H A S E C H E C K

: **

R E T U R N


N E X T E X I T

Measurement in progress examples

A U T O

S E T U P

1


C A N C E L


N O W A N A L Y Z I N G ! !

A M B I E N T N O I S E

: O K

S P E A K E R S C H E C K : - -

P H A S E C H E C K

: **

R E T U R N

N E X T E X I T

START:

Press the OK/ENTER button. The indication changes to “CANCEL” and processing starts.

CANCEL (Available only during processing): Interrupt processing with the OK/ENTER button. The status prior to the start of Auto Setup 1 is restored.

Progress bar:

Restarts from 0 each time processing ends for each item.

During measurement, “-- ” appears in the message area, otherwise “✽✽” appears. When measurement ends successfully, “OK” is displayed.

5. Measurement results are displayed. Check the speaker system.

YES: Speakers connected

NON: Speakers disconnected

REV: The speaker cable is opposite in polarity (Check the speaker's cable connection.) ERR: The speaker layout is incorrect. (Check against cable connection diagrams.)


A U T O


S E T U P 2

C H E C K ! !


S P E A K E R

F R O N T

L

:

Y E S

C E N T E

R

:

N O N

F R O N T

R

:

Y E S

S U R R . R

:

Y E S

S U R R . B R : N O N

S U R R . B L : N O N

S U R R . L

:

Y E S

S U B W


:

Y E S


R E T U R N R E T R Y

N E X T

E X I T

Error example

A U T O


S E T U P

2

C H E C K ! !


S P E A K E R

F R O N T L

: Y E S

R E V

C E N T E R

:

N O N


F R O N T R

: Y E S

R E V

S U R R . R

: N O N E R R

S U R R . B R : Y E S E R R R E V

S U R R . B L : Y E S E R R R E V

S U R R . L

: N O N E R R

S U B W

:

Y E S


R E T U R N

R E T R Y


E X I T

Move the cursor to “NEXT” or “RETRY” with the or

cursor buttons and press the OK/ENTER button.

RETRY: Retries measurement from the beginning.

NEXT: Advances to the Auto Setup 3 menu.

(If there is an error, "NEXT" cannot be displayed.)

6. Move the cursor to “NEXT” with the , , and cursor buttons and press the OK/ ENTER button. Measurement starts for the remaining items.

7. When measurements are complete, “FINISH!!” and “CHECK RESULT” are displayed.

A U T O S E T U P 3

C A N C E L

N O W A N A L Y Z I N G ! !

S P E A K E R S


S I Z E

: - -

D I S T A N C E

: **

F L A T M O D E : **

F R O N T

MO D E : **

R E T U R N

E X I T

36

Page 38
Image 38
Marantz SR9600 manual Mrac Marantz Room Acoustic Calibration, Measurement, Auto Setup, How to operate, Start

SR9600 specifications

The Marantz SR9600 is a high-performance home theater receiver that has long been renowned for its remarkable sound quality and comprehensive features. A favorite among audiophiles and movie enthusiasts, the SR9600 stands out in the crowded field of A/V receivers due to its blending of cutting-edge technology with a classic, stylish design.

At the heart of the SR9600 is its robust audio architecture, boasting a powerful 7.1-channel amplification system. It is equipped with 110 watts per channel, which ensures that even in larger rooms, sound remains clear and dynamic. The receiver employs high-quality components, including discrete power amplifiers, that reduce noise and distortion, resulting in an immersive auditory experience.

The SR9600 supports multiple surround sound formats, including Dolby TrueHD, DTS-HD Master Audio, and several others, delivering crystal-clear audio that fully envelops the listener. This model also integrates Marantz's proprietary HDAM (Hyper Dynamic Amplification Module) technology, enhancing the overall sound performance by providing superior transient response and detail.

For video enthusiasts, the SR9600 offers advanced video processing with upscaling capabilities up to 1080p, ensuring that standard and high-definition sources look their best on a big screen. The receiver is compatible with a variety of formats, thanks to its multiple HDMI inputs and outputs, allowing seamless connectivity to Blu-ray players, gaming consoles, and streaming devices.

Another standout feature is its comprehensive connectivity options, including network capability for streaming audio content from popular services like Spotify and Pandora. With built-in Wi-Fi and Ethernet support, users can easily access their favorite music, while the USB port enables playback from portable devices.

The SR9600 also boasts an intuitive user interface and an easy setup process, complemented by an on-screen display that guides users through the configuration settings. Its automatic calibration system, Audyssey MultEQ XT, adjusts speaker settings, ensuring optimal sound quality tailored to the specific acoustics of the room.

In terms of design, the Marantz SR9600 reflects a premium aesthetic, featuring a sleek, black finish with a well-illuminated front panel. The layout is thoughtfully arranged, making it user-friendly for both setup and operation.

Overall, the Marantz SR9600 is a powerful, versatile A/V receiver that encompasses the essential technologies and features needed for an exceptional home theater experience. Its solid performance, along with its rich set of capabilities, makes it an enduring choice for those seeking to enhance their listening and viewing enjoyment.