CHIIMNEY INSTALLATION

CHIMNEY CAP INSTALLATION (CONTINUED)

CAUTION

Be careful to avoid electrical shock


hazard when contacting wires to the


metal chimney components.


1.Extend the regular chimney sections until the top of the chimney is 4" below the total flue height desired. Do not snap the last section of inlet air duct or largest diameter pipe in place until Step 3 is completed.

2.Remove the shingles from around the chimney so that the flashing may be installed. Install the upper part of the flashing under the shingles.

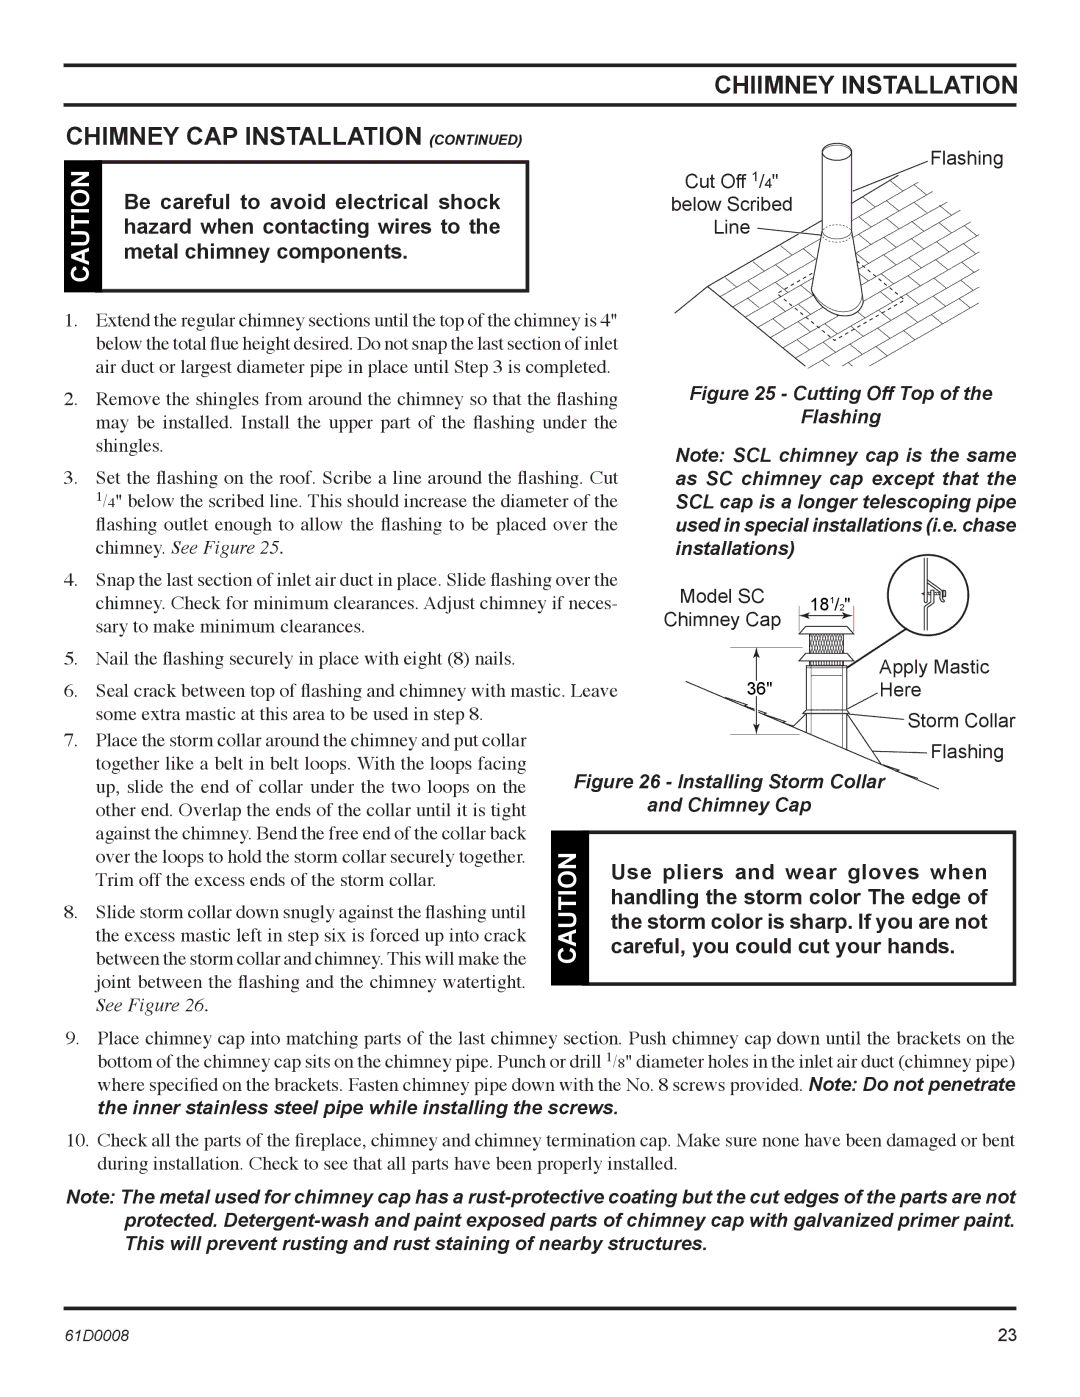
3.Set the flashing on the roof. Scribe a line around the flashing. Cut 1/4" below the scribed line. This should increase the diameter of the flashing outlet enough to allow the flashing to be placed over the

chimney. See Figure 25.

Flashing

Cut Off 1/4" below Scribed

Line

Figure 25 - Cutting Off Top of the

Flashing

Note: SCL chimney cap is the same as SC chimney cap except that the SCL cap is a longer telescoping pipe used in special installations (i.e. chase installations)

4.

Snap the last section of inlet air duct in place. Slide flashing over the

Model SC


chimney. Check for minimum clearances. Adjust chimney if neces-


181/2"


sary to make minimum clearances.


Chimney Cap


5.

Nail the flashing securely in place with eight (8) nails.


Apply Mastic


6.

Seal crack between top of flashing and chimney with mastic. Leave

36"


Here


some extra mastic at this area to be used in step 8.


Storm Collar


7.

Place the storm collar around the chimney and put collar


Flashing


together like a belt in belt loops. With the loops facing


Figure 26 - Installing Storm Collar


up, slide the end of collar under the two loops on the


other end. Overlap the ends of the collar until it is tight


and Chimney Cap


against the chimney. Bend the free end of the collar back


over the loops to hold the storm collar securely together.

CAUTION

Use pliers and wear gloves when


between the storm collar and chimney. This will make the


Trim off the excess ends of the storm collar.


handling the storm color The edge of

8.

Slide storm collar down snugly against the flashing until


the storm color is sharp. If you are not


the excess mastic left in step six is forced up into crack


careful, you could cut your hands.


joint between the flashing and the chimney watertight.


See Figure 26.


9.Place chimney cap into matching parts of the last chimney section. Push chimney cap down until the brackets on the bottom of the chimney cap sits on the chimney pipe. Punch or drill 1/8" diameter holes in the inlet air duct (chimney pipe) where specified on the brackets. Fasten chimney pipe down with the No. 8 screws provided. Note: Do not penetrate the inner stainless steel pipe while installing the screws.

10.Check all the parts of the fireplace, chimney and chimney termination cap. Make sure none have been damaged or bent during installation. Check to see that all parts have been properly installed.

Note: The metal used for chimney cap has a rust-protective coating but the cut edges of the parts are not protected. Detergent-wash and paint exposed parts of chimney cap with galvanized primer paint. This will prevent rusting and rust staining of nearby structures.

61D0008

23

Page 23
Image 23
Martin Fireplaces 400BWBCA, 400BWBIA, 400BWBCIA Chiimney Installation Chimney CAP Installation, Metal chimney components

400BWBCA, 400BWBCIA, 400BWBIA, 400BWBA specifications

Martin Fireplaces has established a reputation for crafting high-quality, innovative heating solutions that seamlessly blend function and style. The models 400BWBCIA, 400BWBA, 400BWBIA, and 400BWBCA showcase the company’s commitment to excellence in design and performance in the realm of modern fireplaces.

One of the standout features of these models is their sleek, contemporary design that fits perfectly in both traditional and modern home settings. The 400BWBCIA and 400BWBA are designed with an emphasis on a clean face appearance, eliminating any visible frames or trim to provide a minimalist aesthetic. This clean design maximizes the viewing area of the fire, creating a striking focal point in any room.

Each model is equipped with advanced technologies that enhance user experience and efficiency. The Martin Fireplaces utilize a high-efficiency wood-burning system, which not only produces ample heat but also ensures that the emissions are minimized. This eco-friendly approach aligns with contemporary standards for sustainability, making the models an excellent choice for environmentally conscious consumers.

The linear burner design found in the 400BWBIA and 400BWBCA models allows for a larger flame presentation, creating a mesmerizing effect. This design also optimizes heat output, ensuring that the warmth spreads evenly throughout the space. Additionally, the inclusion of glass doors ensures that the flames remain contained while still allowing for an unobstructed view.

Safety is another priority for Martin Fireplaces, and these models integrate several features to promote secure operation. The built-in air wash system keeps the glass clean, enhancing visibility of the flames while reducing maintenance efforts. Moreover, the combustion chamber is engineered to ensure a safe, efficient burn, protecting both the user and the environment.

The versatility of installation is another key characteristic. Both the 400BWBCIA and 400BWBA can be installed as direct vent units, allowing for flexible placement in a variety of settings. Meanwhile, the 400BWBIA and 400BWBCA are perfect for builders looking to integrate contemporary fireplaces into their designs without compromising floor space.

In conclusion, Martin Fireplaces’ 400BWBCIA, 400BWBA, 400BWBIA, and 400BWBCA models are exemplary representations of high-efficiency heating solutions that marry design, technology, and safety. With features that enhance both performance and aesthetics, these fireplaces are ideal for any modern home looking to add warmth and sophistication.