Over The Range
Installation Instructions
Contents
Electric Microwave
SAVE THESE INSTRUCTIONS
IMPORTANT SAFETY INFORMATION
PRECAUTIONS TO AVOID POSSIBLE EXPOSURE TO EXCESSIVE MICROWAVE ENERGY
SAVE THESE INSTRUCTIONS
Recognize this symbol as a SAFETY message
IMPORTANT SAFETY INFORMATION
SAVE THESE INSTRUCTIONS
Grounding Instructions
IMPORTANT SAFETY INFORMATION
Oven MUST be grounded. Grounding reduces
Make Sure You Have Enough Space And Support
IMPORTANT SAFETY INFORMATION
Damper/duct connector
Parts, Tools, Materials
THE FOLLOWING PARTS ARE SUPPLIED WITH THE OVEN
One power cord clamp and
You will need the following tools and materials for the installation
Parts, Tools, Materials
AVOID ELECTRICAL SHOCK! THIS APPLIANCE MUST BE GROUNDED
STEP 1 Prepare The Electrical Connection
W A R N I N G
This appliance MUST be grounded
W A R N I N G - F I R E H A Z A R D
REMEMBER AS YOU INSTALL THE VENTING
STEP 2 Prepare The Venting System
THIS OVEN MUST BE PROPERLY VENTED
STEP 2 Prepare The Venting System
Standard Fittings
Duct Length
Examples
STEP 3 Prepare The Venting Blower
Room-Vented recirculating Installation
Wall-Vented Installation
Before You Start
Figure 15 ports
Roof-Vented Installation
STEP 3 Prepare The Venting Blower
W A R N I N G
STEP 4 Prepare The Wall & Upper Cabinet
Measure And Track/Tape Up The Templates
W A R N I N G
To avoid risk of personal injury, electrical shock or death
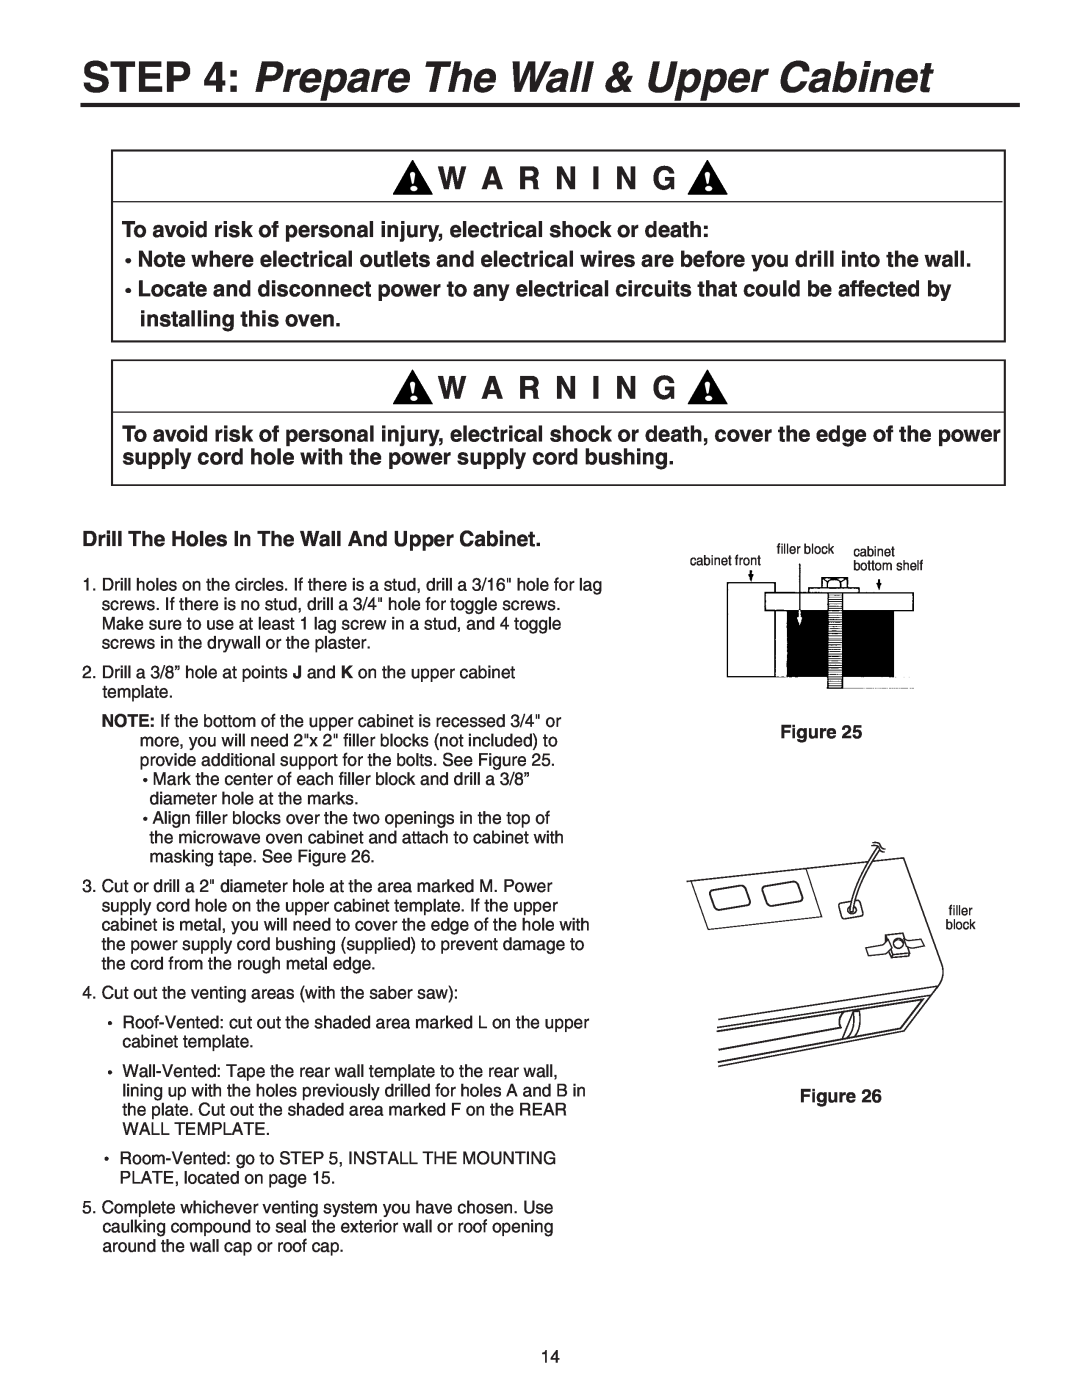
STEP 4 Prepare The Wall & Upper Cabinet
W A R N I N G
STEP 5 Install The Mounting Plate
The Oven Must Be Connected To At Least One Wall Stud
For Wall-Vented
STEP 5 Install The Mounting Plate
STEP 6 Attach The Oven To The Wall
W A R N I N G
5. Roof venting installation See Figure
STEP 6 Attach The Oven To The Wall
Microondas eléctrico
Sobre la estufa
Instrucciones de instalación
Contenido
CONSERVE ESTAS INSTRUCCIONES
INFORMACIÓN IMPORTANTE DE SEGURIDAD
PRECAUCIONES PARA EVITAR LA EXPOSICIÓN
PRECAUCIÓN
INFORMACIÓN IMPORTANTE DE SEGURIDAD
ADVERTENCIA
Reconozca este símbolo como un mensaje de SEGURIDAD
CONSERVE ESTAS INSTRUCCIONES
CONSERVE ESTAS INSTRUCCIONES
Instrucciones para la Puesta a Tierra
INFORMACIÓN IMPORTANTE DE SEGURIDAD
ADVERTENCIA
Asegúrese de tener suficiente espacio y ayuda
INFORMACIÓN IMPORTANTE DE SEGURIDAD
ADVERTENCIA
Un gabarit pour le mur arrière - Dimensions réduites
Piezas, herramientas, materiales
LAS SIGUIENTES PIEZAS SE SUMINISTRAN CON EL HORNO
Puerta de tiro invertido, conector del ducto
Piezas, herramientas, materiales
Cartón u otros materiales resistentes para cubrir el mostrador
¡EVITE LAS DESCARGAS ELÉCTRICAS
PASO 1 Preparación de la conexiones eléctricas
A D V E R T E N C I A
¡ESTE ELECTRODOMÉSTICO DEBE ESTAR CONECTADO A TIERRA
¡ESTE HORNO DEBE ESTAR BIEN VENTILADO
PASO 2 Preparación del sistema de ventilación
ADVERTENCIA PELIGRO DE INCENDIO
TENGA EN CUENTA LO SIGUIENTE MIENTRAS INSTALA LA VENTILA
PASO 2 Preparación del sistema de ventilación
Accesorios estándar
Longitud del ducto
Figura
Retire la placa de montaje
PASO 3 Preparación del ventilador
Antes de comenzar
Instalación de ventilación ambiente recirculación
Figura
Instalación de ventilación en techo
PASO 3 Preparación del ventilador
Figura 15 escape
Mida las plantillas y márquelas con cinta métrica
PASO 4 Preparación de los gabinetes de pared y superior
PRECAUCIÓN
A D V E R T E N C I A
A D V E R T E N C I A
Taladre los orificios en la pared y en el gabinete superior
PASO 4 Preparación de los gabinetes de pared y superior
A D V E R T E N C I A
El horno debe estar fijado a un travesaño como mínimo
PASO 5 Instalación de la placa de montaje
Figura
Figura
Figura
PASO 5 Instalación de la placa de montaje
Figura
Para ventilación en pared
Figura
PASO 6 Sujeción del horno a la pared
A D V E R T E N C I A
Figura
Figura
PASO 6 Sujeción del horno a la pared
Figura
Figura
Électrique à micro-ondes
Mise en service
Au- dessus de la cuisinière
Table des matières
CONSERVER CES INSTRUCTIONS
CONSIGNES DE SÉCURITÉ IMPORTANTES PRÉCAUTIONS CONTRE LES RISQUES
DEXPOSITION À UN EXCÈS DE MICRO-ONDES
AVERTISSEMENT
Ce symbole signale un message de SÉCURITÉ
CONSIGNES DE SÉCURITÉ IMPORTANTES
CONSERVER CES INSTRUCTIONS
CONSIGNES DE SÉCURITÉ IMPORTANTES
CONSERVEZ CES INSTRUCTIONS
Instructions de liaison à la terre
Il FAUT que ce
AVERTISSEMENT
Utiliser le gabarit inclus avec la notice de mise en service
CONSIGNES DE SÉCURITÉ IMPORTANTES
AVERTISSEMENT
Clapet de refoulement / raccord de conduit
Pièces, outils, matériaux
LES PIÈCES SUIVANTES SONT FOURNIES AVEC LE FOUR
Un serre-câble et une vis de couleur foncée
Il faut les outils et matériaux suivants
Pièces, outils, matériaux
ÉVITER L’ÉLECTROCUTION ! CET APPAREIL DOIT ÊTRE RELIÉ À LA TERRE
ÉTAPE 1 Préparer le raccordement à l’électricité
A V E R T I S S E M E N T
dommages corporels
CE FOUR DOIT ÊTRE RACCORDÉ À UNE ÉVACUATION APPROPRIÉE
ÉTAPE 2 Préparer l’évacuation
AVERTISSEMENT- RISQUE D’INCENDIE
PENDANT LA POSE DU MATÉRIEL D’ÉVACUATION, NE PAS OUBLIER
ÉTAPE 2 Préparer l’évacuation
Matériel standard
Longueur de conduit
Examples
Retirer la plaque de montage
ÉTAPE 3 Préparer le ventilateur d’évacuation
Avant de commencer
Évacuation dans la pièce recirculation de l’air
Évacuation par le toit
ÉTAPE 3 Préparer le ventilateur d’évacuation
ÉTAPE 4 Préparer le mur et l’armoire supérieure
A V E R T I S S E M E N T
A V E R T I S S E M E N T
Percer les trous dans le mur et l’armoire supérieure
ÉTAPE 4 Préparer le mur et l’armoire supérieure
A V E R T I S S E M E N T
ÉTAPE 5 Poser la plaque de montage
Le four doit être fixé à au moins un montant de mur
Ouvrir la découpe de la boîte pour le conduit mural arrière
ÉTAPE 5 Poser la plaque de montage
Évacuation par le mur
cordon d’alimentation
ÉTAPE 6 Fixer le four au mur
A V E R T I S S E M E N T
ÉTAPE 6 : Fixer le four au mur
Évacuation par le toit Poser le conduit d’évacuation dans
Page
Part No.8101P641-60
Form No. A/04/04
2004 Maytag Appliance
3828W5U0363