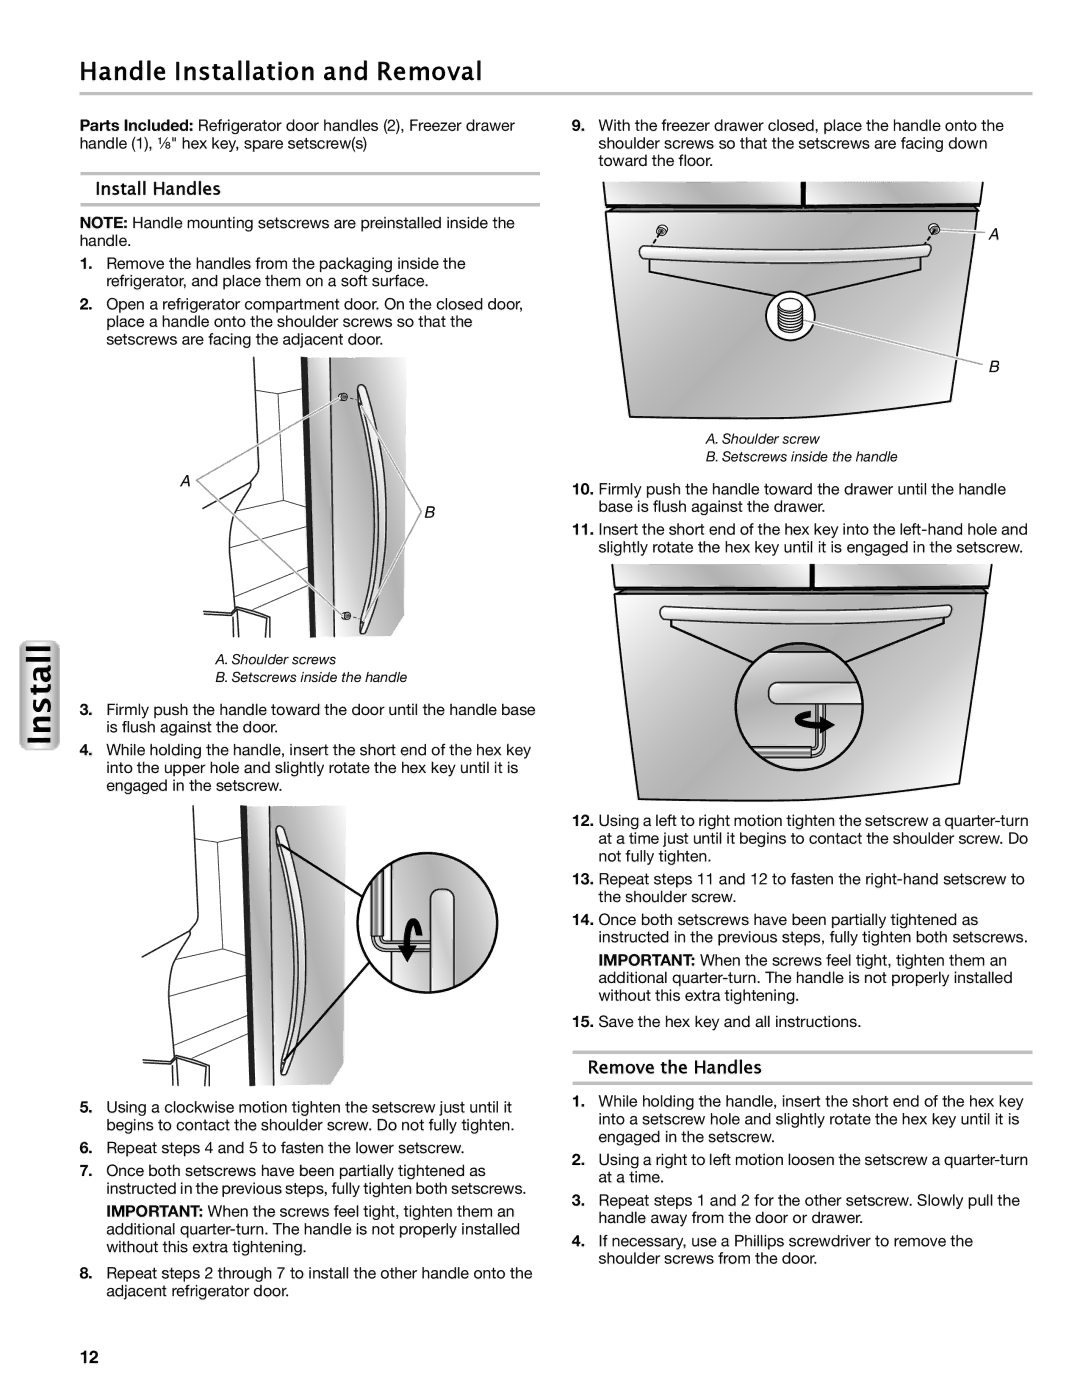
Handle Installation and Removal

Parts Included: Refrigerator door handles (2), Freezer drawer

9. With the freezer drawer closed, place the handle onto the

handle (1), ¹⁄₈" hex key, spare setscrew(s)

shoulder screws so that the setscrews are facing down


toward the floor.

Install Handles

NOTE: Handle mounting setscrews are preinstalled inside the handle.

1.Remove the handles from the packaging inside the refrigerator, and place them on a soft surface.

2.Open a refrigerator compartment door. On the closed door, place a handle onto the shoulder screws so that the setscrews are facing the adjacent door.

A

B

Install

A

B

A. Shoulder screws

B. Setscrews inside the handle

3.Firmly push the handle toward the door until the handle base is flush against the door.

4.While holding the handle, insert the short end of the hex key into the upper hole and slightly rotate the hex key until it is engaged in the setscrew.

A. Shoulder screw

B. Setscrews inside the handle

10.Firmly push the handle toward the drawer until the handle base is flush against the drawer.

11.Insert the short end of the hex key into the left-hand hole and slightly rotate the hex key until it is engaged in the setscrew.

12.Using a left to right motion tighten the setscrew a quarter-turn at a time just until it begins to contact the shoulder screw. Do not fully tighten.

13.Repeat steps 11 and 12 to fasten the right-hand setscrew to the shoulder screw.

14.Once both setscrews have been partially tightened as instructed in the previous steps, fully tighten both setscrews.

IMPORTANT: When the screws feel tight, tighten them an additional quarter-turn. The handle is not properly installed without this extra tightening.

15.Save the hex key and all instructions.

Remove the Handles

5.Using a clockwise motion tighten the setscrew just until it begins to contact the shoulder screw. Do not fully tighten.

6.Repeat steps 4 and 5 to fasten the lower setscrew.

7.Once both setscrews have been partially tightened as instructed in the previous steps, fully tighten both setscrews.

IMPORTANT: When the screws feel tight, tighten them an additional quarter-turn. The handle is not properly installed without this extra tightening.

8.Repeat steps 2 through 7 to install the other handle onto the adjacent refrigerator door.

1.While holding the handle, insert the short end of the hex key into a setscrew hole and slightly rotate the hex key until it is engaged in the setscrew.

2.Using a right to left motion loosen the setscrew a quarter-turn at a time.

3.Repeat steps 1 and 2 for the other setscrew. Slowly pull the handle away from the door or drawer.

4.If necessary, use a Phillips screwdriver to remove the shoulder screws from the door.

12

Page 12
Image 12
Maytag W10558103A manual Handle Installation and Removal, Install Handles, Remove the Handles

W10558103A specifications

The Maytag W10558103A is a high-quality appliance designed to enhance the efficiency and convenience of everyday laundry tasks. This top-load agitator washing machine stands out in a crowded market thanks to its robust construction, advanced features, and user-friendly interface.

One of the most notable features of the Maytag W10558103A is its powerful Agitator system. This allows for thorough and effective cleaning of clothes, ensuring that dirt and stains are removed with ease. The agitator's design helps to move the laundry around the drum, providing an optimized wash cycle that penetrates even the toughest fabrics. This feature is particularly beneficial for families or individuals with active lifestyles who require their garments to be cleaned thoroughly.

Another highlight is the large capacity of the drum, which provides ample space for bulky items like comforters or multiple loads of laundry at once. With a capacity of 4.7 cu. ft., this washer can handle family-sized loads, saving users both time and energy. The machine is designed with efficiency in mind, allowing for fewer trips to the laundromat and reducing water and energy consumption.

The Maytag W10558103A also incorporates advanced technology with its PowerWash Cycle. This innovative cycle features extra cleaning action and a prolonged wash time, ensuring that stubborn stains are eliminated, even in heavily soiled laundry. It provides users with a tailored laundry experience, adapting to the needs of various types of fabric and soil levels.

Durability is a hallmark characteristic of Maytag appliances, and the W10558103A is no exception. Built with commercial-grade components, including a high-performance motor and stainless-steel wash basket, this washing machine is designed to withstand the rigors of daily use. The robust construction not only enhances longevity but also helps in maintaining performance over time.

Moreover, the user-friendly control panel offers a range of wash cycles, including Normal, Heavy Duty, Delicate, and Quick Wash. This versatility allows users to customize their washing experience based on the specific requirements of each load. The intuitive design makes it easy for everyone in the household to operate the machine without difficulty.

In summary, the Maytag W10558103A is a top-tier washing machine that combines powerful cleaning capabilities, ample capacity, and durable construction, making it a valuable addition to any home. With its innovative features and advanced technology, it promises to meet the diverse laundry needs of modern households while delivering reliable performance for years to come.