Output B Settings

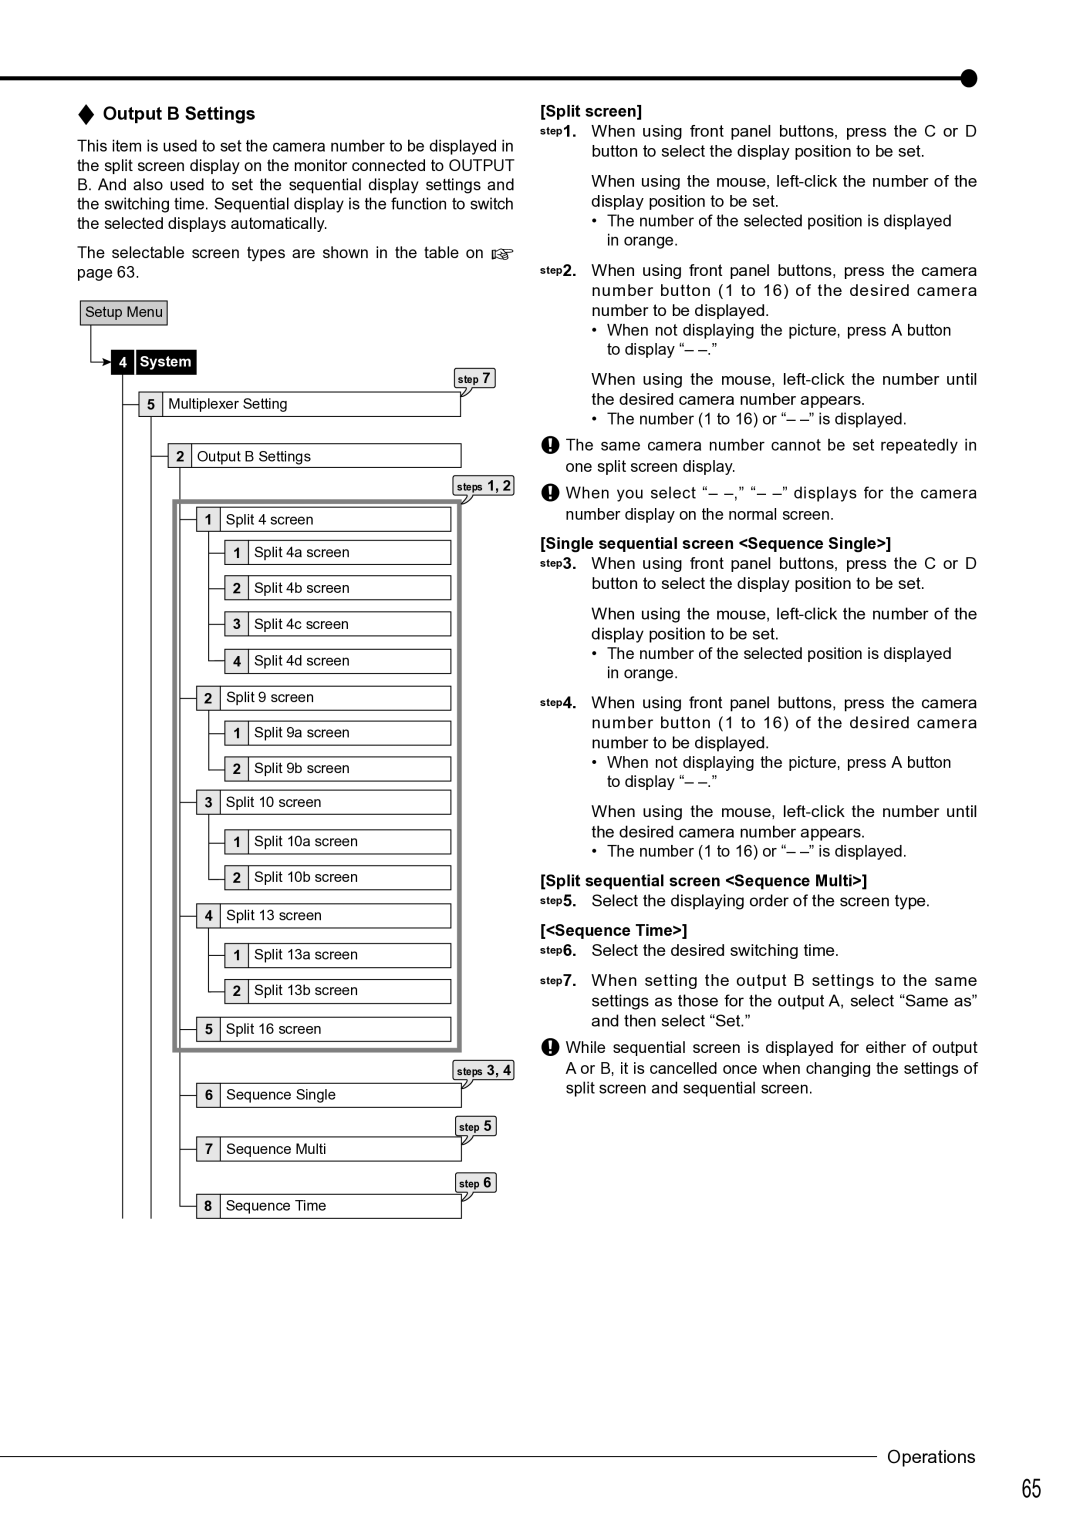
This item is used to set the camera number to be displayed in the split screen display on the monitor connected to OUTPUT B. And also used to set the sequential display settings and the switching time. Sequential display is the function to switch the selected displays automatically.

The selectable screen types are shown in the table on page 63.

Setup Menu

4 System

step 7

5Multiplexer Setting

2Output B Settings

steps 1, 2

1Split 4 screen

1Split 4a screen

2Split 4b screen

3Split 4c screen

4Split 4d screen

2Split 9 screen

1Split 9a screen

2Split 9b screen

3Split 10 screen

1Split 10a screen

2Split 10b screen

4Split 13 screen

1Split 13a screen

2Split 13b screen

5Split 16 screen

steps 3, 4

6Sequence Single

step 5

7Sequence Multi

step 6

8Sequence Time

[Split screen]

step1. When using front panel buttons, press the C or D

button to select the display position to be set.

When using the mouse, left-click the number of the display position to be set.

The number of the selected position is displayed in orange.

step2. When using front panel buttons, press the camera number button (1 to 16) of the desired camera number to be displayed.

When not displaying the picture, press A button to display “– –.”

When using the mouse, left-click the number until the desired camera number appears.

• The number (1 to 16) or “– –” is displayed.

The same camera number cannot be set repeatedly in one split screen display.

When you select “– –,” “– –” displays for the camera number display on the normal screen.

[Single sequential screen <Sequence Single>]

step3. When using front panel buttons, press the C or D

button to select the display position to be set.

When using the mouse, left-click the number of the display position to be set.

The number of the selected position is displayed in orange.

step4. When using front panel buttons, press the camera number button (1 to 16) of the desired camera number to be displayed.

When not displaying the picture, press A button to display “– –.”

When using the mouse, left-click the number until the desired camera number appears.

• The number (1 to 16) or “– –” is displayed.

[Split sequential screen <Sequence Multi>]

step5. Select the displaying order of the screen type.

[<Sequence Time>]

step6. Select the desired switching time.

step7. When setting the output B settings to the same settings as those for the output A, select “Same as” and then select “Set.”

While sequential screen is displayed for either of output A or B, it is cancelled once when changing the settings of split screen and sequential screen.

Operations

65

Page 68
Image 68
Mitsubishi Electronics DX-TL4516U instruction manual Output B Settings

DX-TL4516U specifications

The Mitsubishi Electronics DX-TL4516U is a cutting-edge digital video recorder (DVR) designed for security and surveillance applications. This advanced DVR excels in providing reliable video management along with comprehensive features suitable for various environments, from small businesses to larger enterprise settings.

At the heart of the DX-TL4516U is its ability to support 16-channel recording, which allows users to monitor multiple points simultaneously. The device accommodates both analog and IP cameras, making it a versatile choice for users looking to upgrade their existing systems or implement a new setup. The hybrid functionality ensures that users can maximize their investment in existing camera infrastructure while seamlessly integrating new technology.

One of the standout features of the DX-TL4516U is its high-resolution recording capability. The DVR supports video recordings at 4CIF resolution, providing clear and detailed images for critical monitoring. This clarity ensures that surveillance footage can be used effectively for identification and analysis, which is crucial in security applications.

Another key technology included in the DX-TL4516U is its built-in storage management system. With a capacity of up to 8TB through an internal hard drive, users benefit from extended recording times without needing frequent data management. The DVR's intelligent overwrite functionality automatically recycles older footage, ensuring that critical newer recordings remain accessible.

The user interface of the DX-TL4516U is designed for ease of use, featuring an intuitive menu system that simplifies navigation through settings and playback options. Remote access capabilities are also integrated, allowing users to view live feeds or recorded footage from virtually anywhere using a compatible device connected to the internet.

Multiple backup options, including USB and network protocols, provide robust data protection measures. The DX-TL4516U efficiently supports remote backup and data transfer, which is essential for businesses that require stringent data security protocols.

In terms of networking features, the device includes support for dynamic IP addresses and can be integrated into various network environments, enhancing its adaptability to different user needs and settings.

Overall, the Mitsubishi Electronics DX-TL4516U emerges as a formidable player in the DVR market, offering an exceptional blend of performance, reliability, and user-friendly features. Its robust architecture and cutting-edge technologies make it an ideal solution for effective surveillance management across diverse applications.