505. TV Menus
 Lock Menu, continued
 Parent Menu Options
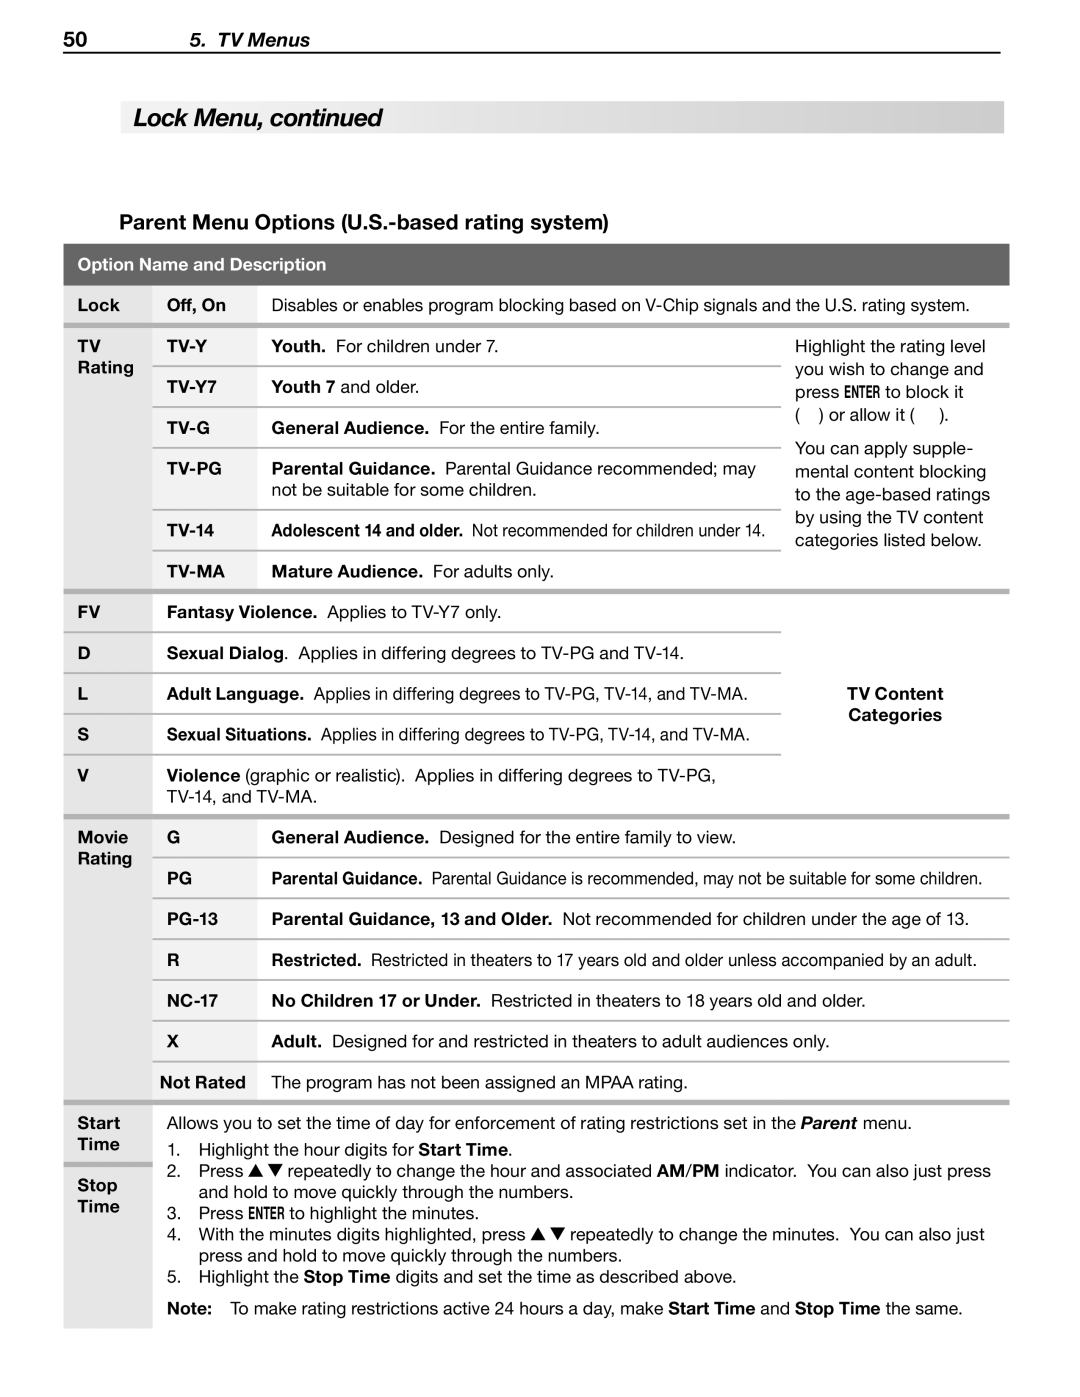
 (U.S.-based rating system)
Option Name and Description
Lock | Off, On | Disables or enables program blocking based on | ||
|
|
|
| |
TV |
| Youth. For children under 7. | Highlight the rating level | |
Rating |
|
| you wish to change and | |
| Youth 7 and older. | |||
| press ENTER to block it | |||
|
|
| ( ) or allow it ( ). | |
|
| General Audience. For the entire family. | ||
|
| |||
|
|
| You can apply supple- | |
|
| Parental Guidance. Parental Guidance recommended; may | ||
| mental content blocking | |||
|
| not be suitable for some children. | to the | |
|
|
| by using the TV content | |
| Adolescent 14 and older. Not recommended for children under 14. | |||
| categories listed below. | |||
|
|
| ||
|
| Mature Audience. For adults only. |
| |
|
|
| ||
FV | Fantasy Violence. Applies to |
| ||
DSexual Dialog. Applies in differing degrees to
L | Adult Language. Applies in differing degrees to | TV Content |
|
| Categories |
|
|
SSexual Situations. Applies in differing degrees to
VViolence (graphic or realistic). Applies in differing degrees to
Movie | G | General Audience. Designed for the entire family to view. | |
Rating |
|
| |
PG | Parental Guidance. Parental Guidance is recommended, may not be suitable for some children. | ||
| |||
|
|
| |
| Parental Guidance, 13 and Older. Not recommended for children under the age of 13. | ||
|
|
| |
| R | Restricted. Restricted in theaters to 17 years old and older unless accompanied by an adult. | |
|
|
| |
| No Children 17 or Under. Restricted in theaters to 18 years old and older. | ||
|
|
| |
| X | Adult. Designed for and restricted in theaters to adult audiences only. | |
|
|
| |
| Not Rated | The program has not been assigned an MPAA rating. | |
|
|
|
Start Time
Stop Time
Allows you to set the time of day for enforcement of rating restrictions set in the Parent menu.
1.Highlight the hour digits for Start Time.
2.Press ![]()
![]() repeatedly to change the hour and associated AM/PM indicator. You can also just press and hold to move quickly through the numbers.
repeatedly to change the hour and associated AM/PM indicator. You can also just press and hold to move quickly through the numbers.
3.Press ENTER to highlight the minutes.
4.With the minutes digits highlighted, press ![]()
![]() repeatedly to change the minutes. You can also just press and hold to move quickly through the numbers.
repeatedly to change the minutes. You can also just press and hold to move quickly through the numbers.
5.Highlight the Stop Time digits and set the time as described above.
Note: To make rating restrictions active 24 hours a day, make Start Time and Stop Time the same.