626. NetCommand IR Control (736 and 835 Series TVs)
Setting Up NetCommand Control of an A/V Receiver, continued
| EMITTER |
|
|
|
|
|
|
|
|
|
|
|
|
|
L |
|
|
|
|
|
|
|
|
|
|
|
|
|
|
R |
|
|
|
|
|
|
|
|
|
|
|
|
|
|
| AVR |
|
|
|
|
|
|
|
|
|
|
| HDMI |
|
| AUDIO |
|
|
|
|
|
|
|
|
|
|
|
| |
| OUTPUT | DVI/PC | INPUT |
| R | AUDIO | L | VIDEO |
| VIDEO: 480i/480p/720p/1080i/1080p |
| |||
|
|
|
| AUDIO: PCM STEREO |
| |||||||||
| L | R | AUDIO |
| L |
|
|
|
| 3 | PC: VGA, |
| ||
|
|
|
|
|
|
|
|
|
| INPUT | XGA, |
| ||
|
|
|
|
|
|
|
|
|
|
| Output / External | HDMI |
| |
ANT 2 / AUX |
|
|
|
|
|
|
| Pb |
|
| Pr 2 | Controller Input |
| |
R |
|
|
|
| Y |
|
|
| 1 | 2 | 3 | |||
ANT 1 / MAIN |
|
|
|
|
|
|
|
|
| INPUT | ||||
|
|
|
|
|
|
|
|
|
|
|
|
|
| |
DIGITAL |
|
|
|
|
| Y/ VIDEO |
| Pb |
| Pr |
|
|
|
|
AUDIO |
|
|
|
|
|
|
|
|
|
| 1 |
|
|
|
OUTPUT | DIGITAL | R | AUDIO | L |
| (480i / 480p / 720p / 1080i) | INPUT |
|
| |||||
|
|
|
|
|
|
|
|
|
|
| INPUT 3 |
|
| |
| AUDIO |
|
|
|
|
|
|
|
|
|
|
|
|
|
| OUTPUT |
|
|
|
|
|
|
|
|
|
|
|
|
|
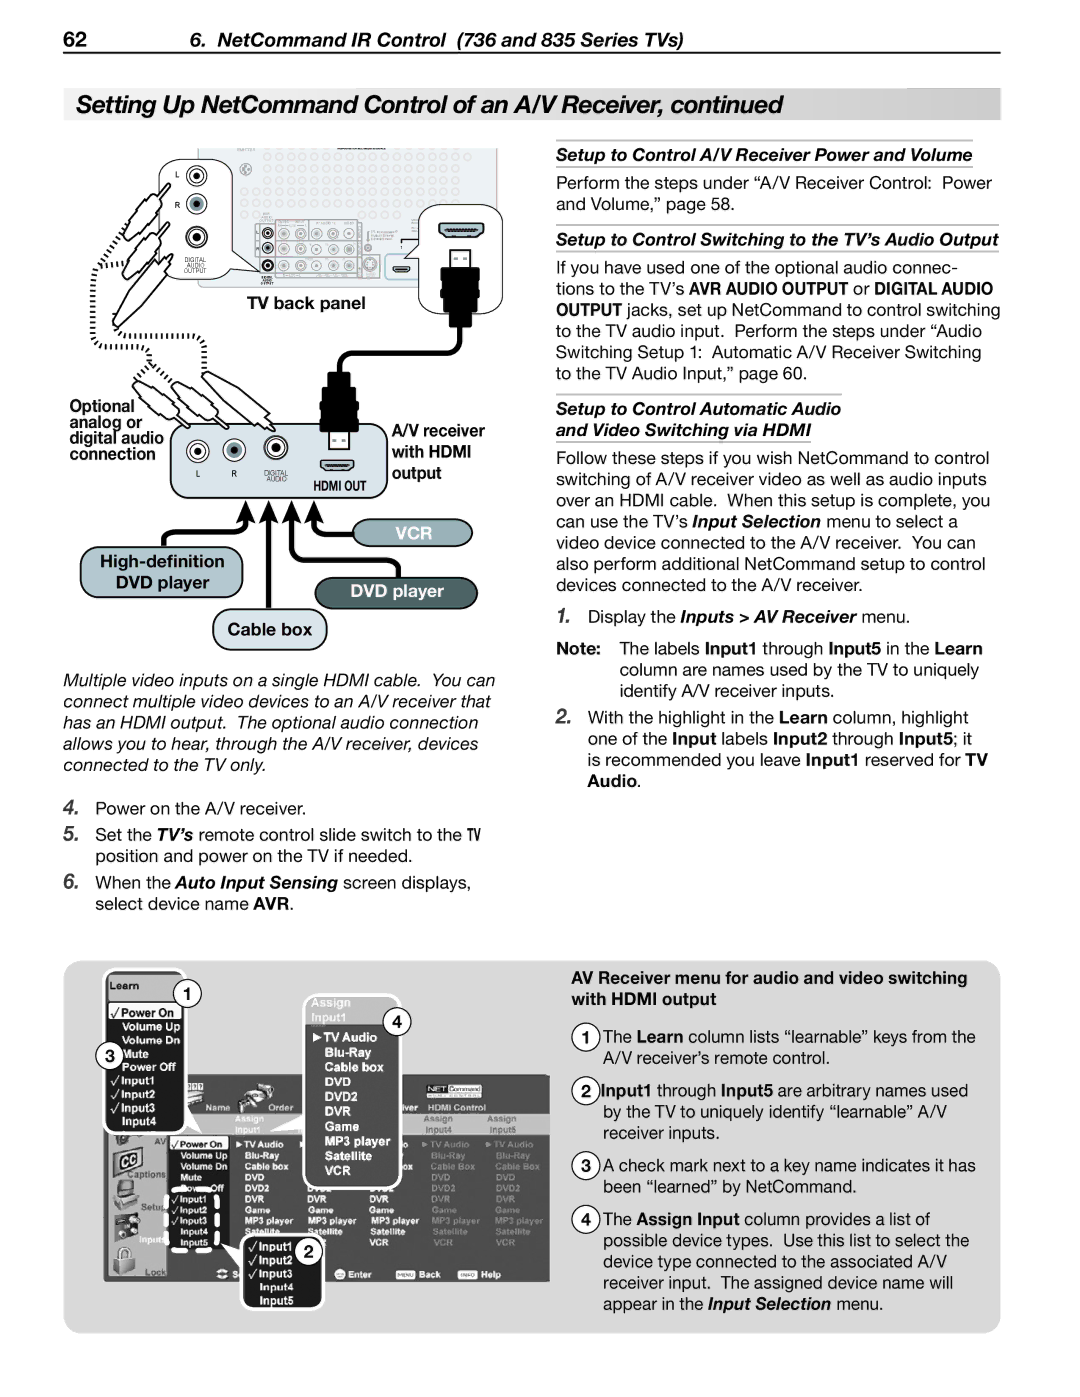
TV back panel
Optional |
|
|
analog or |
| A/V receiver |
digital audio |
| |
| with HDMI | |
connection |
| |
L R AUDIO |
| output |
DIGITAL | HDMI OUT |
|
|
| |
|
| VCR |
|
| |
DVD player | DVD player | |
| ||
Cable box |
|
|
Multiple video inputs on a single HDMI cable. You can connect multiple video devices to an A/V receiver that has an HDMI output. The optional audio connection allows you to hear, through the A/V receiver, devices connected to the TV only.
4.Power on the A/V receiver.
5.Set the TV’s remote control slide switch to the TV position and power on the TV if needed.
6.When the Auto Input Sensing screen displays, select device name AVR.
Setup to Control A/V Receiver Power and Volume
Perform the steps under “A/V Receiver Control: Power and Volume,” page 58.
Setup to Control Switching to the TV’s Audio Output
If you have used one of the optional audio connec- tions to the TV’s AVR AUDIO OUTPUT or DIGITAL AUDIO OUTPUT jacks, set up NetCommand to control switching to the TV audio input. Perform the steps under “Audio Switching Setup 1: Automatic A/V Receiver Switching to the TV Audio Input,” page 60.
Setup to Control Automatic Audio and Video Switching via HDMI
Follow these steps if you wish NetCommand to control switching of A/V receiver video as well as audio inputs over an HDMI cable. When this setup is complete, you can use the TV’s Input Selection menu to select a video device connected to the A/V receiver. You can also perform additional NetCommand setup to control devices connected to the A/V receiver.
1.Display the Inputs > AV Receiver menu.
Note: The labels Input1 through Input5 in the Learn column are names used by the TV to uniquely identify A/V receiver inputs.
2.With the highlight in the Learn column, highlight one of the Input labels Input2 through Input5; it is recommended you leave Input1 reserved for TV Audio.
1
4
3
3
2
AV Receiver menu for audio and video switching with HDMI output
1The Learn column lists “learnable” keys from the A/V receiver’s remote control.
2Input1 through Input5 are arbitrary names used by the TV to uniquely identify “learnable” A/V receiver inputs.
3A check mark next to a key name indicates it has been “learned” by NetCommand.
4The Assign Input column provides a list of possible device types. Use this list to select the device type connected to the associated A/V receiver input. The assigned device name will appear in the Input Selection menu.