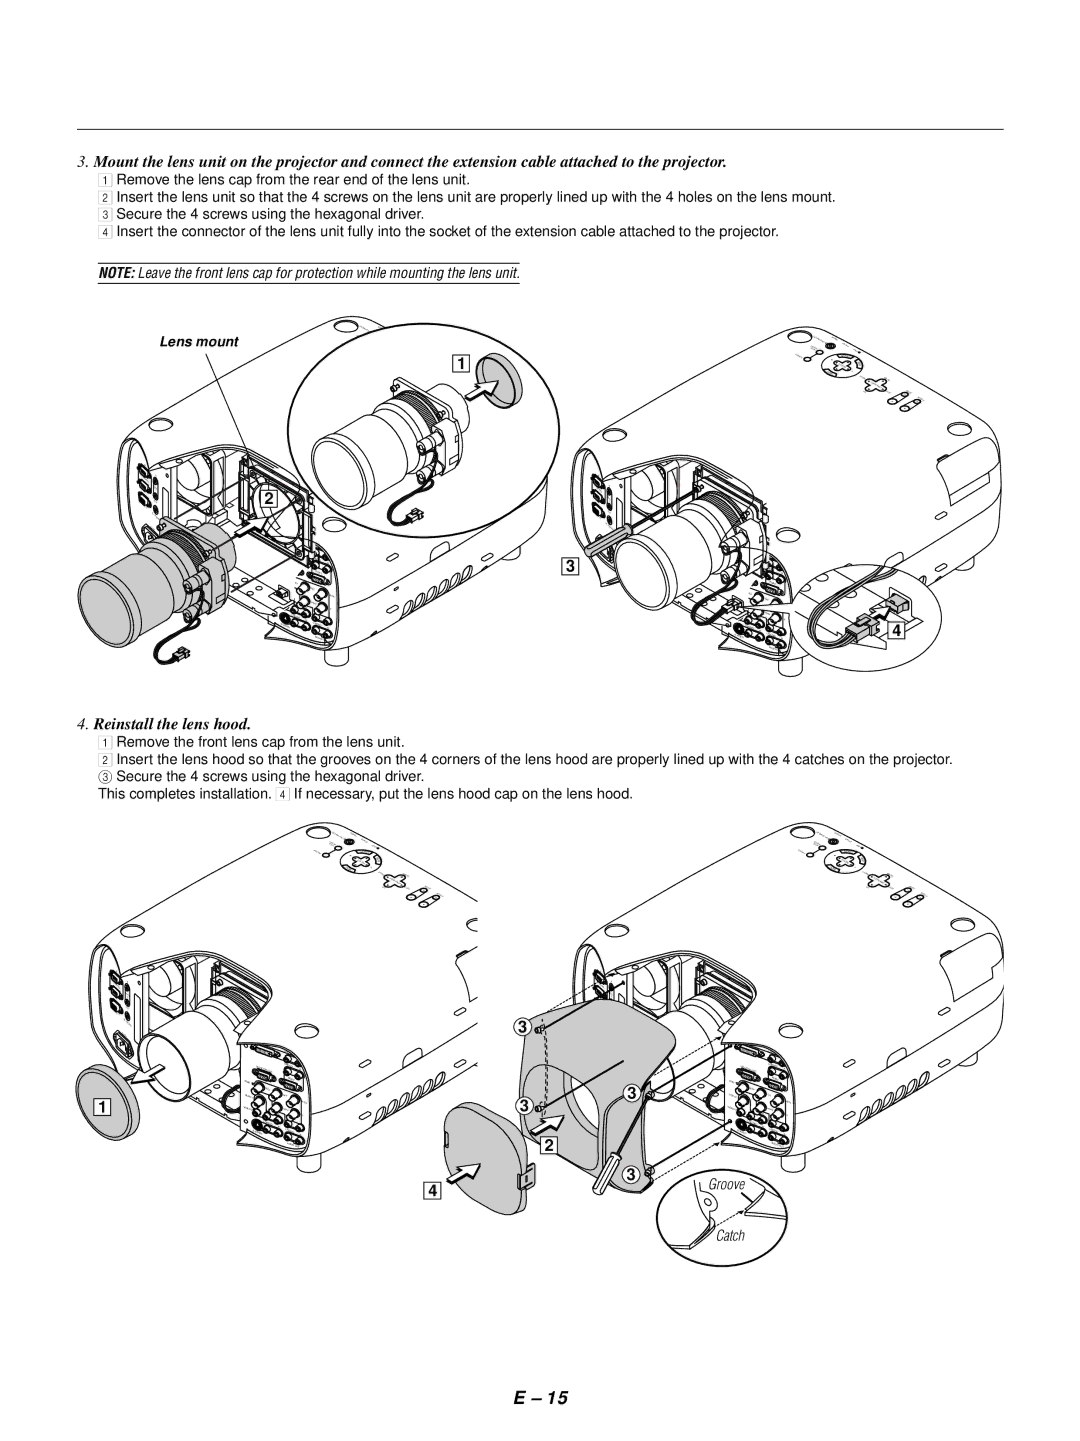
3.Mount the lens unit on the projector and connect the extension cable attached to the projector.

1 Remove the lens cap from the rear end of the lens unit.

2 Insert the lens unit so that the 4 screws on the lens unit are properly lined up with the 4 holes on the lens mount. 3 Secure the 4 screws using the hexagonal driver.

4 Insert the connector of the lens unit fully into the socket of the extension cable attached to the projector.

NOTE: Leave the front lens cap for protection while mounting the lens unit.

Lens mount

ECR

UOS

YB

DNA TS

RE

WOP


/NO


SUTATS

OTSUJD


A


TUA


PMAL


NAC


CT

R


LE SE


U


NEM


T

RIGH

N

OWD


IFTSH


NS LE


UP


FT LE

1

OMOZ


US

OCF


YBD

NAT


RE

WOP


/SN O


S

UTA TS

TS


OTUJDA


PM AL

UA


ECRUOS


N AC

R

ELECTS

UNEM

RIGHT


WNDO


SHIFT

LENS


UP


FTLE

ZOOM

FOCUS

I

N

P

IN

CC

ONT


ROL


REM


OTE

OUT

2

R

OUT

EMO


TE1


SC,


TRI


GGER


A


CIN

2

VI


L/MONO

R


MONITOR


L/MONO


OUT


R

RGB 2


RGB 1


R/Cr


VIDEO 1


G/Y


B/Cb

VIDEO 2

L/MONO


H/HV


R


V


L/MONO

R


L/MONO


S-

VIDEO


R


AUDIO

OUT

I

N

PCC

IN

ONT


ROL


R


EMO

OUT

2TE

O UT R E M OTE 1

S

C,

T

RI

G

GE

R

A

C

I

N

3


VI


L/MONO

R


MONITOR


L/MONO


OUT


R


RGB 2


RGB 2


R/Cr


VIDEO 1


G/Y


VIDEO 2

L/MONO


H/HV


R


V


L/MONO

R


4


L/MONO


S-VIDEO


R


AUDIO

OUT


4.Reinstall the lens hood.

1Remove the front lens cap from the lens unit.

2Insert the lens hood so that the grooves on the 4 corners of the lens hood are properly lined up with the 4 catches on the projector.

3 Secure the 4 screws using the hexagonal driver.

This completes installation. 4 If necessary, put the lens hood cap on the lens hood.

ECR UOS

YB

DNAT/S


RE

WOP


NO


SUTATS

TS


OTUJD A


PM AL

UA


NAC


TC

R


ELE S


U


NEM


THGIR

W OD


N


TFIHS


SN EL


PU

TF EL

MOOZ

S

UCOF


ECR

UOS


YB

DNAT/S


RE WO


NO


S

UTATS

TS U


OT

UAJDA


P


M AL


NAC

R

TCELES

UNEM

THGIR


N

WO D


TFI HS

SNEL


PU


TFEL

MOOZ

SUCOF

IN

PC

IN

CONTROL


RE


MOTE

OUT

2

RE

OUT

MOTE1


SC,


TRI


GGER


ACIN

1


DVI


L/MONO

R


MONITOR


L/MONO


OUT


R

RGB 1


RGB 2


R/Cr


VIDEO 1


G/Y


B/Cb

VIDEO 2

L/MONO


H/HV


R


V


L/MONO

R


L/MONO


S-

VIDEO


R


AUDIO

OUT

4

IN

PCC

IN

ONTROL


REM

OUT

2OTE


OUT


REM


OTE1

3

SC,

TRIG

GER

ACIN

3

3

2

3


DVI


L/MONO

R


MONITOR


L/MONO


OUT


R


RGB 1


RGB 2


R/Cr


VIDEO 1


G/Y


B/Cb

VIDEO 2

L/MONO


H/HV


R


V


L/MONO

R


L/MONO


S-

VIDEO


R


AUDIO

OUT

Groove

Catch

E – 15

Page 23
Image 23
NEC GT1150 user manual Reinstall the lens hood, Lens mount

GT1150 specifications

The NEC GT1150 is a high-performance projector designed to meet the demands of various applications in educational, business, and professional environments. Equipped with advanced technologies, it offers exceptional image quality and versatility, making it an ideal choice for presentations and multimedia displays.

One of the standout features of the NEC GT1150 is its brightness. With a remarkable output of 5,000 ANSI lumens, the projector delivers vibrant images even in well-lit rooms. This high brightness level ensures that presentations can be seen clearly in various lighting conditions, lending itself to classrooms, conference rooms, and auditoriums alike.

The resolution of the GT1150 is another key aspect. It supports XGA (1024 x 768), which provides a sharp and detailed image, crucial for displaying text-heavy presentations or intricate visuals. The projector’s contrast ratio enhances this experience, offering deep blacks and bright whites, thus elevating the overall viewing experience for audiences.

In terms of connectivity, the NEC GT1150 is equipped with multiple input options. It includes VGA, composite, and S-Video connections, enabling users to connect a variety of devices such as laptops, document cameras, and DVD players seamlessly. Additionally, the projector features a built-in 10-watt speaker, providing adequate sound output for most presentation settings.

Another interesting characteristic of the GT1150 is its portability. Weighing approximately 7.5 pounds, it is designed with ease of transport in mind, allowing users to set it up quickly in different locations. This mobility makes it a preferred choice for educators and business professionals who need to move between multiple venues regularly.

The GT1150 is also designed with user convenience in mind. It features an intuitive on-screen menu, providing easy access to a range of functions including picture adjustments, source selection, and setup options. This user-friendly interface contributes to a smoother operation, allowing presenters to focus on their content rather than technical difficulties.

Moreover, the NEC GT1150 is built to last, with an expected lamp life of up to 4,000 hours in normal mode, which can stretch to 5,000 hours in eco mode. This longevity reduces maintenance costs and minimizes downtime due to lamp replacements.

In summary, the NEC GT1150 is a versatile and robust projector that excels in delivering high-quality images, a variety of connectivity options, and user-friendly features, making it an excellent choice for a wide array of presentations and multimedia applications. Whether in the classroom or a corporate setting, the GT1150 helps ensure that your content is delivered effectively and efficiently.