MultiSync LCD2090UXi
Utilisation de la fonction de luminosité automatique
Index
FCC Information
Canadian Department of Communications Compliance Statement
Contents
Figure A.1
Quick Start
Highest Stand Position
Power
Raising and Lowering Monitor Screen
Button
Tilt Swivel
Screen Rotation
Pull lever towards stand Slide lever to the right
Remove Stand for Mounting
Figure F.1
Flexible Arm Installation
Landscape Portrait
Controls
Auto Adjust Analog input only
Black Level Adjusts the black level
Brightness/Contrast Controls
Image Controls
Tools
AccuColor Control Systems
Controls
There are four ways to use OSM Lock OUT function
Menu Tools
Information
Making the viewing experience more comfortable
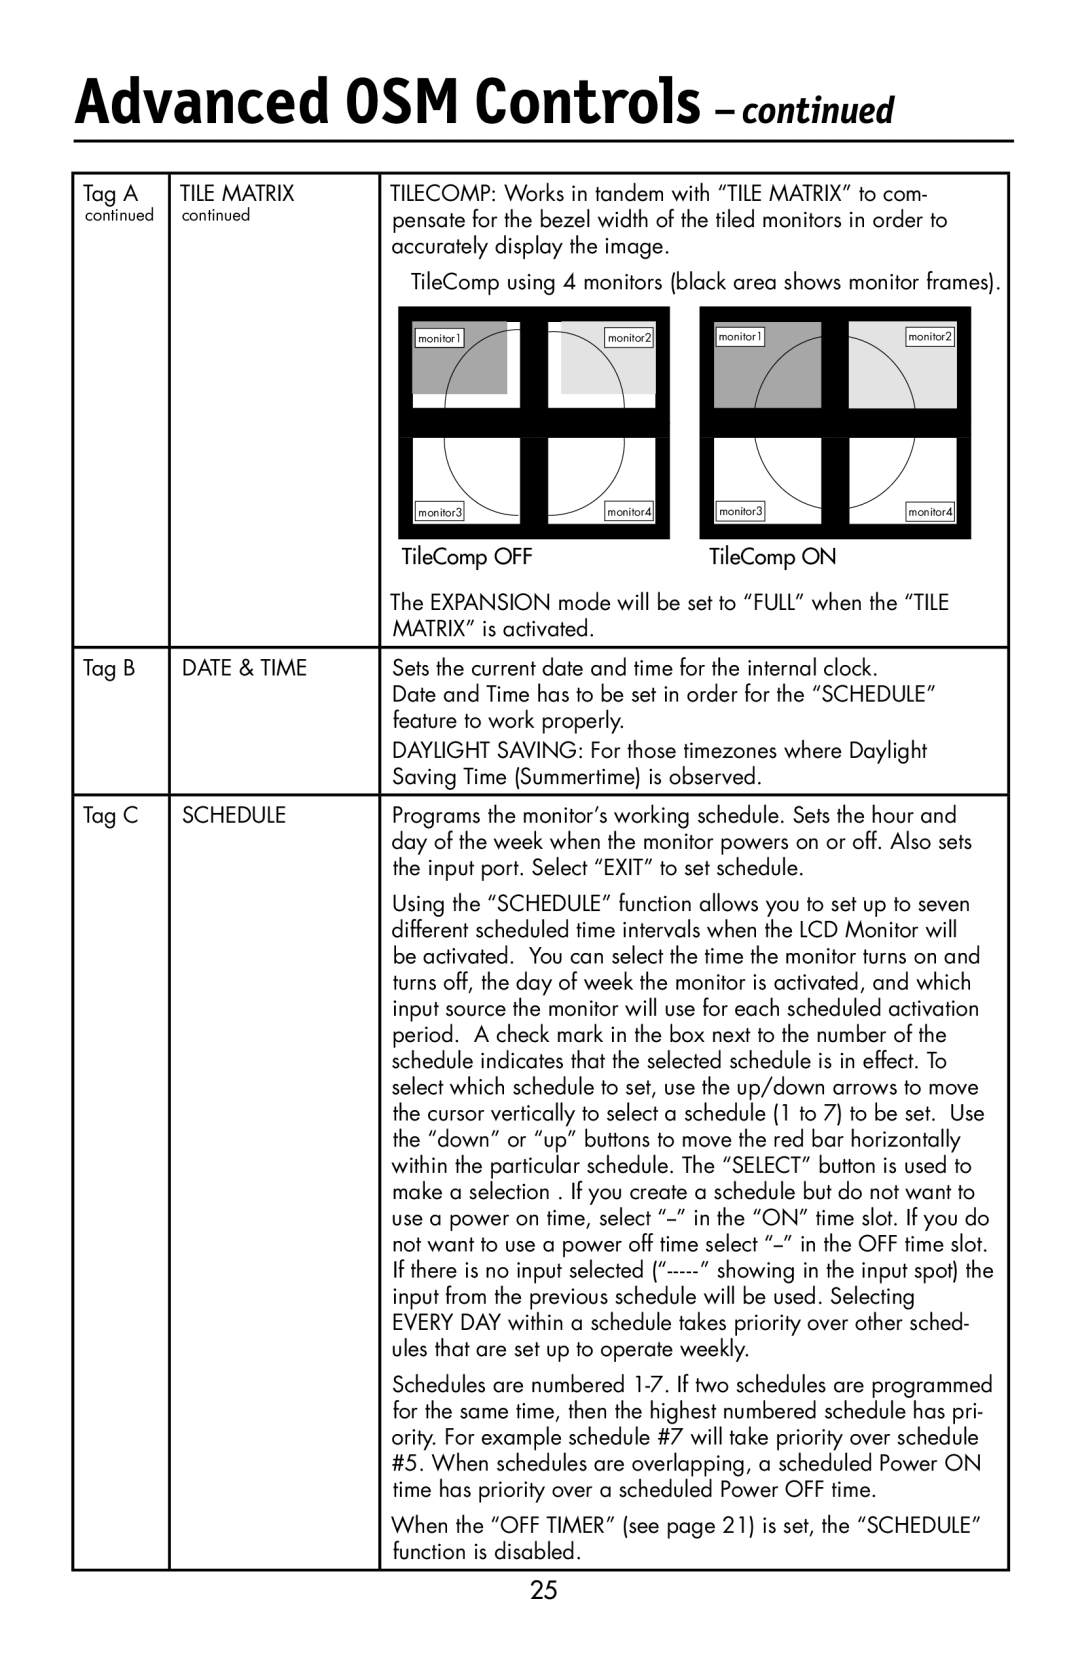
Advanced OSM Controls
To use the advanced menu
User
Fine
Auto Adjust
Signal Adjust
Position
Ntaa SW
Level
Expansion
Resolution
Size
Auto Fine
Gamma
Selection
Color Control
Video Detect
OFF Timer
IPM Setting
DVI Selection
Controls the brightness of the LED on the front
Monitor
LED on the front can be blue or green
OSM Lockout
SEL, HOT KEY BRIGHTNESS/CONTRAST ECO Mode
Signal
Factory Preset
Screen Saver
Input Setting
OSM Rotation
Image Rotation
Schedule
Date & Time
ECO Mode
Select 1 in the Auto Brightness menu Figure
Using the Auto Brightness function
Using the Auto Brightness function
CableComp Adjustment
Using the CableComp function
Safety Precautions and Maintenance
Recommended Use
Do not put anything on top of monitor
Recommended Use
Cleaning the LCD Panel
Cleaning the Cabinet
Ergonomics
Monitor MultiSync Specifications LCD2090UXi
Specifications
Monitor MultiSync Specifications LCD2190UXi
Features
Features
No picture
Troubleshooting
References
Limited Warranty
For more information, please visit
TCO’03
Manufacturer’s Recycling and Energy Information
Disposing of your old NEC Products
Information de la FCC
Avertissement
Mini-D-SUB 15 broches mâle à DVI-A
Contenu
Câble DVI-D à DVI-D Câble d’alimentation
Protecteur de câble Vis4 Manuel de l’utilisateur
Remarque
Mise en train
Mise en train Suite
Alimentation
Élévation et descente de l’écran du moniteur
PivotementInclinaison
Rotation d’écran
Retrait du support pour le montage
Installation du bras flexible
Paysage Portrait
Commandes
Niveau DE Noir Ajuste le niveau du noir
Commandes suite
Commandes de luminosité/contraste
Réglage auto Entrée analogique seulement
Commandes d’image
Outils
Systèmes de commande AccuColor
Menu Outils
PREM. Si la première détection est sélectionnée comme
Droite
Information
Pour utiliser le menu option avancée
Ajuste la position de la composante Bleu de l’image
Signal Suivants Simple et Full Plein
Ajuste la position de la composante Rouge de l’image
Ajuste la position de la composante Vert de l’image
» Détaillé
Resolutions
Tion Gamma
Analogique
Numérique
OSM H. Position
’alimentation située à l’avant du moniteur
La DEL frontale peut être bleue ou verte
Colorcomp Level
Contrast LUMINOSITÉ,/CONTRASTE ECO Mode Mode
Lockout NOTIFICAT. Résolution / Verrouillage OSM
Transparency
’ÉCRAN
Économiseur
Tag a Tile Matrix Matrice en Mosaïque
Tile Comp Arrêt
Tile Comp Marche
Programme
Mode Éco Information Tag E
Règle la date et l’heure courantes pour l’horloge interne
Suivent l’Heure avancée d’été
Utilisation de la fonction de luminosité automatique
Nosité
Utilisation de la fonction de luminosité automatique Suite
Ajustement CableComp
Utilisation de la fonction de CableCompMD
Utilisation recommandée
Consignes de sécurité et d’entretien
Ou d’une autre Ne placez rien sur le dessus du moniteur
Utilisation recommandée suite
Ergonomie
Entretien de l’écran ACL
Nettoyage du boîtier
Caractéristiques MultiSync Du moniteur LCD2090UXi Remarques
Fiche technique
Caractéristiques MultiSync Du moniteur LCD2190UXi Remarques
Fiche technique Suite
Fonctions
Fonctions suite
Aucune image
Dépannage
Références
Service à la clientèle et assistance technique
Garantie limitée
TCO’03 C’est une traduction de portion Anglaise de TCO’03
Page
Mise au rebut de vos produits NEC usagés
Recepción de radio y televisión
Información FCC
Manual del usuario
Contenidos
DVI-D a DVI-D cable Cable de alimentación SUB a D-SUB cable
Tapa de cable
Figura A.1
Inicio rápido
No encienda y apague reiteradamente el interruptor vacation
Inicio rápido continuación
Encendido
Cómo elevar y bajar la pantalla del monitor
InclinaciónGiro
Rotación de la pantalla
Figura S.1
Cómo quitar el soporte del monitor para el montaje
Figura F.1
Instalación de brazos flexibles
Horizontal Vertical
Controles
Nivel DE Negro Ajusta el nivel de negro
Controles de brillo/contraste
Nota No cubra el sensor de AmbiBright
Ajuste automático para entrada análoga únicamente
Control de imagen
Herramientas
Herramientas del Menú
Encendido
Información
Custom
Cómo utilizar el menú avanzado
Apague el monitor con el botón Encendido
100
101
Detalle
102
103
Color Control Sistema DE Control DEL Color Accucolor
104
105
Traste
106
SELECCIONAR, SELECCIONAR, , , , , Salir
107
108
Protector
DE Pantalla
109
Tilecomp Apagado
Tilecomp Encendido
110
Seleccione 1 en el menú de Brillo Auto
Configuración
Iluminación ambiente
Condiciones de iluminación ambiente claras
Oscuras
112
Uso de la función CableComp
Ajuste de la función CableComp
113
Uso recomendado
Precauciones de seguridad y mantenimiento
114
115
Uso recomendado continuación
116
Ergonomía
Limpieza del panel LCD
Limpieza del gabinete
117
Especificaciones MultiSync Del monitor LCD2090UXi Notas
Specifications continuación
Especificaciones MultiSync Del monitor LCD2190UXi Notas
118
119
Características
Características continuación
121
Solución de problemas
122
Referencias
123
Garantía limitada
Para obtener más información, visite 124
TCO’03 traducción de la normativa TCO’03 en inglés
Información del fabricante sobre reciclado y energía
Dentro de la Unión Europea
126
Déclaration DE Conformité
Declaración DE Conformidad
Declaration of Conformity