Manuals
/
Nikon
/
Photography
/
Digital Camera
Nikon
E5600, E4600
manual
Lighting Samples Before, After
Models:
E4600
E5600
1
56
128
128
Download
128 pages
63.15 Kb
53
54
55
56
57
58
59
60
Page 56
Image 56
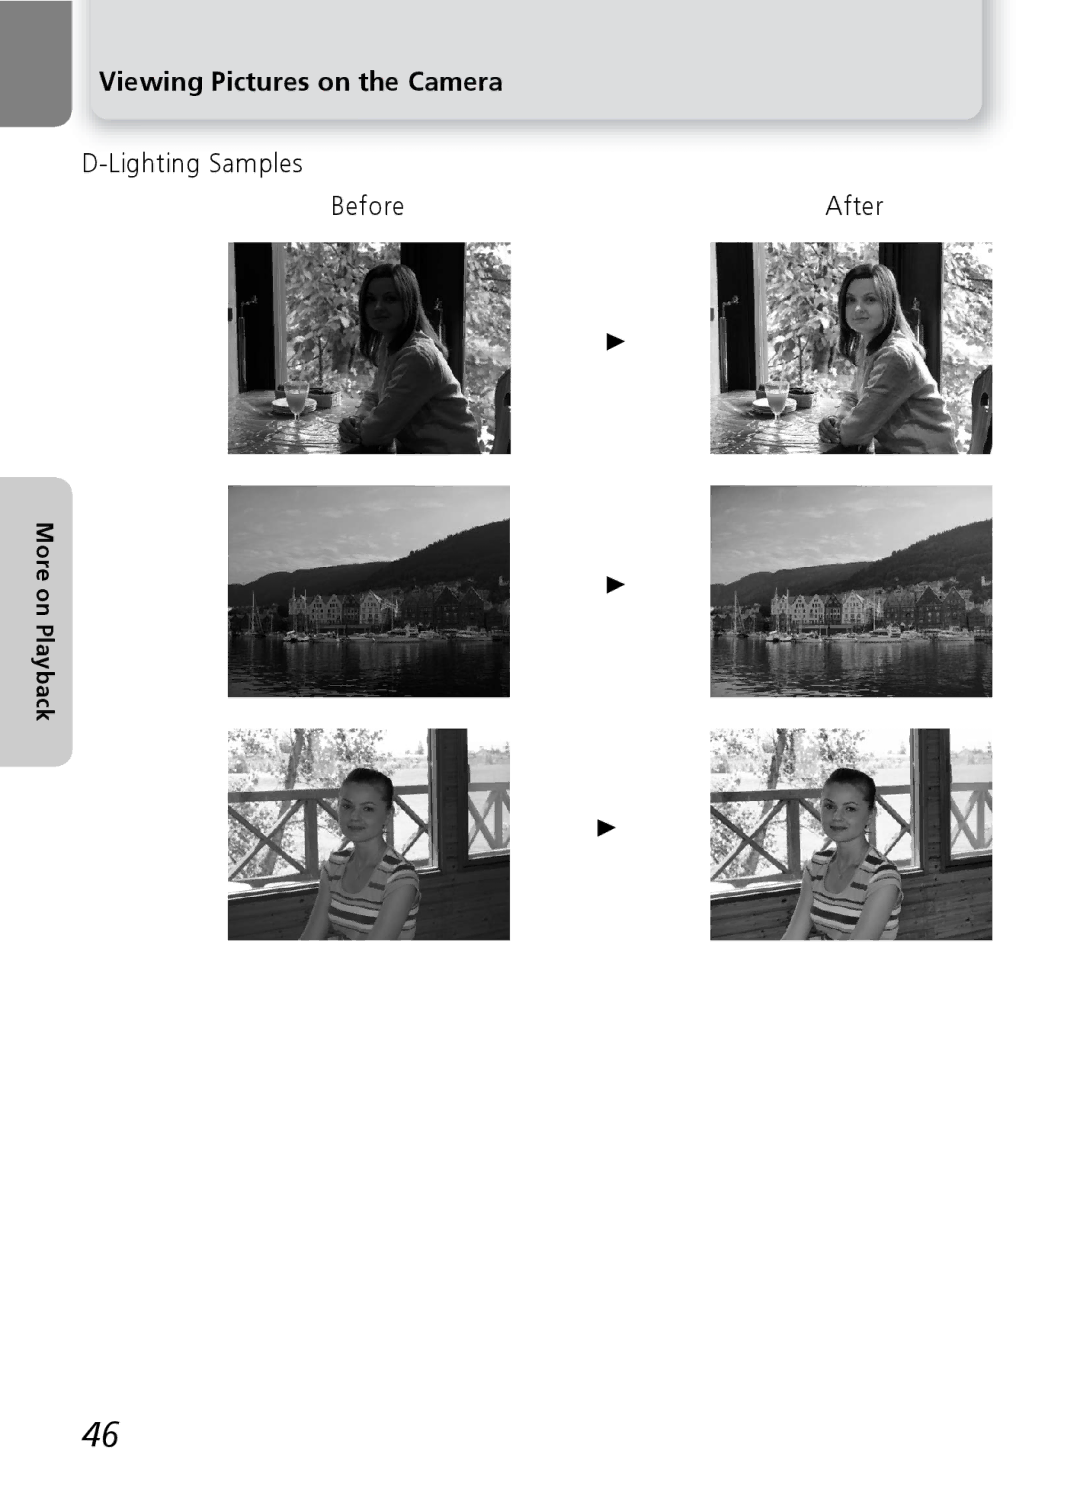
Viewing Pictures on the Camera
D-Lighting
Samples
Before
After
More on Playback
+
+
+
46
Page 55
Page 57
Page 56
Image 56
Page 55
Page 57
Contents
Digital Camera
Trademark Information
Observe caution when using the camera strap
Observe proper precautions when handling batteries
Turn off immediately in the event of malfunction
Do not use in the presence of flammable gas
Observe caution when operat- ing the flash
Use appropriate cables
Keep out of reach of children
Removing memory cards
Iii
For Home or Office USE
Postage stamps or post cards issued
This class B digital apparatus meets all
Requirements of the Canadian Interfer
Do not copy or reproduce paper
Use Only Nikon Brand Electronic Accessories
Before Taking Important Pictures
Design Rule for Camera File System DCF
Exif Version
Table of contents
Viii
Shooting Menu
Introduction
Internal Memory and SD Memory Card
Life-Long Learning
Before You Begin
Parts of the Camera
Attaching the Camera Strap
Monitor Xplay button Speaker Battery-chamber Cover Q
Interface connector cover
Parts of the Camera
Red ! lamp Q
999
Monitor
Monitor
Controlling the Monitor
Mode Dial
Setup Q
Before You Begin Movie Q
Auto Q
Navigating the Menus
Shutter-Release Button
Multi selector is used to navigate through the camera menus
Move cursor up
Open the battery-chamber cover
Close the battery-chamber cover
Important Battery Type
Inserting Batteries
Read Battery Warnings
Alternative Power Sources
Inserting Batteries Replacing Batteries
Damaged Batteries
Inserting Memory Cards
Confirm that the camera is off
Open the memory card slot cover
Insert the memory card
Write Protect Switch
Inserting Memory Cards Formatting Memory Cards
Removing Memory Cards
Memory Cards
Checking the Battery Level
Check the battery level in the monitor
Turn the camera on
X Button
Checking the Battery Level Turning the Camera Off
Power-on Lamp
Auto Power Off Standby Mode
Sleep Mode
Time Zone
Basic Setup
Clock Battery
Basic Setup
Home Time Zone
Date
01 01
Select P Mode
Rotate the mode dial to P Turn the camera on
Basic Photography
Select P Mode Number of Exposures Remaining
Shooting Menu
Frame the Picture
Ready the camera
Frame your subject
Dont Block the Shot
Monitor or Viewfinder?
When Lighting Is Poor
Frame the Picture Digital Zoom
Focus and Shoot
Getting Good Results with Autofocus
Focusing on Off-Center Subjects Focus Lock
Focus and Shoot During Recording
Deleting Unwanted Pictures
Press the x button
View pictures in the monitor
Picture type Identifier Extension
Playback Tip
Image File and Folder Names
When Lighting Is Poor Using the Flash
To select the flash mode
Following flash modes are available
Display Flash menu
When Lighting Is Poor Using the Flash
Flash Mode Selection
Sensitivity ISO Equivalency
2 Camera Shake Icon
Taking a Self-Portrait Using the Self-Timer
Display Self-timer menu
Stopping the Self-Timer
Self-Timer
Macro Close-up Mode
Display Macro close-up menu
Mode Description
Assist and Scene Modes
Assist Modes
Scene Modes
Assist and Scene Modes Help
Image Mode
Assist and Scene Modes
Using the Guides
Framing Assist
Portrait
After selecting mode, display framing as Sist menu
Portrait
Portrait Assist
Framing Assist
NLandscape Assist
Landscape
Sports
Sports Assist
Sports Assist
Flash Mode Selection in m Mode
Night Portrait Assist
BEACH/SNOW
Scene Mode
PARTY/INDOOR
Scene Mode
Following scenes are available
OFF* & OFF
Preserves the deep hues seen in sunsets and sunrises
EDUSK/DAWN
$ Y OFF* & OFF
$*Y OFF* & OFF
Jback Light
To use panorama assist, follow the steps below
Press Ithe center of the multi se
Highlight K Panorama Assist
White
Using a Tripod
Compose the next shot to overlap with Previous picture
Panorama Assist
Storage Locations for Panoramas
Viewing Pictures on the Camera
Viewing Pictures on the Camera
Zoom
View other
Zoom out
Zoom picture in and out
Save this image as displayed? Yes
Photo Trim
On Playback
Lighting
Press I. The tone adjusted picture is dis Played
Select picture in full-screen playback
Lighting Samples Before
After
Voice Memos
Press Description
Choosing a Video Mode
Viewing Pictures on TV
Turn the camera off
Connectcamera the AV/video cable to
Before Connecting the Camera
Pictures transferred using
Viewing Pictures on a Computer
Operating system Camera
UC-E6 USB cable
Connecting the USB Cable
Viewing Pictures on a Computer
Mac OS
Disconnecting the Camera
Drag the Noname camera volume into Trash
Printing Pictures
Printing pictures
Delete print set
Printing Pictures
Highlight Print selected
Printing Pictures
Printing Pictures Print Set
Date
Cancel
Printing Via Direct USB Connection
USB
PTP
Print all images Dpof printing Cancel
Printing Via Direct USB Connection
Display Print Selection dialog
Icon
Highlight Dpof printing
Use a Reliable Power Source
Error Messages
Before Printing
Dpof Printing
Rotate the mode dial to W Turn the camera on
Recording Movies
Start recording
Monitor shows the length of the movie that can be recorded
Flash Mode Selection in W Mode
Macro Close-up Mode in W Mode
Recording Movies
Movies
Highlight mode To exit without changing mode, press button
Movie
Movie Movie Options
Small size Smaller size
AUTO-FOCUS Mode
Highlight Auto-focus mode
Continuous AF
Single AF
Deleting Movies
Playback Volume E5600 only
Viewing Movies
Using the Shooting Menu
BSS
Icon Type Display
Shooting Menu
Using the Shooting Menu
To make a selection from the Shooting Menu
Shooting Menu 1/2
Display options
Image Mode
Image Mode
High2592
Normal2048
Image Mode and Number of Exposures Remaining
Image mode Memory Memory card
Image Size
Print Size
White Balance
Daylight
Incandescent
Fluorescent
Preset White Balance
White BAL Preset
White Balance
Measure
Choosing an Exposure Compensation Value
Exp. +
Exposure Compensation
Restrictions on Camera Settings
Continuous
Continuous
Continuous Multi-shot
Best Shot Selector
Best Shot Selector
Continuous and BSS
Option Description Off BSS off camera functions normally
Color Options Indicator
Color Options
Vivid color
Sepia Cyanotype
Using the Playback Menu
Playback Menu contains the following options
To display the Playback Menu
Display the Playback Menu
Using the Playback Menu Icon Type Display
Playback Menu
Slide Show
Slide Show
Loop
Auto Off
Delete
Deleting Selected Pictures
Delete
Erase all images
Deleting All Pictures
Delete
Highlight Erase all images
Before Deletion
Protect
Protect
Tures marked by U icon
Protect Icon
Transfer Marking
All off Select images
Transferring More than 999 Pictures
Hidden Pictures
Marking Selected Pictures for Transfer
Transfer Marking
Transfer Marking
Highlight Select images
Copies can not be viewed or cropped using playback zoom
Small Picture
Highlight option
Small Picture
Copy
Copying Selected Pictures
Copy
All images
Copying All Pictures
Copy
Camera to Card
All images will be copied. OK? Yes
Print Set
Copy
File Number
Using the Set-up Menu
SET-UP menu contains the following options
Using the Set-up Menu Icon Type Display
Set-up Menu Help
Tween Text and Icons Q103
Set-up Menu
Welcome Screen
Nikon
Small Pictures and Cropped Copies
Select an Image
Date
Time zone
Camera Clock
Set-up Menu Option Description Date Set the date and time Q
To set the clock to the travel destination time zone, high
Time Zones
Light and press I the center of the multi selector. While
GMT + Location
Monitor Settings
Photo Info
Brightness
Photo Info
Date Imprint
Date Imprint
Date Date and time
Date Imprint
Sound Settings
Sound Settings
Shutter sound Start-up sound Volume
Shutter sound
Shooting modes where the Blur Warning does not function
Blur Warning
Blur Warning
Blur Check
Auto OFF
Sleep mode
Auto Off
Format memory/card
To format the internal memory, remove the memory card
All images will be deleted
Set-up Highlight Quick format or Format*. To
Format memory/card Formatting Memory/Card
Quick format and Format
Language
Interface
Traditional Chinese or Korean
Interface
Reset All
Reset ALL
Auto Transfer
100
Reset All
Following settings are affected
Resetting File Numbering to
Setting Default
Battery Type
Battery Type
Backup Battery
102
Menus
103
Menus
Icons
Firmware Version
104
Select this option to display the current firmware version
E5600 Ver.XX
Optional Accessories
105
Approved Memory Cards
SanDisk
Caring for Your Camera
106
Batteries
107
Caring for Your Camera
108
Error Messages
Display Problem Solution
109
110
Display
Troubleshooting
Problem Possible cause
111
Electronically-Controlled Cameras
Troubleshooting
112
Or E DUSK/DAWN or F Night Landscape are
Color options is not set to Standard color
113
Specifications
114
Specifications
115
Symbols
Index
116
Index
Transfer marking
117
Index
6MA05611
Top
Page
Image
Contents