Reference Manual
Ensuring Longer Battery Life
Page
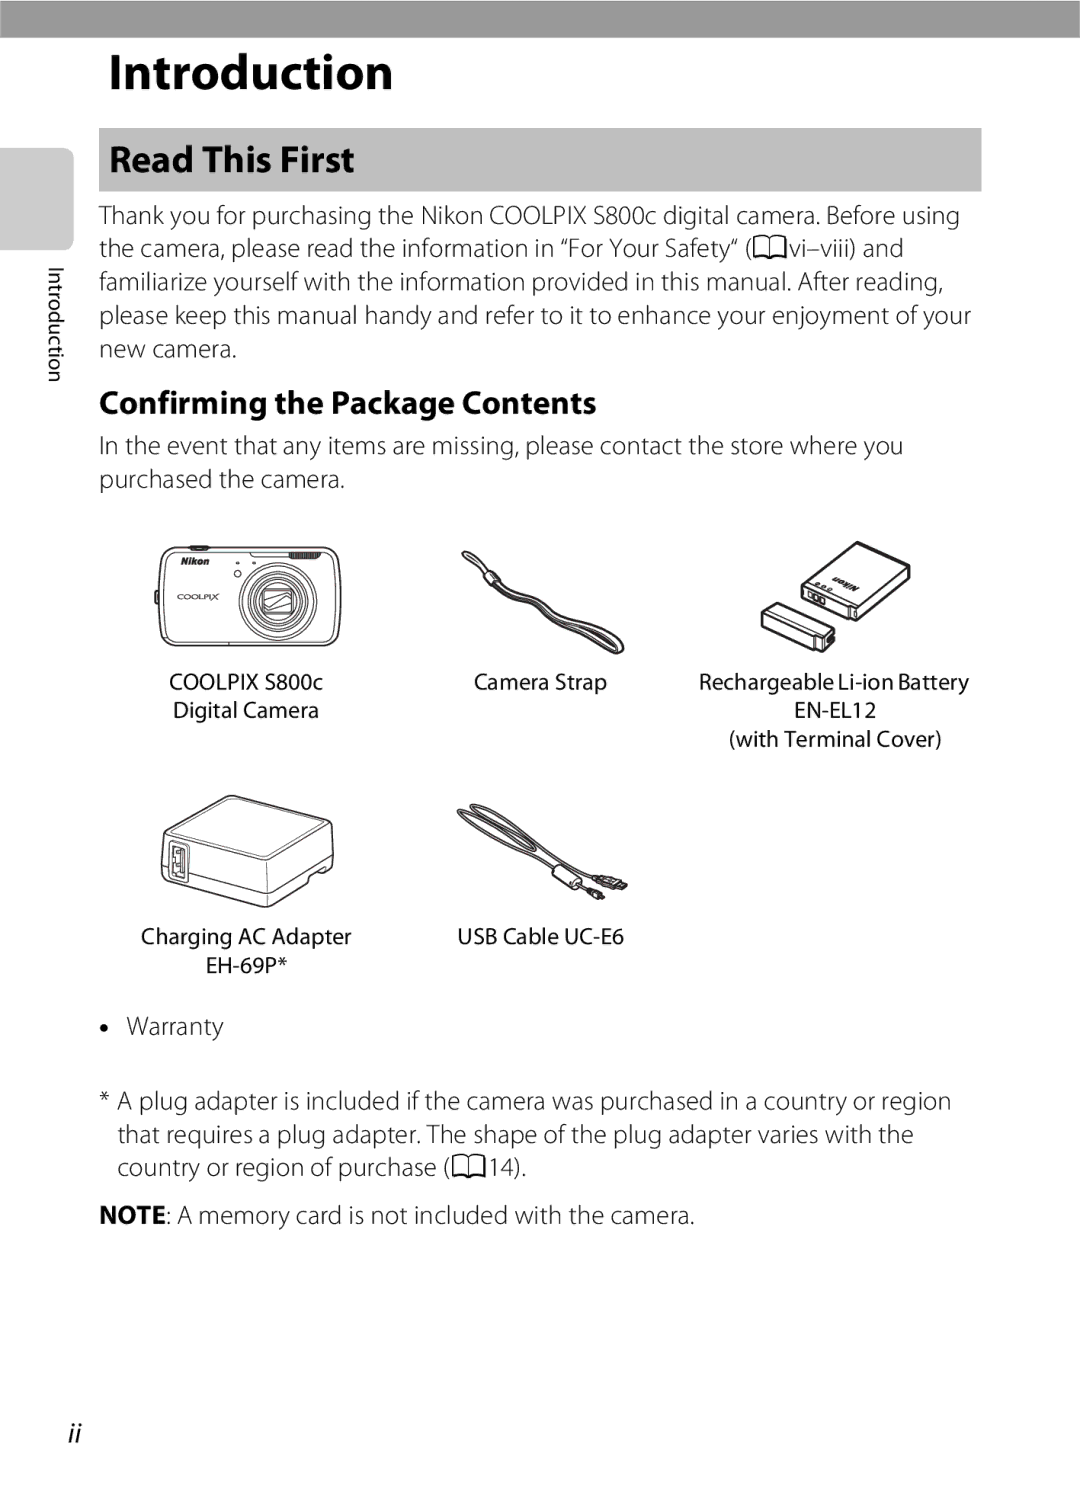
Confirming the Package Contents
Read This First
Symbols and conventions
About This Manual
Iii
Read This First
Information and Precautions
Use Only Nikon Brand Electronic Accessories
Life-Long Learning
Before Taking Important Pictures
Disposing of Data Storage Devices
Items prohibited by law from being copied or reproduced
For Your Safety
Turn off in the event of malfunction
Do not disassemble
Handle the camera strap with care
Observe caution when handling the battery
Vii
Observe caution when using the flash
Viii
Use appropriate cables
Handle moving parts with care
Modifications
Interface Cables
Following apply only to users in European countries
Wi-Fi Wireless LAN Network/Bluetooth Function
Restrictions on Wireless Devices
Declaration of Conformity
FCC/IC RF Exposure Statement
Xii
Wi-Fi Wireless LAN Network/Bluetooth Function
Complies with IDA Standards DA103423
Precautions when Using the Wireless LAN Features
Precautions when Using Radio Transmissions
Xiii
Precautions when Using the Bluetooth Feature
Using the Camera Overseas
Xiv
Personal Information Management and Disclaimer
Table of Contents
Table of Contents
Xvi
Table of Contents
Xvii
Xviii
Xix
F19
F14
F22
Camera Body
Parts of the Camera
Lens cover closed
Battery chamber
Power connector cover For connection with optional AC
Parts of the Camera
Tripod socket
Using the Camera Buttons
Attaching the Camera Strap
Vback button
Whome button
Operating the Touch Panel
Tapping
Touching and Holding
Dragging
Use this operation to Switch the screen A89
Spreading/Pinching
Flicking
Operating the Touch Panel
Indicators and Operations of the Monitor/Touch Panel
Shooting Mode Information Indicators
Shooting Mode Operation Controls
Indicators and Operations of the Monitor/Touch Panel
Touch AF/AE cancellation E33
Shooting mode2
Playback Mode Information Display
Playback Mode Operation Controls
Shooting mode switch to shooting
Icons displayed vary depending on the shooting mode
Delete
Switching Between Shooting Mode and Playback Mode
Mode icon
Tap an icon to select a shooting mode
Shooting mode
Switching the Horizontal/Vertical Screen Rotation
Preparation 1 Insert the Battery
Battery rechargeable Li Ion battery
Close the battery-chamber/memory Card slot cover
Inserting the Battery Correctly
Preparation 1 Insert the Battery
Removing the Battery
High Temperature Caution
Prepare the included Charging AC Adapter EH-69P
Preparation 2 Charge the Battery
Keep the camera turned off
Charging Using Battery Charger
Understanding the Power-on Lamp
AC Power Source
Preparation 3 Insert a Memory Card
Insert the memory card
Inserting the Memory Card Correctly
Formatting a Memory Card
Removing the Memory Card
Internal Memory and Memory Cards
Preparation 3 Insert a Memory Card
Press the power switch to turn on the camera
Battery Level Indicator
Battery level indicator
Turn the Camera On
Turning Off Functions to Save Power
Power Supply Status and Power Saving Function
To Turn the Camera Back On
Tap the shooting mode icon
Select a Shooting Mode
Displayed
Available Shooting Modes
Features Available in Each Shooting Mode
Recording Position Information for Images
Hold the camera steadily in both hands
Frame a Picture
Frame the picture
Using the Zoom
Using a Tripod
Frame a Picture
Use the zoom control to activate optical zoom
Focus and Shoot
Subjects Not Suitable for Autofocus
Touch Shooting
AF-assist Illuminator and Flash
To Make Sure You Do Not Miss a Shot
Play Back Images
Tap the playback mode icon
Playback
Viewing Images
Play Back Images
More Information
Delete Unwanted Images
Play back an image to delete and tap
Tap the desired delete option
Tap Yes in the delete confirmation
Operating the Erase Selected Images Screen
Tap an image to display y
Delete Unwanted Images
Operation
GEasy Auto Mode
Changing the GEasy Auto Mode Settings
Portrait Landscape Night portrait Night landscape
Close-up Backlighting Other shooting scenes
AAuto Mode
Adjusting the AAuto Mode Settings
Viewing a Description Help Information of Each Scene
Scene Mode Shooting Suited to Scenes
On the screen shown at the left
Changing the Scene Mode Settings
Adjusting Scene Effect
Scene Mode Shooting Suited to Scenes
Scene effect adjustment slider Food More blue
Selecting a Scene Mode Features
Digital zoom is not available
Night portrait Flash always fires
Digital zoom is not available Party/indoor
Scene Mode Shooting Suited to Scenes
Scene Mode Shooting Suited to Scenes
Scene Mode Shooting Suited to Scenes
Viewing Images Taken Using Pet Detection
AF Areas
Changing Special Effects Mode Settings
Special Effects Mode Applying Effects When Shooting
Select an effect by tapping the icon
Smart Portrait Mode Shooting Smiling Faces
A54 is activated and the shutter is automatically released
Changing the Smart Portrait Mode Settings
Smart Portrait Mode Shooting Smiling Faces
Power Saving Function When Using Smile Timer
Self-timer Lamp
Basic Shooting Settings
Functions Available for Each Shooting Mode
Functions That Cannot Be Used Simultaneously
A44 A46 A48 A49
Using the Flash Flash Modes
Tap the flash mode icon
Tap the desired flash mode icon
Frame the subject and take an image
Available Flash Modes
Flash Mode Setting
Red-eye Reduction
Using the Self-timer
Tap the self-timer icon
Tap Yor Z
Frame the picture and press Shutter-release button halfway
Press the shutter-release button the rest of the way down
Using Macro Mode
Tap the macro mode icon
Position where Fand the zoom indicator glow green
Macro Mode Setting
Adjusting Brightness Exposure Compensation
To exit the setting screen without taking an image, tap
Tap the exposure compensation icon
Press the shutter-release button to take an image
Default Settings
Flash mode Self-timer Macro mode Exposure
A44 A46 A48 A49 Easy auto Off Off2 Auto
Off Smart portrait Off4 Off5 Movie
Basic Shooting Settings
Auto Scene2 Special Smart
Shooting menu, the options listed below can be changed
Shooting Menu Options
RTouch
ASmile timer
Skin Softening
YBlink proof
With this option
Some shooting settings cannot be used with other functions
Functions That Cannot Be Used Simultaneously
Functions That Cannot Be Used Simultaneously
A75 Shutter sound is disabled
Digital zoom A75 Is not available Subject tracking
Ure value
Focusing on Subjects
Face Detection
Focus area
Portrait and Night portrait scene
Viewing Images That Were Taken Using Face Detection
Switch to a auto mode A31
Select Touch AF/AE A53 for Touch shooting setting
Shooting Subjects Not Suitable for Autofocus
Press the shutter-release button halfway
Playback Zoom
Display area guide
Thumbnail Playback
12, and 20 images per screen
Functions That Can be Set with the dButton Playback Menu
Playback Menu Options
Playback menu, the options listed below can be changed
Retouch, I D-Lighting, iFilter effects, e Skin
Connecting the Camera to a TV and Computer
Using ViewNX
Installing ViewNX
Compatible Operating Systems
Windows
Follow the on-screen instructions to install the software
Exit the install
Using ViewNX
Transferring Images to the Computer
Transfer images to the computer
Connecting the USB Cable
Click Start Transfer
Viewing Images
Terminate the connection
Start ViewNX
Starting ViewNX 2 Manually
You can record movies with sound
Recording Movies
Maximum Movie Length
Recording Movies
Recording Movies
Changing Movie Recording Settings
Maximum Movie Length
Functions That Can be Set with the dButton Movie menu
Options listed below can be changed when recording movies
Movie Menu Options
Select the desired movie in playback mode A26 and tap R
Adjusting the Volume
Movie Playback
Operations During Movie Playback
Setup Menu
Setup menu, the following options can be changed
Drag the screen up or down to scroll through the options
To On, Easy panorama, or Pet portrait when
Setup Menu
When shooting. The default setting is Off
When using Record GPS data , Synchronize
To check the images
GPS options Menu is set to On E63
Uploading Images to Online Services
Sharing Images
Uploading Images to Online Services
Tap the images or movies you want to Upload
Tap Displayed list, tap the icon
My Picturetown Application
When Turning On the Camera for the First Time
Tap the Wi-Ficheck box
Setting Up a Wi-Fi Wireless LAN Network
When Turning On the Camera for the First Time
Disconnecting from a Wi-Fi Wireless LAN Network
Reducing Battery Power Consumption
Setting Up a Google Account
Tap Add account
Tap Create
Logging in to a Google Account
Setting the Date and Time
Specify the time zone
Tap your current time
Zone
Selecting Time Zone
Clock Battery
Imprinting the Shooting Date on Printed Images
Using a Keyboard for a Specific Language
How to Enter Text, Number and Symbol
Entering Text
Editing Text
Other Keyboard Operations
Entering Text
Basic Operations for Android Platform
Using Widgets
Displaying the Home Screen
Switching the Screen
Opening Applications and Putting Them in Stand by Mode
Displaying the Applications Screen
Basic Operations for Android Platform
Status Bar and Notification Panel
Status Bar
Notification Panel
Status bar
On the home screen or applications screen
Press the dbutton and tap Settings to set
Options listed below
Press the d button to set the options listed
Using the Option Menu
Below
Using the Internet
Using the Applications
Searching for Information
Using the Applications
Using Google Play Store Getting Applications
Tap the icon on the applications screen
E15
E17
E20
E26
When the camera detects which direction it is
Using Easy Panorama Shooting and Playback
Shooting with Easy Panorama
Example of Camera Movement
Using Easy Panorama Shooting and Playback
Changing the Shooting Range
Viewing Images Captured with Easy Panorama Scroll Playback
Operation Description Tap the monitor to pause scrolling
Editing Images Still Images
Editing Functions
For information about Rotate image function, see page E49
Effects are Color options, Soft, Selective color, Cross
Restrictions on Image Editing
Editing Images Still Images
Original and Edited Images
KQuick Retouch Enhancing Contrast and Saturation
Choose the degree of enhancement and tap
Tap Yes
New, retouched copy is created
Tap
Lighting Enhancing Brightness and Contrast
New, edited copy is created
IFilter Effects Digital Filters
Tap the icon of the desired effect
E10
Adjust the effect
Color options Select the color and tap
ESkin Softening Softening Skin Tones
Tap the degree of enhancement
Check the enhancement
Performance
GSmall Picture Making Smaller Images
Tap the desired small copy size icon and tap
E12
Small picture size cannot be selected for
Crop Creating a Cropped Copy
Enlarge the image for cropping A61 Refine copy composition
Tap G
E13
E14
Keeping an Image’s Tall Orientation When Cropping
Image Size
Connecting the Camera to a TV Playback on a TV
Turn off the camera Connect the camera to the TV
Tune the TV to the video channel
Turn on the camera
Connecting the Camera to a TV Playback on a TV
Connecting the Cable
Operations with TV Connection
E16
Playing Audio via Bluetooth Device
Enable the Bluetooth device
Tap Wireless & networks, and tap Bluetooth settings
Bluetooth device can be detected by the camera
Tap the Bluetooth check box
Tap Scan for devices
Tap the device in the list you want to pair
Play a movie A73
Pairing with a Bluetooth Device
Unpairing from a Bluetooth Device
E19
Install the Connect to S800c application
Transferring Images to Your Smart Device
Download the Connect to S800c application from the Market
E20
Tap Simple setup on the camera screen
After that, tap Simple setup on the smart device screen
E21
Transferring Images to Your Smart Device
Tap OK on both screens
E22
Tap Start service on the camera screen
Transferring Images from Camera to Smart Device
Tap Connect to camera on the smart device screen
E23
Tap Bon the smart device screen
Confirm the results on the smart device screen and tap OK
E24
Screen returns to the one shown in step
Changing the Connect to S800c Application Settings
ELimit size
AEnd connection
E25
Shooting Menu for AAuto Mode
AImage Mode Image Size and Quality
Image Mode
E26
Shooting Menu for a Auto Mode
Image Mode Setting and Monitor Display
E27
Number of Exposures Remaining
RTouch Shooting
E28
Touch Shooting Setting
QTapping the Monitor to Release the Shutter Touch Shutter
E29
Tap the desired subject to take an image
E30
Shooting Modes That Support Touch Shutter
SFocusing on a Moving Subject Subject Tracking
Subject tracking is enabled only in a auto mode
Register a subject
E31
E32
Tap the subject on which the camera focuses
RTapping the Monitor to Focus Touch AF/AE
E33
Shooting Modes That Enable Touch AF/AE Function
E34
Eiso Sensitivity
E35
Continuous
Enable continuous shooting or BSS best shot selector
E36
E37
Setting cannot be changed
Pressed all the way, camera takes
E38
WWhite Balance Adjusting Hue
Manual E39 for more information
Preset Manual
Tap b
Tap Measure to measure a new white balance value
E39
Enable or disable skin softening
Smart Portrait Menu
ESkin Softening
E40
ASmile Timer
YBlink Proof
E41
Smart Portrait Menu
Playback Menu
BSlide Show
Tap Start
E42
E43
Slide show begins
Playback Menu
Protect
Protecting 1 Image
Tap oOn
E44
Protecting Multiple Images
Tap the desired images to be Protected
Removing Protection from Images
E45
Creating a Print Order for 1 Image
APrint Order Creating a Dpof Print Order
E46
Creating a Print Order for Multiple Images
E47
E48
Canceling Print Order
Print Date
E49
FRotate Image
Rotate 90 degrees Clockwise
HCopy Copy Between Internal Memory and Memory Card
Tap the copy destination
Tap a copy option
Tap the images to be copied
E51
Memory contains no images. Message
Movie Menu
Movie Options
Normal Speed Movie Options
E52
E53
QTouch Shooting
HS Movie Options
YWind Noise Reduction
AAutofocus Mode
E54
Welcome Screen
Shooting or playback mode
E55
E56
Monitor Settings
Set the options below
E57
Print Date Imprinting Date and Time
Print Date and Print Order
Vibration Reduction
E58
Enable or disable digital zoom
AF Assist
Digital Zoom
E59
Shut-down Timer
When the Monitor Turns Off to Save Power
Shutter Sound
E60
Blink Warning
E61
Operating the Blink Warning Screen
E62
Operation Icon Description Rotate the zoom control to gi
Face that blinked
Update A-GPS file
GPS Options
E63
Synchronize
E64
E65
GPS Reception Indicator
Images with Recorded Position Information
Updating the A-GPS File
E66
Reset All
Scene Mode
E67
Basic Shooting Functions
Special Effects Mode
Smart Portrait Mode
Setup Menu
E68
Setup menu Synchronize under GPS options E63
Firmware Version
E69
Others
Wireless & Networks
Basic Settings for the Android Platform
E70
Brightness
Audible Selection
Display Off
E71
Reboot
Reboot the camera
Use GPS Satellites
E72
Erase SD Card Format
Erase SD Card
E73
Formatting Internal Memory
Select Language
E74
Simplified Chinese Traditional Chinese
Japanese Korean Thai
File and Folder Names
E75
Images or movies are assigned file names as follows
Dscn 000 1 .JPG
Battery charger AC adapter
Optional Accessories
E76
Error Messages
E77
Error Messages
E78
E79
Memory contains
Image data
Following situations Camera in one
E80
Troubleshooting Specifications
Cleaning and Storage
Index
F19
Maximizing Camera Life and Performance
Camera
Battery
Maximizing Camera Life and Performance
Charging AC Adapter
Memory Cards
Technical Notes and Index
Cleaning and Storage
Cleaning
Storage
Do not use alcohol, thinner, or other volatile chemicals
Troubleshooting
Power Supply, Display, and Settings
Auto info is selected for Photo info
Troubleshooting
Print date
Shooting
F10
Flash
Red-eye reduction
Than bAuto with red-eye reduction
Playback
F11
Mode setting of l4608×2592 or
F12
Others
F13
Not be able to unlock the screen. If this
Representative
F14
Specifications
Nikon Coolpix S800c Digital Camera
Specifications
Fireworks show scene mode
F15
WGS
F16
F17
Rechargeable Li-ion Battery EN-EL12
Imaging Products Association Cipa
Charging AC Adapter EH-69P
Specifications
F18
Approved Memory Cards
Supported Standards
F19
AVC Patent Portfolio License
MPEG-4 Visual Patent Portfolio License
About Open Source Software
F20
Trademark Information
F21
Index
Symbols
F22
F23
JPG E75
F24
MOV E75
F25
F26
Page
YP3H0511