Instructions
Thank you for purchasing an Olympus Digital Voice Recorder
Introduction
Trademarks and registered trademarks
Table of contents
Safety precautions
Convention used in this manual
Word card is used to refer to the SD card and microSD card
Keep young children and infants away from the recorder
Safety precautions
Handling the recorder
Do not operate the unit while operating a vehicle
Keep battery out of the reach of children
Battery handling precautions
Never heat or incinerate battery
Dispose of the used battery following the instructions
Docking station
AC adapter
Do not moisten the AC adapter or touch it with a wet hand
Case
LCD monitor
Memory Card
Noise, heat, smoke, or a burning odor
Authentication system via password
Main features
Main features
Large color LCD display
Identification of parts
Display status indicators LCD panel
Identification of parts
Then close the battery cover
Inserting the battery
Inserting the battery
Battery indicator
Charging directly via USB cable
Charging the battery
Charging the battery using the docking station
Connect the USB cable to the recorder
Recommended temperature range of use During operation
Charging the battery
Using the lithium ion battery
Charging
Using the USB cable
Power supply from AC adapter or USB cable
Using the AC adapter
Cable
Turning on the recorder/ Memory card
Memory card
Compatible cards
Cards compatibility
Memory card
Inserting and ejecting a SD card
Memory card
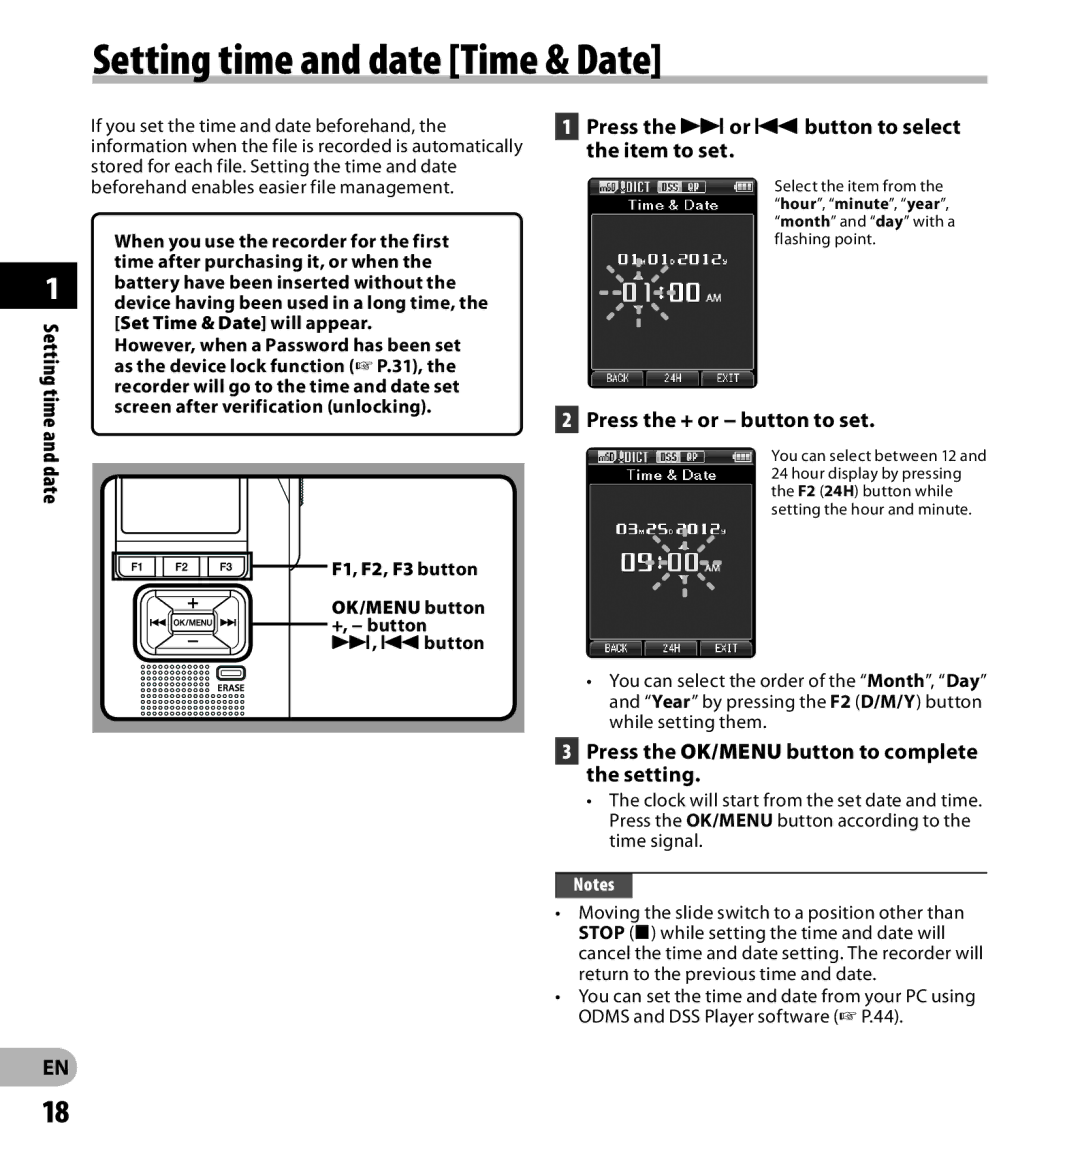
Press the OK/MENU button to complete the setting
Setting time and date Time & Date
Setting time and date
Press the 9or 0button to select the item to set
Changing the time and date
Setting time and date
Setting time and date
Press the F3 Exit button to close the menu screen
Recording
By default, the recorder has five folders, A, B
Recording related settings
Recording
Recording
New recording
Press the NEW button to create a new file
Overwrite recording
Select and play the file you want to overwrite
Insert recording
Insert Rec? will appear on the display
Recording monitor
Volume can be adjusted within a range from 00 to
Playback
Select the file, then move the slide
Beginning of the previous file
Playback
At the end of the file F.Skip
Can be set to On or Off P.39
Erasing
Erasing
Erasing files
Erase in Folder
Erasing
Partially erasing a file
Any unnecessary part of a file can be erased
Press the Erase button to confirm the erasure
Display changes to Partial erasing ! Erasing will start
Folder list screen will be displayed
9, 0button
Changing folders
Selecting a file
Authentication halt mode
Device lock function
Device lock function
Turn on the recorder
Setting the Author ID and Work Type
Setting the Author ID and Work Type
While the recorder is in stop mode, press the NEW button
Verbal Comment
When playing a Verbal Comment, press the Erase button
When playing back a file, press and hold the 9or 0button
Verbal Comment
F3 Index button
Index marks
Index marks
While playing back a file, press and hold the 9or 0button
Press the + or − button to move to
How to use the menu
How to use the menu
Item you want to set
LCD/Sound Menu Backlight
How to use the menu
Menu list
Beep
Rec Menu
Menu items
File Menu
Select On
LCD/Sound Menu
Adjust the start/stop actuation level
Menu items
Items
Device Menu
Select Sound or Speed
Editing the Work Type information
Entering characters
Press the F2 Finish button
Moving the entry column
Maximum entered character count
Format Done displays when formatting ends
Formatting the card Format
Formatting the card
Formatting the card
Formatting the card
Customizing the recorder
Programmable Buttons
Customizing the recorder
Device Folders
Hands Free
Odms and DSS Player software
Minimum requirement
Odms software Windows
Player software
Using online help
Odms and DSS Player software
DSS Player software Macintosh
Connecting to your PC
Connecting to your PC using the USB cable
Disconnecting from your PC
Connecting to your PC
Connecting to your PC using the docking station
Connecting to your PC
Alarm message list
Alarm message list Message Explanation Action
Troubleshooting
Symptom Probable cause Action
Troubleshooting
Troubleshooting
Troubleshooting Symptom Probable cause Action
Accessories optional
Specifications
For customers in Europe
Technical assistance and support
For customers in North and South America
Technical assistance and support
Olympus Imaging America INC