Reloj y Temporizador
English Français Español
Horloge et minuterie
Important Safety Instructions
Avis
Precautions
Power
Installing this Unit
Never Touch this Unit with Wet Hands
Precautions
FCC Information for User
Supplied Accessories
Features
Contents
Getting to Know the CBX-300
Top and Front Panels
Getting to Know the CBX-300
Display
Rear Panel
Remote Controller RC-713S
Volume / buttons 20
Timer button 40, 41, 43
Preset EQ button
Input / buttons
Replacing the Battery
Aiming the Remote Controller
Disc Notes
Supported Discs
Discs Made on Personal Computers
MP3/WMA Compatibility
Disc Notes
Installing the iPod Dock Adapters
Installing the iPod Dock Adapters
About the iPod Dock Adapters
Removing the Dock Adapters
Connecting Antennas
Connecting the AM Loop Antenna
Connecting the Indoor FM Antenna
FM antenna jack AM antenna push terminals
Connecting Antennas
Connecting an Outdoor FM Antenna
Connecting an Outdoor AM Antenna
Using a TV/FM Antenna Splitter
Connecting an External Audio/Video Source
Connecting Other Components
Connecting Your TV or Projector
About Connections
Connector type varies from country to country
Connecting the Power Cord
AccuClock-Automatic Clock Setting European models only
Adjusting the Volume
Using Headphones
Basic Operation
Turning On the CBX-300
Preset EQ
Basic Operation
Changing the Display Brightness
Muting the CBX-300
Using the Top Panel Buttons
Playing CDs
Selecting Tracks
Fast Forward and Rewind
Displaying CD Information
Using the Remote Controller
Playing CDs
Selecting MP3/WMA Files in Navigation Mode
Selecting MP3/WMA Files
While playback is stopped, press the Folder button
Press Enter
Selecting MP3/WMA Files in All Folder Mode
Playing the MP3/WMA Files in Only One Folder
Displaying MP3/WMA Information
Memory Playback
Cancelling Random Playback
Cancelling Repeat Playback
Random Playback
Repeat Playback
Setting MP3/WMA Preferences
Preferences
Pausing Playback
Playing Your iPod
IPod Backlight
Insert your iPod into the CBX-300’s iPod dock
Navigating the iPod Menus with the Remote Controller
Playing Your iPod
Press the MENU/NO/CLEAR but- ton to view the menu
Operating Note
Listening to the Radio
Tuning into Radio Stations
Adjusting the Antennas
Listening to the Radio
Presetting FM Stations Automatically Auto Preset
After Storing Presets You Can
Presetting FM/AM Stations Manually
Selecting Preset Stations
Use the Preset Buttons To select a preset
Selecting Presets on the CBX-300 Top Panel
Use the Tuner or Input
Receiving RDS European models only
What is RDS?
Displaying Radio Information
Naming Presets
Available Characters
Copying Presets
To copy the preset, press
PresetCopy? Press Enter
Destination preset
Erasing Presets
Erasing a Preset’s Name
Setting the Clock
Setting the Clock
Using the 12- or 24-hour Format
Displaying the Time in Standby Mode
Setting the Clock
AccuClock with a Specific Station European models only
To specify the frequency of a sta
Tion that’s broadcasting RDS CT
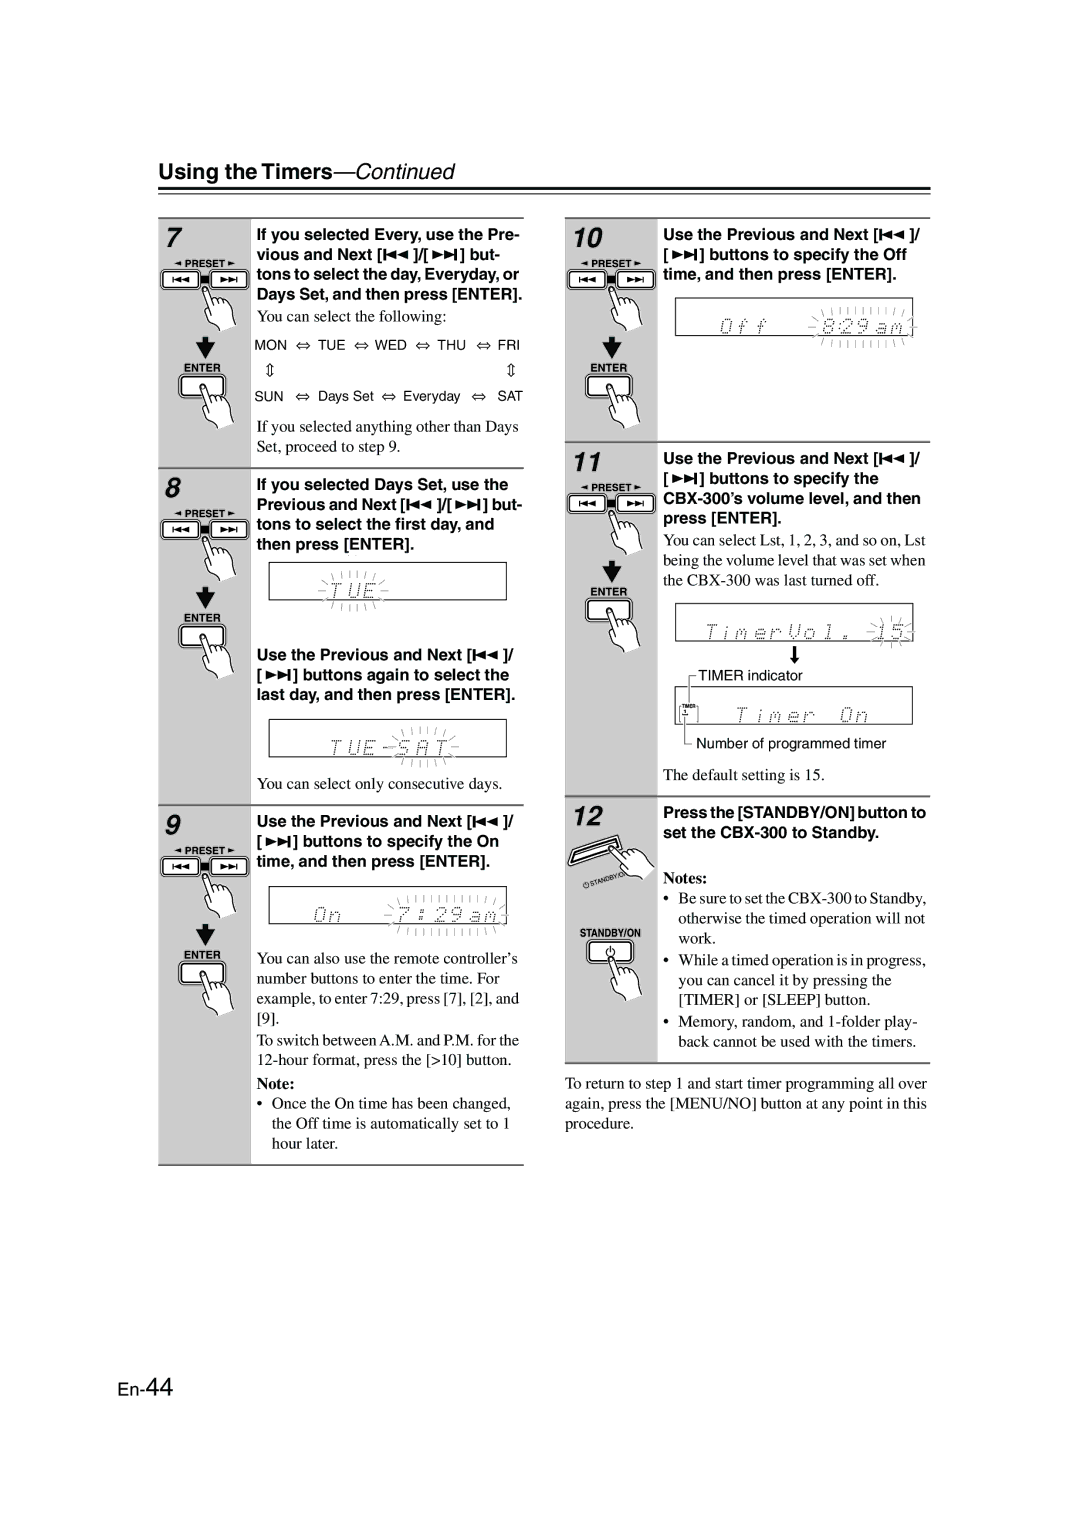
Using the Timers
About the Timers
Using the Timers
Programming the Timers
If you selected Every, use the Pre
If you selected Days Set, use
Press the STANDBY/ON button to
Set the CBX-300 to Standby
Turning Timers On and Off
Checking Timer Settings
Using the Snooze Function
Timer Setting
Setting the Snooze Time
Snooze in Use
Checking the Remaining Sleep Time
Using the Sleep Timer
Canceling the Sleep Timer
Setting the Maximum Volume
Troubleshooting
Audio
IPod
Troubleshooting
CD Playback
Remote Controller
Timers
Tuner
External Components
Time is not displayed in Standby mode
Reset appears on the display when the power cord is plugged
Clock
Others
Specifications
Amplifier
Tuner
Audio input
Remarques importantes pour votre sécurité
Piles
Alimentation
Installation de cet appareil
Précautions
Précautions-Suite
Prudence
Accessoires fournis
Fonctions
Sommaire
Tour d’horizon de le CBX-300
Faces supérieure et avant
Tour d’horizon de le CBX-300-Suite
Écran
Panneau arrière
Télécommande RC-713S
Boutons Volume / 20
Bouton Timer 40, 41, 43
Bouton Preset EQ
Bouton Clock Call
Remarques
Utilisation de la télécommande
Remplacer la pile
Remarques concernant les disques
Disques compatibles
Disques créés sur ordinateur
Compatibilité MP3/WMA
Remarques concernant les disques-Suite
Installation des adaptateurs pour socle iPod
Installer les adaptateurs pour socle iPod
Adaptateurs pour socle iPod
Retirer l’adaptateur pour socle
Connexion d’une antenne
Connexion de l’antenne-cadre AM
Connexion de l’antenne FM intérieure
Fixez l’antenne FM au mur à l’aide de punaises
Connexion d’une antenne-Suite
Connexion d’une antenne FM extérieure
Connexion d’une antenne AM extérieure
Utilisation d’un répartiteur d’antenne TV/FM
Brancher une source audio/video externe
Propos des connexions
Connexion d’autres éléments
Connexion d’un téléviseur ou d’un projecteur
Connexion du câble d’alimentation
Le type de connecteur dépend du pays
Réglage du volume
Manipulations de base
Mise sous tension de le CBX-300
Sélection d’une source d’entrée
Manipulations de base-Suite
Régler la luminosité de l’écran
Mise en sourdine
Egalisation préréglée
Lecture d’un CD
Utiliser les boutons en face supérieure
Sélection de la plage
Avance rapide et recul
Utilisation de la télécommande
Lecture d’un CD-Suite
Affichage d’informations du CD
Remarque
Sélection des fichiers MP3/WMA en mode Navigation
Sélection des fichiers MP3/WMA
Sélection de fichiers MP3/WMA en mode All Folder
Lecture des fichiers MP3/WMA d’un seul dossier
Affichage d’informations sur MP3
Lecture mémoire
Lecture aléatoire
Lecture repeat
Réglage des préférences MP3/WMA
Éléments
Lecture d’un iPod
Avec les boutons en face supérieure
Sélection des plages
Interruption de la lecture Pause
Avec la télécommande
Naviguer dans les menus de l’iPod avec la télécommande
Lecture d’un iPod-Suite
Appuyez sur le bouton MENU/ NO/CLEAR pour afficher le menu
Réglage de l’antenne
Choix d’une radio
Recherche d’une station radio
Après la mémorisation des présélections vous pouvez
Recherche automatique de stations FM Auto Preset
Choix d’une radio-Suite
Réglage manuel des stations FM/AM
Après la mémorisation de présélections vous pouvez
Présélections
Sélectionnez une présélection
Choix d’une présélection
Qu’est-ce que RDS ?
Affichage d’informations radio
Réception RDS uniquement sur le modèle européen
Nommer les présélections
Caractères disponibles
Une fois que vous avez entré le
Nom, appuyez sur le bouton YES
Copier des présélections
Effacer des présélections
Effacer le nom d’une présélection
Tion, appuyez sur le bouton
Pour effacer la présélection, appuyez sur le bouton Enter
Affichage de l’heure en mode de veille
Réglage de l’horloge
Réglage de l’horloge
Affichage de la date et de l’heure
Réglage de l’horloge-Suite
Propos des minuteries Timers
Utilisation des minuteries
Utilisation des minuteries-Suite
Programmation d’une minuterie
En veille
Appuyez sur le bouton Standby
On pour faire passer le CBX-300
Activer/couper les minuteries
Vérification des réglages de minuterie
Terie 1, 2, 3 ou
De toutes les minuteries
Utiliser la fonction ‘Snooze’
Réglage de minuterie
Snooze
Réglage de la durée d’interruption ‘Snooze’
Annuler la fonction ‘Sleep’
Utilisation de la minuterie Sleep Timer
Vérification du délai ‘Sleep’ résiduel
Régler le volume maximum
MENU/NO ENTER4
Dépannage
Alimentation
Dépannage-Suite
Lecture CD
Minuterie
Télécommande
Eléments externes
’heure n’est pas affichée en mode veille
Heure
Autres
’horloge affiche
Fiche technique
Sectiteur on amplifica
Section tuner
Entrée audiot
Advertencia
Instrucciones de seguridad importantes
Precauciones
Alimentación
Notas acerca del manejo de la unidad
Instalar esta unidad
Precauciones-Continúa
Precaución
Accesorios incluidos
Características
Altavoces
Reproductor de CDs
Contenido
Descripción del Receptor de CD
Paneles superior y frontal
Descripción del Receptor de CD-Continúa
Pantalla
Panel posterior
Controlador remoto RC-713S
Botones Volume / 20
Botón Timer 40, 41, 43
Botón Preset EQ
Botón Clock Call
Notas
Cambiar la batería
Uso del controlador remoto
Notas sobre los discos
Discos compatibles
Discos realizados con el ordenador personal
Compatibilidad con MP3/WMA
Notas sobre los discos-Continúa
Instalar los adaptadores de la base Dock para iPod
Acerca de los adaptadores de la base Dock para iPod
Instalar los adaptadores de la base Dock para iPod
Retirar los adaptadores de la base Dock
Conexión de antena FM de interiores
Conexión de la antena
Conexión de la antena en bucle AM
Conexión de la antena-Continúa
Conexión de una antena FM de exteriores
Conexión de una antena AM de exteriores
Utilizar un divisor de antena de TV/FM
Conectar una fuente externa de audio/vídeo
Notas sobre las conexiones
Conectar otros componentes
Conectar el televisor o el proyector
Conexión del cable de alimentación
El tipo de conector varía según el país
Ajuste del volumen
Funcionamiento básico
Activar el CBX-300
Selección de la fuente de entrada
Funcionamiento básico-Continúa
Cambiar el brillo de la pantalla
Silenciamiento del sonido
EQ predefinido
Reproducción de un CD
Utilizar los botones del panel superior
Selección de la pista
Avanzar rápido y rebobinar
Reproducción de un CD-Continúa
Uso del controlador remoto
Visualizar información del CD
Nota
Selección de los archivos del MP3
Selección de los archivos del MP3/WMA en el modo Navigation
Selección de los archivos de MP3/WMA en el modo All Folder
Reproducir los archivos MP3/WMA de una única carpeta
Visualización de la información de MP3/WMA
Pulse el botón YES/MODE
El indicador 1FOLDER
Reproducción memorizada
Configuración de las preferencias para el MP3/WMA
Reproducción aleatoria
Reproducción repetición
Elementos
Utilizar el iPod
Seleccionar pistas
Introducir una pausa en la reproducción
Retroiluminación del iPod
Utilizar el iPod-Continúa
Utilizar el controlador remoto
Navegar por los menús del iPod con el controlador remoto
Pulse el botón MENU/NO/CLEAR para visualizar el menú
Ajuste de la antena
Escuchar la radio
Sintonizar emisoras de radio
Después de guardar las presintonías puede
Presintonizar emisoras FM automáticamente Auto Preset
Escuchar la radio-Continúa
Presintonizar emisoras FM/AM manualmente
Seleccionar emisoras presintonizadas
¿Qué es RDS?
Visualizar información de radio
Recepción de RDS sólo para el modelo europeo
Asignar nombres a las presintonías
Caracteres disponibles
Copiar presintonías
Parpadeará el número de presintonía a
Copiar
Cionar la presintonía de destino
Borrar presintonías
Eliminar el nombre de una presintonía
Seleccione la presintonía cuyo
Nombre desea eliminar consulte
Configuración del reloj
Ajustar el reloj
Visualizar la fecha y la hora
Utilizar el formato de 12 horas o 24 horas
Configuración del reloj-Continúa
Uso de las funciones del Timer
Acerca de los temporizadores
Temporizadores con repetición
Ejemplo de temporizador
Uso de las funciones del Timer-Continúa
Pulse el botón Timer varias
Programación de un temporizador
Zador 1, 2, 3 ó 4 y luego pulse
Pulse el botón STANDBY/ON
Para ajustar el CBX-300 a Standby
Activar y desactivar los temporizadores
Comprobar los ajustes del temporizador
Utilizar la función Snooze repetición de alarma
Ajustar el tiempo de repetición de alarma
Ajuste de temporizador
Snooze en uso
Comprobar el tiempo Sleep restante
Cancelar el temporizador Sleep
Uso del temporizador Sleep
Ajustar el volumen máximo
Solucionar Problemas
Alimentación
Solucionar Problemas-Continúa
Reproducción CD
Componentes externos
Sintonizador
Controlador remoto
Reloj
Otros
El reloj visualiza
La hora no se visualiza durante el modo Standby
Especificaciones
Sección del amplificador
Sección del sintonizador
Entrada de audio
Memo
Es-55
Onkyo Europe Electronics GmbH
Onkyo Europe UK Office