DR-815
Avis
Important Safety Instructions
Precautions
Power
Installing this Unit
For British models
Precautions
Features Supplied Accessories
Receiver
Others
Table of Contents
Table of Contents
Disc Notes
Disc Notes
Remote Controller
Installing the Batteries
Using the Remote Controller
Front Panel
Part Names and Functions
Display
Part Names and Functions
FM Antenna 16
Rear Panel
AM Antenna 16,17
PRE OUT 22
Remote Controller
DVD Setup button 29, 36, 37, 67
Mode button 38, 39
Memory button
Random button
Connecting the Indoor FM Antenna
Connecting Antenna
Connecting the AM Loop Antenna
Attach the FM antenna, as shown
Connecting an Outdoor FM Antenna
Connecting Antenna
Connecting an Outdoor AM Antenna
Using a TV/FM Antenna Splitter
Connecting Speakers
Connecting Speakers
Speaker Connection Precautions
AV Cables & Connectors
AV Cables and Connectors
Before Making Any Connections
RCA AV Connection Color Coding
Using Video
Connecting Your TV
Using Scart
Using S Video
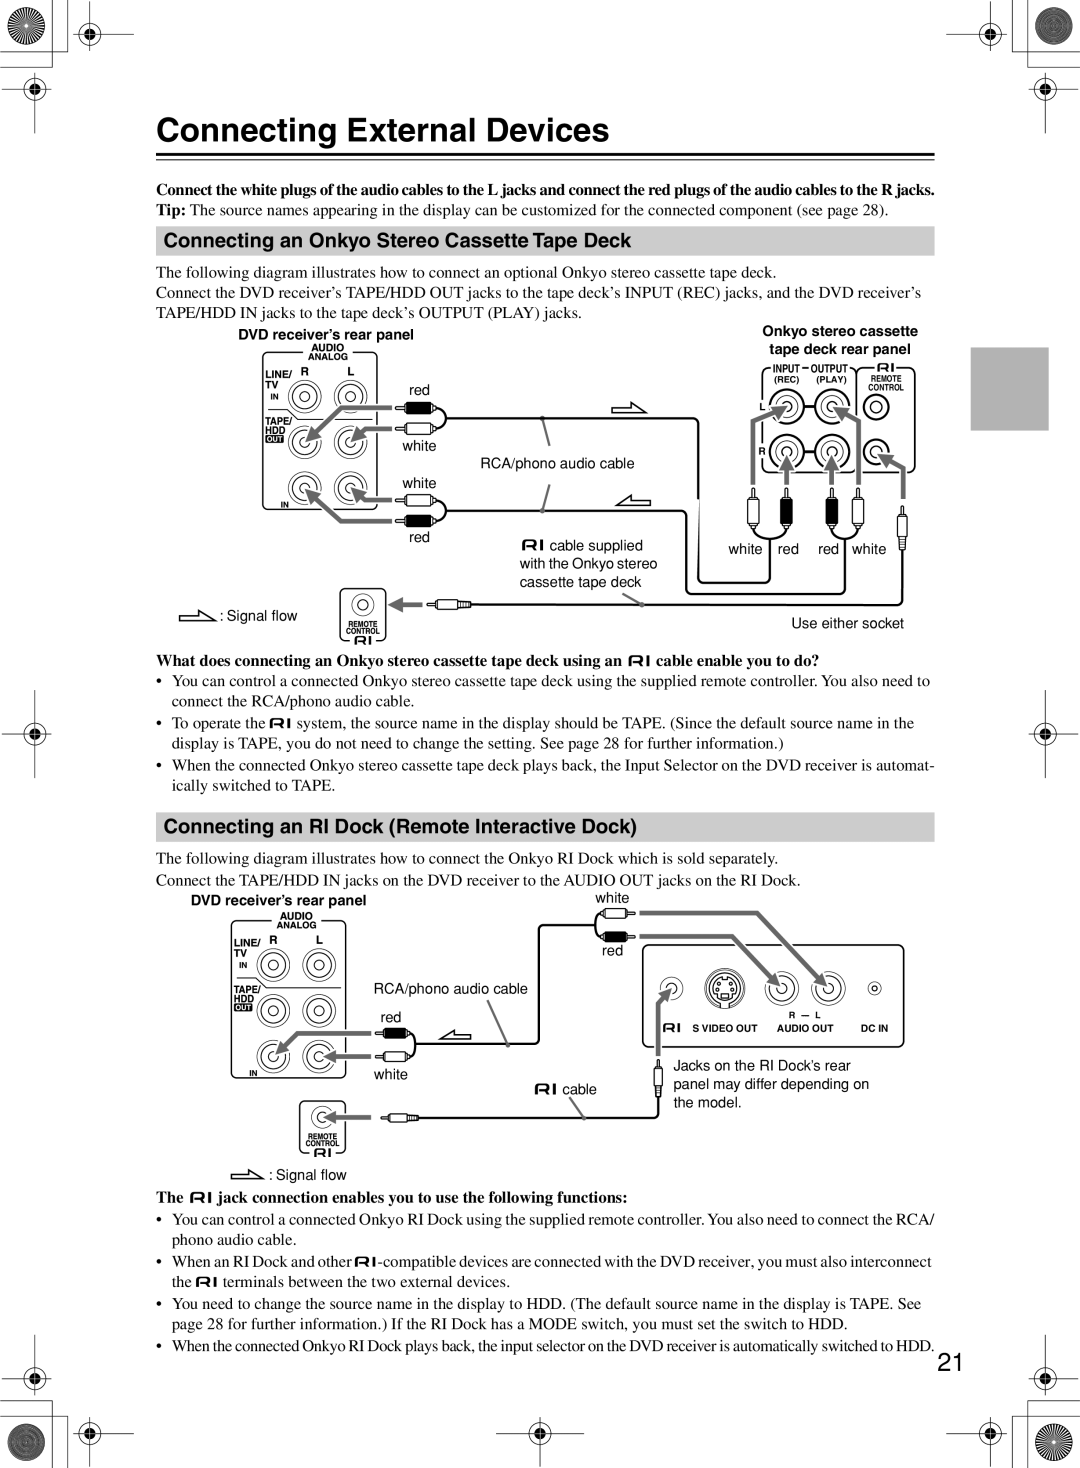
Connecting an Onkyo Stereo Cassette Tape Deck
Connecting External Devices
Connecting an RI Dock Remote Interactive Dock
Jack connection enables you to use the following functions
Connection for TV Audio Signal
Connecting External Devices
Connecting a Subwoofer
DVD receiver Active subwoofer With a built-in amplifier
DVD receiver
Connection for Enjoying 5.1ch Playback
Front left and right speakers
Enjoying Home Theater
Center speaker
Subwoofer
First Time Setup
Connecting the Power Cord
Turning Off Accuclock
To turn off ACCUCLOCK, press
Understanding Common Operations
Adjusting the Volume
Turning the Unit On and Off
Tip
Understanding Common Operations
Listening through the Headphones
Selecting a Source
Muting the Sound
About short source names
Customizing the Source Names
Press DVD Setup to exit the menu screen
Using the On-screen Displays
Before Starting DVD Playback
Enter
Before Starting DVD Playback
Setting the Language of This Player’s On-screen Displays
Resume and Last Memory
Playing Discs
Playing Discs
Basic Playback Controls
DVD Disc Menus
Scanning Discs
Video CD PBC menus
Frame Advance/Frame Reverse
Playing in Slow Motion
Switching Subtitles
Switching Audio Language/Channel
Switching Camera Angles
Zooming the Screen
Browsing Video Content with the Disc Navigator
Playing Discs
Browsing WMA, MP3 and Jpeg files
With the Disc Navigator
Creating a Program List for CD
Creating a Program List
Other functions available from the program menu
Repeat to build up a pro- gram list
Searching a Disc
Using Random Play
Looping a Section of a Disc Using Repeat Play
Viewing a Jpeg Slideshow
To show/switch/hide the informa
Displaying Disc Information
Tion displayed, press Display
Auto Tuning Mode
Manually Tuning a FM/AM Broadcast Station
Manual Tuning Mode
Listening to the Radio
Adjusting and installing the FM antenna
Adjusting the Antenna
Adjusting the AM antenna
Listening to the Radio
Customizing the Preset Channels
Programming FM Stations Automatically Auto Preset
Before auto presetting
Press Input / to display FM
Programming FM/AM Stations One by One Preset Write
To cancel presetting
If you wish to change the channel number, turn Multi JOG
Preset channel
Selecting Preset Stations
Press the Input Button to Select FM or AM
Turn Multi JOG or press the dial
Switching the Display Information
What is RDS?
Receiving RDS
Changing the Preset Channels
Tips for Changing the Preset Channels
Copying a Preset Channel Preset Copy
Erasing a Preset Channel Preset Erase
Changing the Preset Channels
Multi JOG until PresetErase?
To erase
Naming a Preset Channel
Naming Preset Channels
Entering a Name
Correcting and Erasing a Character
Erasing the Name Assigned to a Preset Channel
Naming Preset Channels
Inputting Characters from the Remote Controller
Inserting a Character
Enjoying Surround Sound
Configuring Subwoofer and Setting Up the Number of Speakers
Adjusting Speakers with Test Tone
Setting Distance of Speakers
Enjoying Surround Sound
Speaker Level Calibration
Enjoying Listening Modes
About the Listening Modes
Onkyo Original DSP Modes
Select a listening mode
Selecting Listening Mode
Enjoying Listening Modes
Play back the selected device
Emphasizing the Low End Using Remote Controller
Adjusting Sound
Adjusting Individual Speaker Levels
Using the Late Night Function Dolby Digital only
Audio Adjust Function
Adjusting Sound
Setting Accuclock to Use a Specific Station
Setting the Clock
Press Timer
Use / to tune into the FM station
Setting the Clock Manually
Setting the Clock
Checking the Time and the Day of the Week
To Switch between the 12-hour and 24-hour Displays
About the Once and Every Timers
Using the Timer Functions
Using the Sleep Timer
Using the Timer Functions
Canceling Sleep Timer
Checking the Remaining Time
Repeatedly press Timer to select the desired timer number
Programming a Once / Every Timer
Turn Multi JOG to selectTimer Play or Timer Rec
Turn Multi JOG to select the source
Turn Multi JOG to select the days of the week
Turn Multi JOG to select Once or Every
Turn Multi JOG to select the first day
Turn Multi JOG to select the last day
Turn Multi JOG to set the Off time for the timer operation
Turn Multi JOG to set the On time of the timer operation
Turn Multi JOG to set the volume
Place the unit in Standby mode
Switching the Timer On and Off Viewing the Timer Settings
Video Adjust menu
DVD Audio Settings and Video Adjust menus
Select and change settings using
/ / / cursor buttons
Initial Settings menu
Using the Initial Settings menu
Video Output settings
Language settings
Initial Settings menu
Options settings
Display settings
Registering a new password
How to Use Parental Lock
Changing your password
Setting/changing the Parental Lock
Country code list
Setting/changing the Country code
Select a new level and press
Select Country Code
Additional information
Setting the TV system
Screen sizes and disc formats
Widescreen TV users
Selecting languages using the language code list
Resetting the DVD player
Additional information
Titles, chapters and tracks
Language Code Letter
Language code list
Page
10/0
Buttons on
Source component
Recording
Prepare the recording component
Start recording
Power
Troubleshooting
Audio
Disc Playback
Troubleshooting
Remote Controller
Tuner
Timer Function
Connection with External Devices
Colors of the TV Picture Bleed
General
Specifications
Amplifier Section
Tuner Section
Memo
Onkyo Europe UK Office
Onkyo Europe Electronics GmbH
 white
white : Signal flow
 jack connection enables you to use the following functions: