Additional Operation
Recording Using the Connected Equipment
You can record according to the following using the connected recording equipment:
•Sound/picture of discs played back by the DVD Receiver,
•Sound of FM/AM programs, and
•Sound/picture of the connected source.
Note
Many discs and sources are copy protected. Copy protected sources are impossible to record.
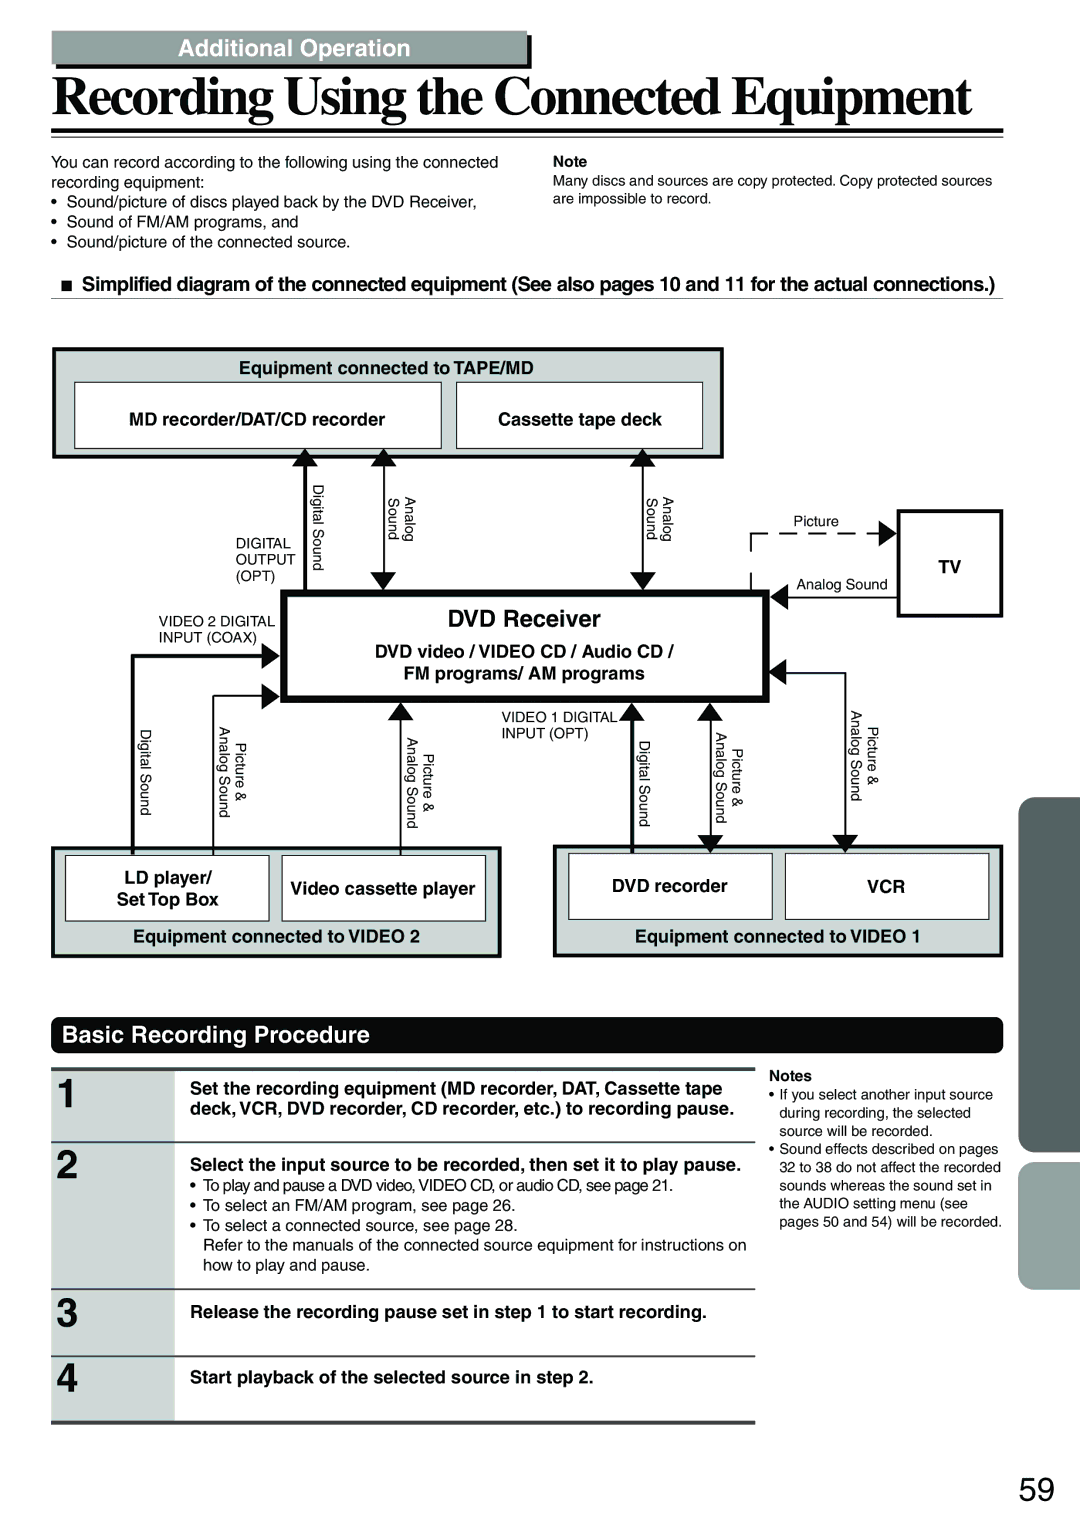
Simplified diagram of the connected equipment (See also pages 10 and 11 for the actual connections.)
Equipment connected to TAPE/MD
MD recorder/DAT/CD recorder
Cassette tape deck
|
| DigitalSound | Analog Sound |
| Analog Sound | Picture |
| ||||||||||
|
|
| |||||||||||||||
|
|
|
|
|
|
|
|
|
| ||||||||
DIGITAL |
|
|
|
|
|
|
|
|
|
|
|
|
|
|
|
| |
|
|
|
|
|
|
|
|
|
|
|
|
|
|
|
| ||
OUTPUT |
|
|
|
|
|
|
|
|
|
|
|
|
|
|
| TV | |
(OPT) |
|
|
|
|
|
|
| Analog Sound | |||||||||
|
|
|
|
|
|
|
|
|
| ||||||||
|
|
|
|
|
|
|
|
|
|
|
|
|
|
|
|
|
|
VIDEO 2 DIGITAL |
|
| DVD Receiver |
|
|
|
|
|
|
|
|
| |||||
|
|
|
|
|
|
|
|
|
|
| |||||||
INPUT (COAX)
DVD video / VIDEO CD / Audio CD /
FM programs/ AM programs
DigitalSound | AnalogSound | Picture& | AnalogSound | Picture& | DigitalSound | AnalogSound | Picture& | AnalogSound | Picture& |
|
|
|
|
| VIDEO 1 DIGITAL |
|
|
|
|
|
|
|
|
| INPUT (OPT) |
|
|
|
|
LD player/ |
|
| Video cassette player | DVD recorder |
|
| VCR | ||
Set Top Box |
|
|
|
| |||||
|
|
|
|
|
|
|
|
| |
Equipment connected to VIDEO 2 |
| Equipment connected to VIDEO 1 | |||||||
Basic Recording Procedure
1 | Set the recording equipment (MD recorder, DAT, Cassette tape |
deck, VCR, DVD recorder, CD recorder, etc.) to recording pause. | |
|
|
2 | Select the input source to be recorded, then set it to play pause. |
| |
| • To play and pause a DVD video, VIDEO CD, or audio CD, see page 21. |
| • To select an FM/AM program, see page 26. |
| • To select a connected source, see page 28. |
| Refer to the manuals of the connected source equipment for instructions on |
| how to play and pause. |
|
|
3 | Release the recording pause set in step 1 to start recording. |
| |
|
|
4 | Start playback of the selected source in step 2. |
| |
|
|
Notes
•If you select another input source during recording, the selected source will be recorded.
•Sound effects described on pages 32 to 38 do not affect the recorded sounds whereas the sound set in the AUDIO setting menu (see pages 50 and 54) will be recorded.
59
