Connections
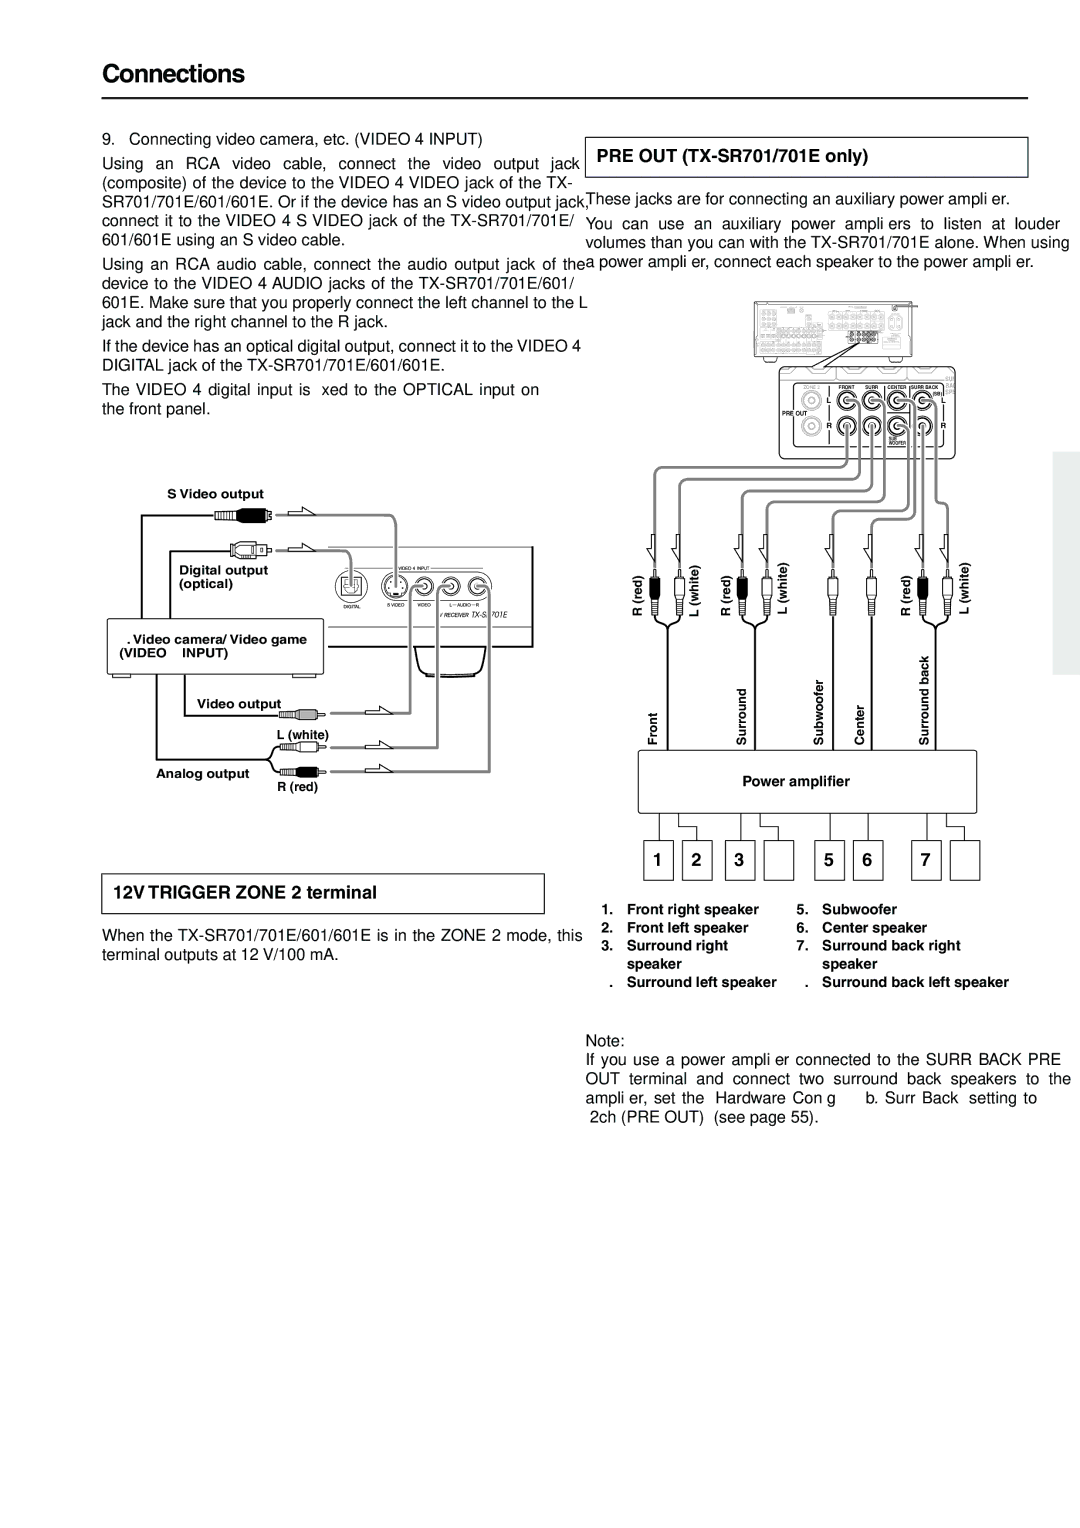
9. Connecting video camera, etc. (VIDEO 4 INPUT)
Using an RCA video cable, connect the video output jack (composite) of the device to the VIDEO 4 VIDEO jack of the TX- SR701/701E/601/601E. Or if the device has an S video output jack, connect it to the VIDEO 4 S VIDEO jack of the
Using an RCA audio cable, connect the audio output jack of the device to the VIDEO 4 AUDIO jacks of the
If the device has an optical digital output, connect it to the VIDEO 4 DIGITAL jack of the
The VIDEO 4 digital input is fixed to the OPTICAL input on the front panel.
S Video output
PRE OUT (TX-SR701/701E only)
These jacks are for connecting an auxiliary power amplifier.
You can use an auxiliary power amplifiers to listen at louder volumes than you can with the
SUR
ZONE 2 FRONT SURR CENTER SURR BACK BAC (SB) SPE
L | L |
PRE OUT |
|
R | R |
| SUB |
| WOOFER |
Digital output (optical)
9.Video camera/ Video game (VIDEO 4 INPUT)
Video output
L (white)
R (red)![]()
Front
L (white) | R (red) | L (white) |
| Surround | Subwoofer |
R (red) | L (white) |
Center | Surround back |
Analog output
R (red)
Power amplifier
12V TRIGGER ZONE 2 terminal
When the
|
|
|
|
|
|
|
|
|
|
|
|
|
|
|
|
|
|
|
|
|
|
|
|
|
|
|
|
|
|
|
|
|
|
|
|
|
|
|
|
|
|
|
|
|
|
|
|
|
|
|
|
|
|
|
|
|
|
|
|
|
| 1 |
|
| 2 |
|
| 3 |
|
| 4 |
| 5 |
| 6 |
| 7 |
|
| 8 |
| ||||||||
|
|
|
|
|
|
|
|
|
|
|
|
|
|
|
|
|
|
|
|
|
|
|
|
|
|
|
|
| |
1. | Front right speaker |
|
| 5. | Subwoofer |
|
|
|
|
|
|
| |||||||||||||||||
2. | Front left speaker |
|
| 6. | Center speaker |
|
|
| |||||||||||||||||||||
3. | Surround right |
|
|
|
|
|
| 7. | Surround back right | ||||||||||||||||||||
| speaker |
|
|
|
|
|
|
|
|
|
|
| speaker |
|
|
|
|
|
|
| |||||||||
4. | Surround left speaker | 8. | Surround back left speaker | ||||||||||||||||||||||||||
Note:
If you use a power amplifier connected to the SURR BACK PRE OUT terminal and connect two surround back speakers to the amplifier, set the “Hardware Config” → “b. Surr Back” setting to “2ch (PRE OUT)” (see page 55).
21
