ENGLISH
4.To pause / unpause the
5.Once the picture has been taken, the
The ![]() p.18) is enabled.
p.18) is enabled.
Playing Back Last Picture Taken
You can display the last still picture taken by pressing ![]() (
(![]() p.4). When viewing
p.4). When viewing
the last image, you may choose to delete it by pressing ![]() and confirm. Press again to return to shooting.
and confirm. Press again to return to shooting.
INTRODUCTION TO CAMERA MODES
GUIDE TO MENUS
Press MENU to access the menu screens, where settings can be specified. To switch between Primary and Secondary Menus, highlight the top menu fields.
Mode | Primary Menu | Secondary Menu | Description |
|
|
|
|
|
|
| Record | Setup | Can be set as Camera Mode | / |
Record |
|
| Movie Mode . |
|
Mode |
|
| Camera Mode: Digital still photography | |
|
|
| with adjustable settings. |
|
|
|
| Movie Mode: Allows you to shoot | |
|
|
| movies with the camera. |
|
| Playback | Setup | Play back and review all images recorded | |
Playback |
|
| onto the camera’s internal or external | |
Mode |
|
| memory card. |
|
Setup Menu | ENGLISH | |
Under the Setup Menu, which is available in all modes, the basic settings of the | ||
|
camera can be adjusted.
Setup Menu Settings and Options
The options underlined and in italics are initial defaults.
|
|
|
|
|
|
Settings | Page | Options |
| FRANÇAIS |
|
|
|
|
|
| |
P.Counter | p.11 | Down / Up |
|
| |
|
|
| |||
Set Clock | p.11 | Adjust date and time settings |
|
|
|
Set City | p.12 | Toggles between Home or World City time |
|
|
|
|
|
|
|
|
|
Show Time | p.12 | Home City / World City |
|
|
|
|
|
| |||
|
|
|
|
| |
Language | p.13 | English / Français / Deutsch / Español / Italiano / Português |
|
| |
|
| ||||
|
|
|
|
| |
Beep Tone | p.13 | On / Off | ESPAÑOL |
| |
|
|
|
|
| |
Auto Off | p.13 | None / 1 min. / 3 min. /5 min. |
| ||
|
| ||||
|
|
|
|
| |
TV Out | p.13 | PAL / NTSC |
|
| |
File No. | p.13 | Continue / New |
|
| |
Format | p.14 | Format internal memory or memory card |
|
| |
|
| ||||
|
|
|
|
| |
Reset | p.14 | Cancel / Reset |
|
| |
|
|
|
|
| |
LCD Bright | p.14 | Adjust LCD brightness levels. |
|
| |
|
|
|
|
| |
Info. | p.15 | View model number and firmware version information. |
|
| |
|
|
|
|
|
|
Use ![]()
![]() to navigate the menu screen (
to navigate the menu screen (![]() p.4). Press directly onto
p.4). Press directly onto ![]()
![]() to confirm setting changes.
to confirm setting changes.
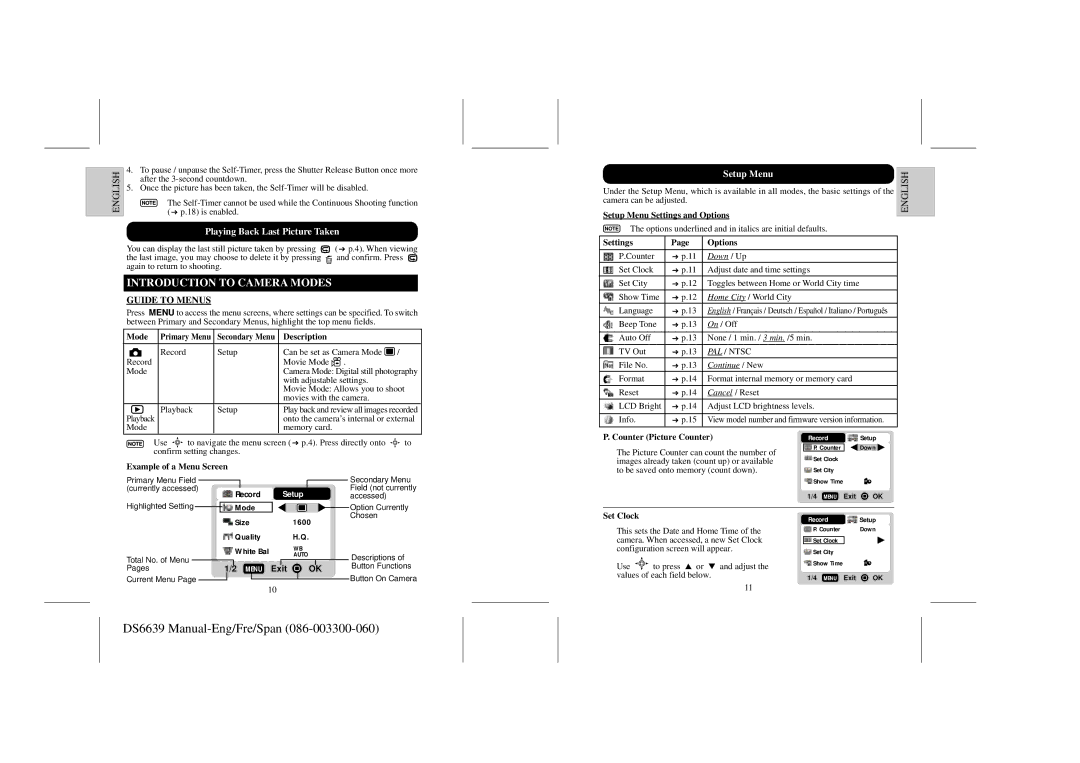
Example of a Menu Screen
Primary Menu Field |
|
|
|
|
|
|
|
|
|
| Secondary Menu | |
(currently accessed) |
|
|
|
|
|
|
|
|
| Field (not currently | ||
|
|
|
| Record | Setup |
|
|
| accessed) | |||
Highlighted Setting |
|
| Mode |
|
|
|
|
|
| Option Currently | ||
|
|
|
|
|
|
|
|
| ||||
|
|
|
|
|
|
|
|
|
|
|
|
|
P. Counter (Picture Counter)
The Picture Counter can count the number of images already taken (count up) or available to be saved onto memory (count down).
Record ![]() Setup
Setup
![]()
![]() P. Counter
P. Counter ![]()
![]() Down
Down ![]()
![]() Set Clock
Set Clock
![]() Set City
Set City
![]() Show Time
Show Time
1/4 MENU Exit ![]() OK
OK
|
|
|
|
| Size |
| 1600 |
| Chosen | |||
|
|
|
|
|
|
| ||||||
|
|
|
|
| Quality | H.Q. |
| |||||
|
|
|
|
| White Bal |
| WB |
|
| |||
|
|
|
|
| AUTO |
| Descriptions of | |||||
Total No. of Menu |
|
|
|
|
|
|
|
|
| Button Functions | ||
Pages | 1/2 | MENU Exit |
| OK | ||||||||
Current Menu Page |
|
|
|
|
|
|
|
|
|
| Button On Camera | |
|
|
|
|
|
|
|
|
|
| |||
10
Set Clock
This sets the Date and Home Time of the camera. When accessed, a new Set Clock configuration screen will appear.
Use ![]()
![]() to press
to press ![]() or
or ![]() and adjust the values of each field below.
and adjust the values of each field below.
11
Record | Setup |
P. Counter | Down |
![]()
![]() Set Clock
Set Clock
![]() Set City
Set City
![]() Show Time
Show Time
1/4 MENU Exit ![]() OK
OK