Operating Instructions
Carefully observe copyright laws
Information for Your Safety
Dear Customer
Following Applies only in the U.S.A
Following Applies only in Canada
FCC Note
Declaration of Conformity
Battery pack Lithium ion battery pack
About the battery pack
About the battery charger
Battery charger/AC adaptor
Care of the camera
This symbol is only valid in the European Union
Contents
Taking Picture by Setting the Exposure
Adjusting each Film Mode to
Taking Pictures while Adjusting Color
Adjusting the custom settings to
Copying to a PC using PHOTOfunSTUDIO 5.0 HD
Playing back pictures using the AV
Connecting to a PC
Digital Camera Accessory Order Form
Software Use it to install the software to your PC
Standard Accessories
Shoulder Strap Stylus pen
Card is optional
VGQ0C14
DMW-BLB13PP
Camera body
Names of the Components
LVF/LCD button P42
Display button P58, 63
Hdmi socket P163 AV OUT/DIGITAL socket P162, 168, 171
Press
Battery charger/AC adaptor P24
Maximum 180o
Rotating the LCD Monitor
90o
Vertical rotating direction
Touch
How to Use the Touch Panel
Drag
About the Stylus pen
What can be done by touch operation
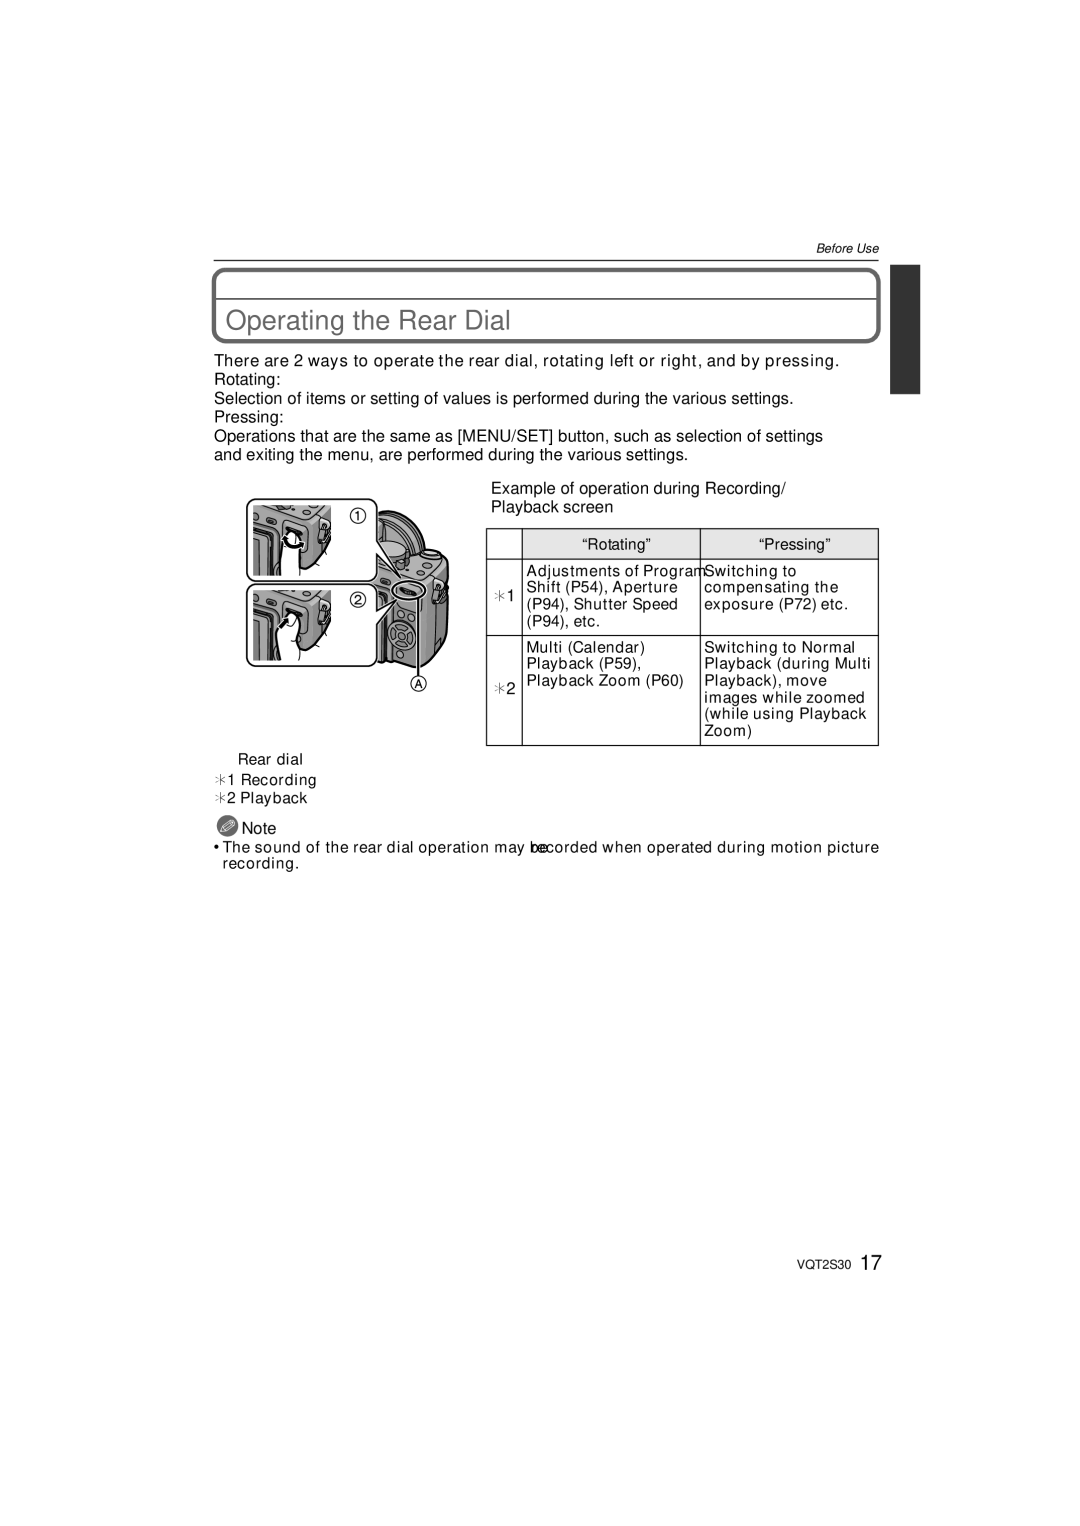
Rotating Pressing
Switching to
Operating the Rear Dial
About the functions of your lens
About the Lens
Micro Four Thirds Mount
Four Thirds mount Specification lens¢1 Compatible to
± Usable, ¥ Some functions/features limited, Not usable
Specification lens Not compatible to
Other Micro Four
Attaching a lens to the camera body
Attaching/Detaching the Lens
Detach the lens cap
Detaching a lens from the camera body
Optical Image Stabilizer
Lens included in DMC-G2K has a stabilizer function
Fitting to the mark
Attaching the Lens Hood
Shoulder strap eyelet
Attaching the Shoulder Strap
Charging
Charging the Battery
Connect the AC cable
Battery indication
About the Charge indicator
When the Charge indicator flashes
Charge
Used
When the 14-42 mm/F3.5-5.6 lens included in DMC-G2Kis
Recording conditions by Cipa standard
Playback when using the LCD monitor
Recording motion pictures when using the LCD monitor
When flash is used repeatedly
When the 14-42 mm/F3.5-5.6 lens included in DMC-G2K is
Card may be damaged if it is not fully inserted
Inserting and Removing the Card optional/the Battery
Do not touch the connection terminals of the card
About the Card
Changing the clock setting
Setting Date/Time Clock Set
Select Clock SET in the Setup menu, and press 1. P32
Turn the camera on
MY Menu
Setting the Menu
Switching to the Setup menu
Setting menu items
Set the mode dial to Press MENU/SET to display the menu
When operating the touch panel
Setting the Quick Menu
Press 3/4 or rotate the rear dial to select I.EXPOSURE
Press 1 or the rear dial
Touch to close the Quick Menu
Touch the menu item and the setup
Travel Setup Location OFF/SET
About the Setup Menu
Destination Travel destination area Home Your home area
Muted t Low u High
Auto LCD OFF
OFF „ Auto Power LCD
… Power LCD
Auto
Hold
Interlace method/progressive method
Press MENU/SET to finish
Viera Link
Scene Menu
Set the language displayed on the screen
Reset the file number of the next recording to
ENGLISH/FRANÇAIS/ESPAÑOL/PORTUGUÊS
Card is formatted
LCD Monitor
Holding and using Your Camera
Tips for taking good pictures
Taking pictures at a low angle
Taking pictures with the camera held vertically
Direction Detection Function
Diopter adjustment
Press LVF/LCD to switch the monitor screen
Press a
Switching the mode by rotating the mode dial
Aperture-Priority AE Mode P94
List of REC Modes Program AE Mode P51
Shutter-Priority AE Mode P94
Manual Exposure Mode P95
Refer to page 52 for information about AFS and AFC
Setting AFS or AFC Set the focus mode lever to AFS or AFC
Taking a still picture
Set the focus mode lever to AFS or AFC
Taking Pictures using the Automatic Function
REC Mode ñ
Press the shutter button halfway to focus
Open the flash when the flash is to be used
When taking pictures using the flash P66
Scene detection
Night Portrait Night Scenery Sunset BABY¢
AF Tracking Function
When operating the touch panel Touch the subject
Backlight Compensation
Is displayed in the lower left of the screen
REC Mode menu
Settings in Intelligent Auto Mode
Setup menu
Custom menu
Economy
Metering Mode
Flash Synchro P71
Burst Rate P73
Set the mode dial to
Taking Pictures with Your Favorite Settings
REC Mode ³
Set the drive mode lever to
Set the focus mode lever to AFS
Setting the Focus Mode AFS/AFC/MF
Set the focus mode lever to AFC
Set the focus mode lever to MF
Preventing jitter camera shake
Focusing
When the subject is not in focus
Touch × in Recording Mode
Taking pictures using the Touch Shutter function
Touch to cancel the Touch Shutter function
Program Shift
Rotate the zoom ring towards Tele. P13
Taking Pictures with the Zoom
Rotate the zoom ring towards Wide. P13
To make subjects appear closer use Tele
Extended Optical Zoom mechanism
Feature Optical Zoom Extended Optical Zoom Digital Zoom
Types of zooms
Button
Playing Back Pictures
Press
Changing the information displayed on the playback screen
Press Display to switch the monitor screen
Displaying multiple screens Multi Playback
Rotate the rear dial left
You can display pictures by recording date
Displaying Pictures by Recording Date Calendar Playback
1k2k4k8k16k
Using the Playback Zoom
Touch the part to enlarge
To delete a single picture
Deleting Pictures
Select the picture to be deleted, and then press ‚
Press 2 to select YES and then press MENU/SET
62 VQT2S30
Switching the Information Displayed on the recording screen
Switching the Display of the LCD Monitor/ Viewfinder
When is set
Press Display to change
Normal display¢1 Normal displayidetailed information¢1
Viewfinder display
No display¢1 Detailed information¢1
Night Portrait P102, the guide line is gray
Set the position of the guide line with
Recording guide line
About the Histogram
Examples of histogram
Switching to the appropriate flash setting
Taking Pictures using the Built-in Flash
Select Flash in the REC Mode menu. P32
Set the position of the histogram
Background landscape will appear brighter
Press 3/4 to select a mode and press MENU/SET
Simultaneously it reduces the red-eye phenomenon
About the Digital Red-Eye Correction
Available flash settings by Recording Mode
±¢ - - ±
± - ±
Auto
Shutter speed for each flash setting
Available flash range to take pictures
Adjust the flash output
Normal method when taking
Setting to the 2nd Curtain Synchro
Dynamic
Effect
Take a picture
Compensating the Exposure
Underexposed Properly
Exposed
High speed
Taking Pictures using Burst Mode
Focus Mode Focus Priority
Focusing in Burst Mode
Normal focusing¢2
Predicted focusing¢3
With Auto Bracket Sequence 0/s/r 1st picture 2nd picture
Taking Pictures using Auto Bracket
D0 EV J1/3 EV I1/3 EV
3rd picture
`/0
Press MENU/SET twice to close the menu
Seconds/3 pictures
Taking Pictures with the Self-timer
Seconds
Setting the Method used to Focus AF Mode
About š Face Detection
Touch SET
Touch the slide bar to change the size of the AF Area frame
Before locking
About Ø 1-area-focusing
About 23-area-focusing
Touch the subject to move the AF area
Touch SET Move the AF area easily with button operations
Taking Pictures with Manual Focus
Touch Cancel to close MF assist
Take the picture
MF Assist
Move the MF Assist easily with button operations
Press MENU/SET to close MF Assist
Technique for Manual Focus
About the focus distance reference mark
Fixing the Focus and the Exposure AF/AE Lock
Taking pictures when AF or AF/AE is set
Fixing the exposure only
AE lock indication
Press Touch the White Balance to select Touch SET
Adjusting the White Balance
Auto White Balance
Setting the White Balance manually
Select 1 or 2 and then touch White SET
Finely adjusting the White Balance
Setting the color temperature
White Balance Bracket
Setting the Light Sensitivity
Press Touch the ISO sensitivity to select Touch SET
Or rear dial left Vertical Gi to Mj
AUTO¢
About Intelligent ISO sensitivity control
Press Touch 2/1 to select an item
Change Tone of the Color for the Picture to be
Touch Memory Touch MY Film 1 or MY Film
Adjusting each Film Mode to the desired setting
Touch the item Touch the slide bar
OFF can be selected only for Multi Film
Multi Film Bracket
Taking Pictures by Specifying the Aperture/ Shutter Speed
REC Mode ±´
Aperture-priority AE
Shutter-priority AE
Press the shutter button halfway
Taking Picture by Setting the Exposure Manually
REC Mode ²
About B Bulb
Manual Exposure Assistance
Press Display while displaying the preview screen
Confirm the Effects of Aperture and Shutter Speed
Press a preview button
You can also use the rear dial to select
Taking Expressive Portraits and Landscape
About the information
Portrait
Sports
Scenery
Flower
CLOSE-UP
Food
Objects
Night Portrait
Night Portrait
Night Scenery
Illuminations
REC Mode ¿
Set the mode dial to Press 3/4/2/1 to select the Scene Mode
¢ Can be set only when Peripheral Defocus is set
Taking Pictures that match the Scene being
Press MENU/SET to finish To cancel AGE and Name
Technique for Party Mode
Party
BABY1/ BABY2
PET
Setting the AF area Touch the subject to move the AF area
Peripheral Defocus
Take the picture
Readjust the My Color settings
Taking Pictures while Adjusting Color
Set the mode dial to Touch 2/1 to select an item
Touch the slide bar Touch SET
Adjusting the custom settings to achieve desired effects
Touch 2/1 to select Custom Touch the item
Registering custom settings
Registering Personal Menu Settings
When changing the menu settings
Taking Pictures in Custom Mode
Press MENU/SET to enter the settings
Recording Motion Picture
Select the mode
Set the focus mode
Focus Mode
About the Focus Mode settings
Start recording by pressing the motion picture button
Continuous AF
Face RECOG./ISO Limit SET
When set to Intelligent Auto Mode
Scene detection
Changing REC Mode and REC Quality
Recording format Features
¢1 What is bit rate
When Avchd Lite is selected in step
When Motion Jpeg is selected in step
¢3 This item cannot be set in the Intelligent Auto Mode
Recording Motion Pictures with the Desired
Settings Motion Picture P Mode
Rotate the rear dial
About the Flicker Reduction Function
Press ‚
Taking a Picture with Face Recognition Function
Playback Mode
Example of faces that are hard to recognize
Face Settings
Point of recording when registering the face images
Registering face image of new person
Press the shutter button halfway to close the menu
Select item to edit with 3/4, and then press
HIGH/NORMAL/LOW
Setting Auto Registration/Sensitivity
MENU/SET
Add the picture, and then press MENU/SET
Auto Registration
NEW Person
Additional Image
Recording which Day of the Vacation You Take the Picture
For details on the Setup menu settings, refer to P32
Useful Functions at Travel Destinations
Press MENU/SET twice to close the menu Take a picture
Canceling the travel date
Press 3 to select Destination and then press MENU/SET to set
Select World Time from the Setup menu, and then press
@ Picture Size
Using the REC Mode Menu
? Aspect Ratio
9M 4000k2248 pixels 5M 2816k1584 pixels 2M 1920k1080 pixels
When the aspect ratio is W
Quality
Center weighted
Metering Mode
Face Recog
Applicable modes OFF/ON/MEMORY/SET
Stabilizer
You can switch the flash setting
Flash
Applicable modes OFF¢
Resolution
Flash Adjust
RED-EYE Removal
Flash Synchro
ISO Limit SET
Exposure Intelligent exposure adjustment
ISO Increments
Applicable modes OFF/200/400/800/1600
EX. OPT. Zoom
Long Shtr NR
Digital Zoom
Burst Rate
Color Space
SELF-TIMER
Auto Bracket
REC Mode
Using the Motion Picture Mode Menu
Audio REC
This sets up the data format of motion pictures
Continuous AF
REC Quality
Wind CUT
This reduces the wind noise in the audio recording
OFF
Using the Custom Menu
P65
OFF
Quick AF Continuous AF About
AF/AE
PRE AF
Move the AF area or MF assist easily during recording
When taking pictures in dark places, the AF Assist
AF Assist Lamp does not turn on
Lamp lights while the shutter button is pressed
Preview Hold
This will set the display style of the viewfinder
Setting items for each REC Mode
Viewfinder style
This will set the display style of the LCD monitor
Enables/disables the motion picture button
It will switch to Intelligent Auto Mode by pressing
Picture/ Motion picture
Remaining Shots
Touch Shutter
Sensor Cleaning
Touch Guide
Touch Scroll
Attached to the camera body or is not attached
No lens on the unit
Correctly
Shoot W/O Lens
Entering Text
Motion pictures
Playing Back Motion Pictures/Pictures with Audio
Avchd Lite
Motion Jpeg
Creating Still Pictures from a Motion Picture
Playback Mode ¸
Pictures with audio
Picture size
Slide Show
Using the Playback Mode Menu
Operations performed during slide show
Cursor displayed during playback is the same as 3/4/2/1
Changing the slide show settings
Playback Mode
Setup
Effect
Title Edit
When Category Play is selected in step
Category
Recording information
Select the picture, and then
Multi setting
Enter the text. P144 Press ‚ to return to the menu screen.¢
Text Stamp
OFF Shooting Date Otime
Select the picture, and then press MENU/SET to set
Withtime
Name
Aspect ratio setting Picture size
Press 3 at the location to divide
Video Divide
Press ‚ to return to the menu screen
Motion picture before the dividing will be deleted
Resize Reducing the picture size number of pixels
Single setting
Single
Multi
Cropping
? Aspect Conv
ROTATE/M Rotate Disp
Select Rotate on the Playback Mode menu. P32
Press 2/1 to select the picture and then press MENU/SET
Rotate The picture is rotated manually
Favorite
To print the date
Print SET
Select the picture, and then press MENU/SET
Repeat these steps for each picture
When Multi has been selected
Protect
Press 2/1 to select the person and then press MENU/SET
Face REC Edit
Align the marks, and insert. B AV cable supplied
Playing back pictures using the AV cable supplied
Playing Back Pictures on a TV Screen
Playing back on the TV with Hdmi socket
What is HDMI?
Playing back pictures on a TV with an SD Memory Card slot
164 VQT2S30
Panasonic TV compatible with Viera Link
Preparations Set the Viera Link to ON. P38
SUB Menu
Return
Press Red button during one screen display
This is displayed initially when using the Viera Link
Usable functions
Other linked operations Turning the power off
Automatic input switching
Saving the Recorded Still Pictures and Motion Pictures
Copy the playback image using an AV cable
Install PHOTOfunSTUDIO 5.0 HD Edition to the PC
Copying to a PC using PHOTOfunSTUDIO 5.0 HD Edition
Copy the images to a PC using PHOTOfunSTUDIO 5.0 HD Edition
For details on connecting, refer to Connecting to a PC P170
PC that can be used
Connecting to a PC
Press 3/ 4 to select PC, and then press
If USB Mode P37 is set to PC in the Setup menu
Double-click on Removable Disk in My Computer
Double-click Dcim folder
Disconnecting the USB connection cable safely
Press 3/4 to select PictBridgePTP, and then press MENU/SET
Printing the Pictures
Press 3 to select Print Start and then press MENU/SET
Selecting a single picture and printing it
Selecting multiple pictures and printing them
Press Press 3/4 to select an item and then press MENU/SET
Print with Date
Print Settings
NUM. of Prints
You can set the number of prints up to
Layout Layouts for printing that can be set with this unit
When printing different pictures on 1 sheet of paper
Paper Size
Using the dedicated flash DMW-FL220 optional
Using an External Flash optional
External flash Forced on External flash Slow Sync
Turn off the camera and close the built-in flash
MCuMulti-coated NDuNeutral Density
Using the Protector/Filter optional
Attach the filter
About Lock on the remote shutter
Using the Remote Shutter optional
About the Off/On Mode Selector Switch
Using the External Microphone optional
Battery Check Lamp Battery
Attach the stereo microphone to the hot shoe a
Connect the AC cable Connect the DC cable a
Using the AC Adaptor
REC Mode when recording motion
Recording Recording in Program AE Mode Initial setting
LCD Monitor Display/Viewfinder Display
Pictures P113/Recording quality P113 Picture size P126
White Balance Fine Adjustment P88 White Balance Bracket P89
Recording after settings
Available recording time¢3 P111 R8m30s
LCD recording information
Detailed information display
Playback
Histogram display
Motion picture playback P145
Others
Dust reduction function
About dirt on the image sensor
Removing dirt on the image sensor
For care of the eye cup on the viewfinder
Bring charged spare batteries when going out
Battery
Dispose of unusable battery
About the Lens
Disclaimer
Do not bend or drop the card
About the personal information
This Memory Card is WRITE-PROTECTED
Message Display
No Valid Picture to Play
This Picture is Protected
Memory Card Parameter ERROR/THIS Memory Card Cannot be Used
Memory Card Error Format this CARD?
Read ERROR/WRITE Error Please Check the Card
No Additional Selections can be Made
This Battery Cannot be Used
No Battery Power Remains
Remaining battery power is low Charge the battery
Battery cannot be recognized by the camera
Battery and power source
Troubleshooting
Recording
Bright spot not in subject is recorded
Recorded picture looks rough Noise appears on the picture
You cannot compensate the exposure
Subject cannot be locked. AF tracking not possible
Object seems to be warped
Lens
Motion picture recording stops in the middle
LCD monitor/Viewfinder
Picture is not played back There are no recorded pictures
Playback
TV, PC and printer
Others
AF Assist Lamp does not turn on
Clock is reset
Camera becomes warm
File numbers are not recorded consecutively
Number of recordable pictures
Number of Recordable Pictures and Available Recording Time
Aspect ratio Picture size 10.5M Quality
Aspect ratio
Aspect ratio Quality
Available recording time when recording motion pictures
Specifications
Exposure AE
Metering Mode
Viewfinder
Flash
Hdmi
MIC/REMOTE
AV OUT/DIGITAL
Aperture type
S. switch
Aperture range
Minimum aperture Value
Accessory# Description
Digital Camera Accessory System
RP-CDHM15
For USA and Puerto Rico Customers
Digital Camera Accessory Order Form
Product or Part Name Parts Labor
Limited Warranty
Limited Warranty Coverage For USA and Puerto Rico Only
Limited Warranty Limits And Exclusions
Mail-In Service
For hearing or speech impaired TTY users, TTY
Pana Monday-Friday 9am-9pm, Saturday-Sunday 10am-7pm EST
AC Adaptor
Color Temperature Setting
138
137
141
172
Intelligent ISO sensitivity control
176
White Balance Fine Adjustment
Recording Quality Setting Motion Picture Mode
143
198
Others
F0410SM0