Example
DVD Recorder
Region number supported by
For United Kingdom and Republic of Ireland
How to replace the fuse
Before use
EB and EBL area code model only
Safety precautions
Table of contents
Unit care
Included accessories
Disc handling
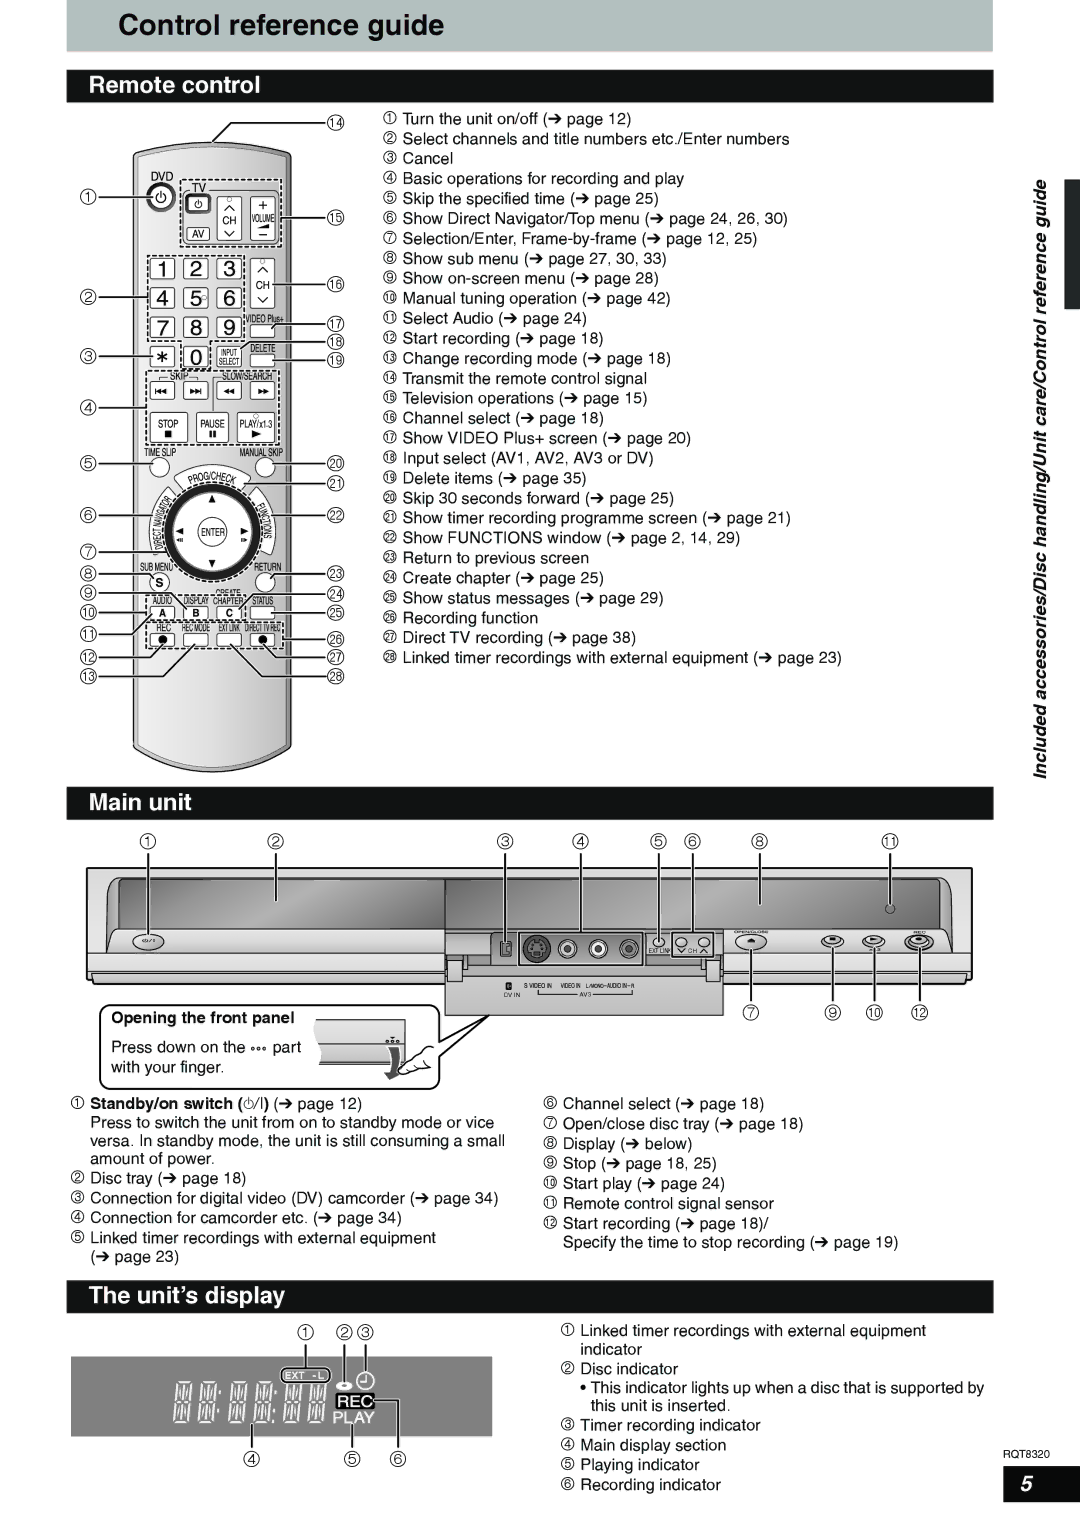
Control reference guide
Remote control
Main unit
Unit’s display
Discs you can use for recording and play
Disc information
+R DL
VR DVD Video Recording format
Play-only discs
Remote control information
Discs that cannot be played
Types of disc for the type of connected TV
AV1 Output in the Setup menu Ô
Connecting to a television only
Connection
Use of the supplied RF coaxial leads
Connection
AV1 Output and AV2 Input in the Setup menu Ô
To view satellite/digital terrestrial programmes
To record satellite/digital terrestrial programmes
Connection
Connecting to a television and VCR
To copy from a VCR
Refer to Copying from a video cassette recorder Ô
Other connections
Connecting to an amplifier with a digital input Terminal
Connecting to a stereo amplifier
TV Tuning Auto Setup
TV Tuning Auto Setup
Timer recording from satellite receiver with Video Plus+
Press Video Plus+
Press e to select the programme
Selecting television type and aspect
Set up to match your television and remote control
To enjoy progressive video
Component and press Enter
Set up to match your television and remote control
When the following indicator appears on the unit’s display
Television operation
While pressing TV, enter the code with the numbered buttons
It is not possible to
Important notes for recording
Record continuously
From the first layer
When opening the tray without disc finalization
When finalizing the disc
Recording modes and approximate recording times
Disc Insertion/Ejection
Press * REC to start recording
Recording television programmes
Press 1 2 CH to select the channel
Flexible Recording
To specify a time to stop recording-One Touch Recording
Playing while you are recording
Press e,r,w,q to select Start and press Enter
Using Video Plus+ system to make timer recordings
Timer recording
Timer icon
Press the numbered buttons to enter the Video Plus+ number
To release the programme from
Timer recording
Recording standby
Press g
Check, change or delete a programme
Making timer recordings on the television
Recording from a satellite/digital terrestrial receiver
To cancel the external control
Manual Recording
To skip unwanted parts
Changing audio during play
Playing discs
Insert a disc Ô Press q Play
Press Audio
Playing discs
Operations during play
Playing MP3
Using menus to play MP3 and still pictures JPEG/TIFF
Press Direct Navigator
Press e,r to select the track
Useful functions during still
Playing still pictures JPEG/TIFF
Picture play
Press e,r,w,q to select the still picture and press Enter
Using on-screen menus
Using on-screen menus/FUNCTIONS window and Status message
Press Display
Enter Return Display Status
Press Status
Functions window
Status message
Editing titles/chapters and playing chapters
Editing titles/chapters
Press Direct Navigator Press e,r,w,q to select the title
Press e,r,w,q to select the chapter
Chapter operations
Title operations
Creating playlists
Creating, editing and playing playlists
Press w,q to select the source title and press r
Press w,q to select the position to
Playlist operations
Editing and playing playlists/ chapters
Start play on the other equipment
Copying from a video cassette recorder
DV automatic recording DV Auto Rec
Deleting titles
Using Delete Navigator to delete titles
Deleting titles during play
Press Functions Press e,r to select Delete Press Enter
DVD Management
Creating Top Menu Create Top Menu
Enabling discs to be played on other equipment Finalize
Press e,r to select Create Top
Menu and press Enter
Child Lock
Linked operations with the TV Q Link
Press q Play
Video Plus+
Summary of settings
Changing the unit’s settings
Unit’s settings
Press e,r to select the tab
DTS Mpeg
Changing the unit’s settings
Press Enter when you have finished the settings
Press e,r to change the setting
Changing the unit’s settings/Set the clock manually
Set the clock manually
Resetting channel setting
Press e,r to select TV System
Press e,r to select Connection
Press e,r to select the TV system
Show Enter Name screen
On the unit’s display
Messages
On the television
Frequently asked questions
Troubleshooting guide
Troubleshooting guide
Troubleshooting guide
Glossary
Troubleshooting guide/Glossary
Quechua 8185 Tajik 8471 Zulu 9085
Specifications
Language code list
For business users in the European Union
Specifications
If you see this symbol
Index