PV-GS200
Thank you for choosing Panasonic
Do not Expose this Equipment to Rain or Moisture
AC Adaptor
Panasonic
Declaration of Conformity Trade Name
Model No
PV-GS120, PV-GS200
Important Safety Instructions
Care
USE & Location
Article 8 Termination of License
Before opening the CD-ROM package, please read the following
Limited USE Software License
Audio Decoder End User License Agreement
Contents
Camcorder Accessory Order Form
Initializing the Modes Before Requesting Service Problems
Limited Warranty For USA Customers
Others
Inserting a Cassette
Quick Guide
Inserting a Card
Recording on a Tape
Recording a Moving Picture on a Card MPEG4 PV-GS200 only
Recording a Still Picture on a Card Photoshot
Playing Back a Tape
Playing Back a Card
Standard Accessories
Before Using
Controls and Components
Camcorder
Lock Button Lock Cover
Card Access Lamp Access
USB Jack
Microphone Jack MIC
Eyepiece Corrector Knob Viewfinder -20
Remote Controller
DV Terminal DV
Video Input/Output Jack S-VIDEO IN/OUT
Magic Wire Remote Control with Narration Mic PV-GS200 only
Remote Controller
Inserting a Button-type Battery
Using the Remote Controller
Power Supply
Using the AC Adaptor
Using the Battery
One-touch Free Style Grip Belt
Charging Time and Available Recording Time
To Use as a Grip Belt
To Use as a Hand Strap
Attaching the Shoulder Strap
Attaching the Lens Cap
Inserting a Cassette
To protect the Lens surface, attach the Lens Cap
Using a Memory Card
Turning on the Camcorder
Selecting Modes
Using the Viewfinder
Using the Viewfinder/LCD Monitor
Using the LCD Monitor
Adjusting Brightness and Color Level
To Increase the Brightness of the Entire LCD Monitor
Using the Menu Screen
To Resume Normal Brightness
To Return to the Previous Screen
Tape Recording Menu
List of Menus
Tape Playback Menu
Picture Playback Menu
Card Recording Menu
MPEG4 Playback Mode PV-GS200 only
Setting Date and Time
Card Format
Screen
Internal Lithium Battery Recharge
LP Mode
Audio Recording Mode
Recording on a Tape
About Recording
Recording Lamp
To Check the Recording
Finding the End of Recording
Recording a Still Picture on a Card Photoshot
Progressive Photoshot
To Add a Sound while Recording PV-GS200 only
Selecting the quality of Photoshot images
Selecting the Size of Photoshot Images
Recording a Moving Picture on a Card MPEG4
RapidFire Consecutive Photoshot
Selecting the Quality of MPEG4 Recording images
To Cancel the Quick Start
Self-timer Recording
Quick Start
Zoom In/Out Functions
To Take Close-up Shots of Small Subjects
Digital Zoom Function
To Use the Tele-Macro Function
To Use the Zoom Microphone Function
Image Stabilizer Function
To Cancel Image Stabilizer Function
Fade In/Out Functions
Backlight Compensation Function
MagicPix Functions
Soft Skin Function
Wind Noise Reduction Function
To Cancel the Program AE Function
To Cancel the Cinema Mode
Cinema Function
Recording in Special Situations
About Black Balance Adjustment
Adjusting White Balance Manually
To Resume Automatic Adjustment
About White Balance Sensor
Manual Shutter Speed Adjustment
Manual Iris Adjustment
About the Card Slow Shutter PV-GS200 only
Manual Focus Adjustment
Using the Built-in Flash
Adjusting Brightness of the Flash
Card Recording Menu Camera
Digital Effect Functions
Red Eye Reduction Function
Multi-Picture Mode
Picture-in-Picture Mode
Wipe Mode and Mix Mode
≥The Wipe or MIX Indication appears
Set Tape Recording Menu Digital EFFECT1 Wipe or MIX
Playing Back a Tape
Adjusting the Sound Volume
Finding a Scene You Want to Play Back
Cue/Review Playback
Slow Motion Playback
Playback with Volume/Jog Lever
Still Playback/Still Advance Playback
Variable Speed Search Function
Playback Zoom Function
Index Search Functions
Photoshot Index Search
Scene Index Search
Playback Digital Effect Functions
To Cancel the Playback Zoom Function
Playing Back a Card
To Change the Enlarging Area of an Image
Slide Show
When you select MPEG4 Playback Mode at PV-GS200 only
To Select a Desired File and Playing Back
To Pause the Slide Show
Adding a Title
Creating a Title
Protecting the Files on a Card
To Verify Dpof Setting
Writing Printing Data on a Card
Variable
Formatting a Card
Deleting the Files Recorded on a Card
To Select and Delete Files or Titles
Select YES and press the Enter Button
Playing Back on Your TV
Enlarging a Movie Picture Size
To Resume Normal Moving Picture Size
To Make the Indications Appear on the TV Screen
Recording from a Tape onto a Card
Audio Dubbing
Recording Pictures from a Card onto a Tape
Copying on an S-VHS or a VHS Cassette
To Cancel Audio Dubbing
To Play Back the Sound Recorded by 12bit Audio Dubbing
To Dub Audio While Listening to a Pre-recorded Sound
Using the DV Cable for Recording
Recording the Contents of Other Equipment
Recorder
PC Connection With DV Interface Cable
To Stop Dubbing
≥Personal Computer must be equipped with an DV Terminal
Select the desired picture and press the Enter Button
If you want to stop printing halfway Press the Button
≥You can set the number of prints up to
Using USB Driver
Using the Software with a Computer
Software Installation Windows
Installing USB Driver
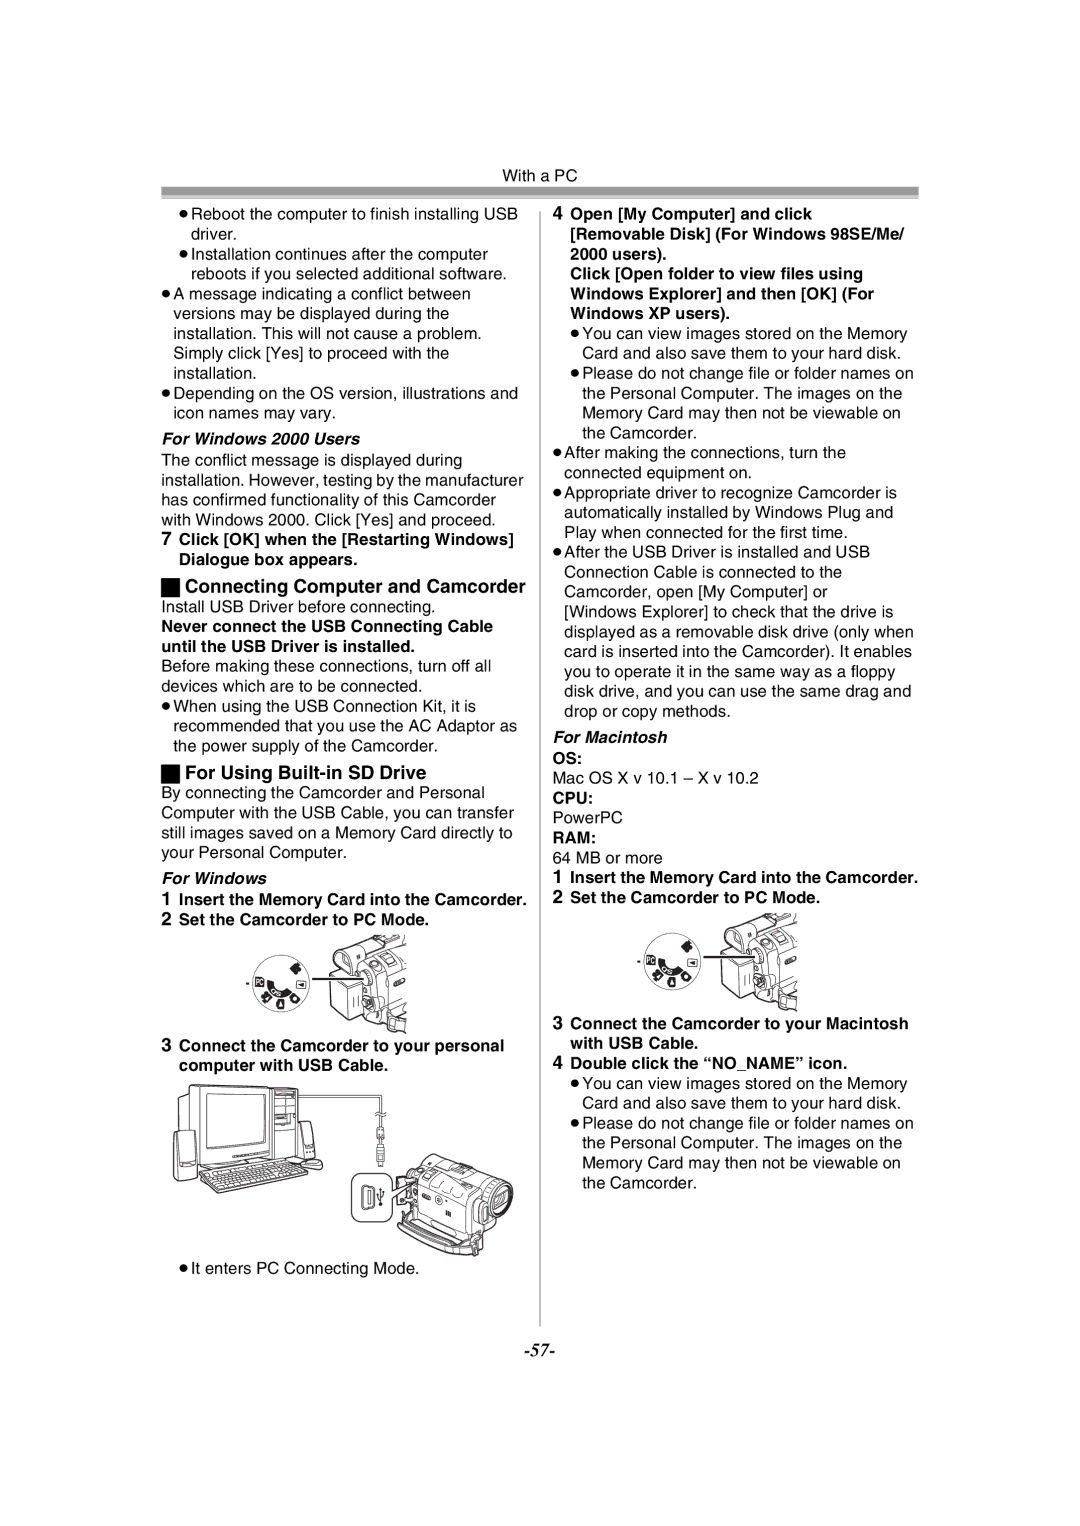
For Using Built-in SD Drive
Connecting Computer and Camcorder
For Windows 2000 Users
For Windows
Installing WebCam Driver
Using as a Web Camera
Cable
Setting up Windows Messenger
For Windows 98SE/Me Users
Start Windows Messenger or MSN Messenger
Setting up MSN Messenger
Using DV Studio 3.1E-SE
Click Sign Type in your Sign-in name and password
After the .NET Passport Wizard is displayed, click Next
To start DV Studio 3.1E-SE
Using the G.726 Audio Decoder
Instructions
DV Studio3
Using the ArcSoft Software
Installation of ArcSoft Software Suite
After the completion of setup, click on Finish
Other requirements
To start software in ArcSoft Software Suite
To disconnect USB cable safely
≥When Mode Dial 39 is turned to change modes
If you no longer need software or driver Uninstall
Removing the USB connection cable safely for Macintosh
Screens may vary with the type of OS
About the compatibility of the card Files
About the SD Memory Card MultiMediaCard
MultiMediaCard
Files recorded on a SD Memory Card or MultiMediaCard
Files in which Dpof Data has
Jpeg format
Been set to the image are in this
Folder
Indicators
To Display Date/Time Indicator
To Change the Counter Display Mode
To Change the Display Mode
Initializing the Modes
Wrong Remote Controller Mode has been selected
Battery is low. Recharge it Built-in battery is low
No Cassette in inserted
Video heads are dirty
Alarm Sounds
Concerning the Power Supply
Inserting/Removing the Cassette
Recording Check
Lines ≥When the scene lacks contrast
Self-timer Recording
Recording Moving Pictures MPEG4 PV-GS200 only
Quick Start
Tele-Macro Function
Zoom In/Out Functions
Zoom Microphone Function
Digital Zoom Functions
Manual Iris Adjustment
Manual Shutter Speed Adjustment
Using The Built-in Flash PV-GS200 only
White Balance
Digital Effect Functions
Red Eye Reduction Function PV-GS200 only
Playing Back
Index Search Functions
Playback Digital Effect Functions
Slide Show
Creating a Title
Recording the Contents of Other Equipment
Lock Setting
Adding a Title
Dpof
Using the DV Cable for Recording Digital Dubbing
After Use
To protect the Lens, attach the supplied Lens Cap
About AC Adaptor
Condensation
Video Head Clogging and Care
Optimal Use of the Battery
Noise in images and sounds
LCD Monitor/Viewfinder/Lens Hood
LCD Monitor
Viewfinder
Before Requesting Service Problems and Solutions
Explanation of Terms
Auto Focus Adjustment
Digital Video System
Focus
Memory Stop Function
Time Code
Image Sensor
Specifications
AC Adaptor
Picture Size
Accessory# Description
Camcorder Accessory System
Visa
Camcorder Accessory Order Form For USA Customers
Request for Service Notice USA Only
Request for Service Notice
Panasonic/Quasar Video Products
Limited Warranty For USA Customers
Accessory Purchases
Customer Services Directory
Centralized Factory Servicenter
Npcparts@panasonic.com
If YOU Ship the Product to a Servicentre
Warranty Service
Panasonic Canada Inc
Limitations and Exclusions
RapidFire Consecutive Photoshot Recording Check
Index
Viewfinder
Colocación del cassette
Spanish Quick Use Guide Guía española para el uso rápido
Inserción de la tarjeta
Grabación en una cinta
Grabación de una imagen fija en una Tarjeta Photoshot
Reproducción de la tarjeta
Reproducción de una cinta
Panasonic Canada Inc
Modèle PV-GS120 PV-GS200
Merci d’avoir choisi Panasonic
Renseignements
Adaptateur secteur c.a
Mesures de sécurité
Directives importantes
Précautions
Utilisation et emplacement
Page
Licence D’UTILISATION Limitée DU Logiciel
Accord de licence Utilisateur final du décodeur audio G.726
Mode enregistrement
Table des matières
Préface
Mode édition
Mode lecture
Ordinateur personnel
Autres
Guide sommaire
Mise en place d’une cassette
Enregistrement sur bande
Enregistrement d’images fixes sur Carte mémoire PhotoShot
Lecture d’un enregistrement sur Bande
Lecture d’un enregistrement sur carte mémoire
Remarques préliminaires
Accessoires standard
Nomenclature
Caméscope
Recommandé d’alimenter le caméscope au
Capteur de la télécommande
Power LCD ’interférence soit produit sur le côté droit
Voyant d’enregistrement
Touche PhotoShot Photo Shot
Télécommande
Bouton de correction du viseur Viseur -21
Prise d’entrée/sortie DV DV
Touche de pause -44 Touche d’arrêt Stop -43
Mise en place d’une pile de type Bouton
Touche du zoom W/T
Pince
Sélection des modes de la télécommande
En utilisant la télécommande
Réglage sur la télécommande
Source d’alimentation
Utilisation de la batterie
Temps de recharge et autonomie d’enregistrement
Utilisation comme courroie de Transport
Fixer le capuchon
Ajuster la courroie à votre main
Pour protéger la surface de l’objectif, fixer le capuchon
Mise en place d’une cassette
Fixation de la bandoulière
Utilisation d’une carte mémoire
Prévention d’effacements accidentels
Mise en marche/arrêt du caméscope
Voyant Access
Sélection des modes
Comment mettre le caméscope en Marche
Utilisation de l’écran à cristaux Liquides
Utilisation du viseur
Niveau de la luminosité et de la Couleur
Refermer l’écran à cristaux liquides
Rétablissement de la luminosité normale
Utilisation du menu
Retour à l’écran précédent
Pour quitter le menu
Liste des menus
Reset
EIS
Zoom
Playback Lecture Sous-menu des fonctions de lecture
MPEG4 Mode PV-GS200 seulement
DV OUT
REC Data
Flash Level PV-GS200 seulement
Shtr Effect Effet d’obturateur
Card Carte
Shoe MIC PV-GS200 seulement Griffe porte-microphone
MPEG4 Playback Mode PV-GS200 seulement
Réglage de la date et de l’heure
Sélection du format d’écran
Mode longue durée LP
Mode enregistrement audio
Recharge de la pile incorporée au lithium
Voyant d’enregistrement
Enregistrement
Régler le commutateur OFF/ON 43 sur on
Enregistrement simultané d’images animées et fixes
Enregistrement d’images fixes sur carte mémoire PhotoShot
Sélection de la qualité des images PhotoShot
Sélection de la taille des images Photoshot
Enregistrement d’images animées MPEG4 sur carte mémoire
Régler Card Recording Menu Card Burst Mode on
Prises de vues en rafale RapidFire
Avec image de 640k480 Images de haute qualité Fine
Retardateur
Activation rapide
Enregistrement automatique
Annulation de l’activation rapide
Fonction zoom numérique
Fonction zoom avant/arrière
Faire des gros-plans de petits objets
Fonction télé-macro
Fonctions fondu à l’entrée et fondu en sortie
Fonction de stabilisation de l’image
Arrêt de la fonction zoom numérique
Annulation de la fonction de stabilisation de I’image
Fonction compensation de contre-jour
Fonctions Magicpix
Fonction de carnation
Fonction atténuation bruit du vent
Désactivation du mode cinéma
Enregistrement dans des situations particulières
Fonction cinéma
Réglage manuel de I’équilibre du blanc
Enregistrement avec des couleurs naturelles
Propos du réglage du niveau de noir
Annulation du réglage automatique de I’exposition
Propos du capteur d’équilibre du Blanc
Réglage manuel de la vitesse d’obturation
Utile pour enregistrer les scènes à action rapide
Régler le commutateur AUTO/MANUAL/FOCUS sur Auto
Réglage manuel de l’ouverture du diaphragme
Réglage manuel de la mise au point
Seulement
Fonction réduction yeux rouges
Utilisation de la lampe-éclair incorporée
Réglage de la luminosité de la lampe-éclair
Pour annuler la fonction réduction yeux rouges
Effets numériques
Mode d’écran multiple
Mode volet et mode mixage
Mode image sur image
Effacer tous les multi-écrans capturés
Pour afficher les multi-écrans à nouveau
Lecture d’un enregistrement sur bande
Réglage du volume du son
Repérage d’une scène pour la lecture
Lecture de repérage/rétrospective
Lecture au ralenti
Lecture avec la touche de Volume/sélecteur
Lecture fixe/Lecture avance fixe
Fonction de recherche à vitesse Variable
Fonction de lecture zoom
Fonctions de recherche par index
Recherche de l’index PhotoShot 1 Régler Tape Playback Menu
Recherche de l’index de scène 1 Régler Tape Playback Menu
Lecture avec effets numériques
Lecture en mode volet et mode Mixage
Lecture d’un enregistrement sur
Carte mémoire
Arrêt de la lecture Pause
Lancer la lecture. Picture Image fixe
Sélection d’un fichier souhaité et visualisation
Appuyer sur la touche //6/5 pour sélectionner un fichier
Création d’un titre
Diaporama
Interruption du diaporama pause
Arrêt du diaporama
Insertion d’un titre
Effacement d’un titre
Vérification du réglage Dpof
Effacement des fichiers enregistrés
Protection des fichiers sur une carte mémoire
Sur une carte mémoire
Sélection et effacement de tous les fichiers
Agrandissement de la taille d’images animées
Formatage d’une carte mémoire
Paramètres de l’affichage d’images animées au format MPEG4
Rétablissement des images animées à leur taille d’origine
Lecture sur téléviseur
Appuyer sur la touche OSD 58 de la télécommande
Effectuer le branchement de la fiche
Affichage des indications sur l’écran télé
Enregistrement sur carte à partir d’une cassette
Mode édition
Doublage audio
≥Pendant la copie, l’indication suivante apparaît
Le caméscope est alors à nouveau en mode lecture fixe
Copie sur cassette S-VHS ou VHS
Doublage audio pendant l’écoute d’un son enregistré
Utilisation du câble DV aux fins d’enregistrement
Enregistrement à partir d’autres sources
Lecture
Fil AV Fil S-vidéo
≥L’enregistrement commence
Branchement à un PC avec un câble d’interface DV
Arrêt du doublage
Comme source d’alimentation
≥Il est possible de régler jusqu’à 9 le nombre d’imprimés
Sélectionner l’image désirée et appuyer sur la touche Enter
Installation du pilote de périphérique
Installation du logiciel Windows
Utilisation du logiciel avec un ordinateur
Utilisation du pilote de périphérique
Connexion du caméscope à un Ordinateur
Après l’installation du pilote USB, redémarrer l’ordinateur
Pour le lecteur SD intégré
Avec Windows
Sansnom
Utilisation comme caméra Web
Avec Windows 98 Deuxième Édition/Me
Installation du pilote WebCam
Configuration de MSN Messenger
Configuration de Windows Messenger
Utilisation de DV Studio 3.1E-SE
Installation de DV Studio 3.1E-SE
Utilisation du décodeur audio G.726
Installation terminée s’affiche
Lancement de DV Studio 3.1E-SE
Régler Camera ou Playback USB Function DV Studio
Logiciel ArcSoft
Lancement d’un logiciel de la suite ArcSoft Software
Installation de la suite ArcSoft Software
La fin du réglage, cliquer sur Finish Terminer
Pour informations sur le logiciel ArcSoft
Double-cliquer sur l’icône dans la barre de tâches
Déconnexion du câble USB
Nota sur le nom du pilote affiché
Avec Windows XP/2000
Désinstallation du pilote ou du
Logiciel
Remarques
Carte MultiMediaCard
Propos de la carte mémoire SD et de la carte MultiMediaCard
Avec des images réglées par des
Ce dossier contient des fichiers
Données Dpof
Ce dossier contient les données
Indications
Compteur
Modification du mode d’affichage
Affichage date/heure
Fonction PhotoShot progressif
Signaux d’avertissement/alarme
Modes initiaux
La cassette est incompatible
Avertisseurs sonores
Propos de la source d’alimentation
Enregistrement d’images animées MPEG4 PV-GS200 seulement
Fonctions de la carte
Pour enregistrer les images fixes nettement
Prises de vues en rafale RapidFire
Activation rapide
Fonctions zoom avant/arrière
Pour utiliser la fonction de
Fonction zoom numérique
Fonctions Magicpix
Fonction compensation de contre-jour
Fonction atténuation bruit du vent
Fonction cinéma
Équilibre du blanc
Réglage manuel de la vitesse ’obturation
Réglage manuel de l’ouverture du Diaphragme
Effets numériques
Fonction réduction yeux rouges PV-GS200 seulement
Lecture
Fonctions de recherche par index
Lecture de la carte
Fonctions de lecture avec effet Numérique
Diaporama
Création d’un titre
Réglage Dpof
Insertion d’un titre
Verrouillage
Lecture sur téléviseur
Enregistrement à partir d’autres Sources
Précautions d’emploi
Après utilisation
Précautions d’emploi
Clignotement en jaune
Propos de l’adaptateur secteur
Clignotement en rouge
Retirer la cassette s’il y a lieu
Nettoyage des têtes vidéo numériques
Précautions de rangement
Utilisation optimale de la batterie
Écran à cristaux liquides/viseur Parasoleil
Écran à cristaux liquides LCD
Viseur
Guide de dépannage
Lecture son
’image n’est pas claire
Casque d’écoute
Des pistes son différentes sont lues en même temps
Système vidéo numérique
Explication des termes
Mise au point
Code temps
Fonction arrêt mémoire
Capteur image
Spécifications
Adaptateur secteur
’IMAGE
≥Ces valeurs peuvent varier selon le sujet photographié
Nde pièce Illustration Description
Accessoires du caméscope
Garantie
Limitations ET Exclusions
Réparation Sous Garantie
Enregistrement d’images animées
Lecture avec la touche de volume
Télécommande câblée avec microphone de
Montréal 3075 Louis A. Amos, Lachine, Québec H8T 1C4 514