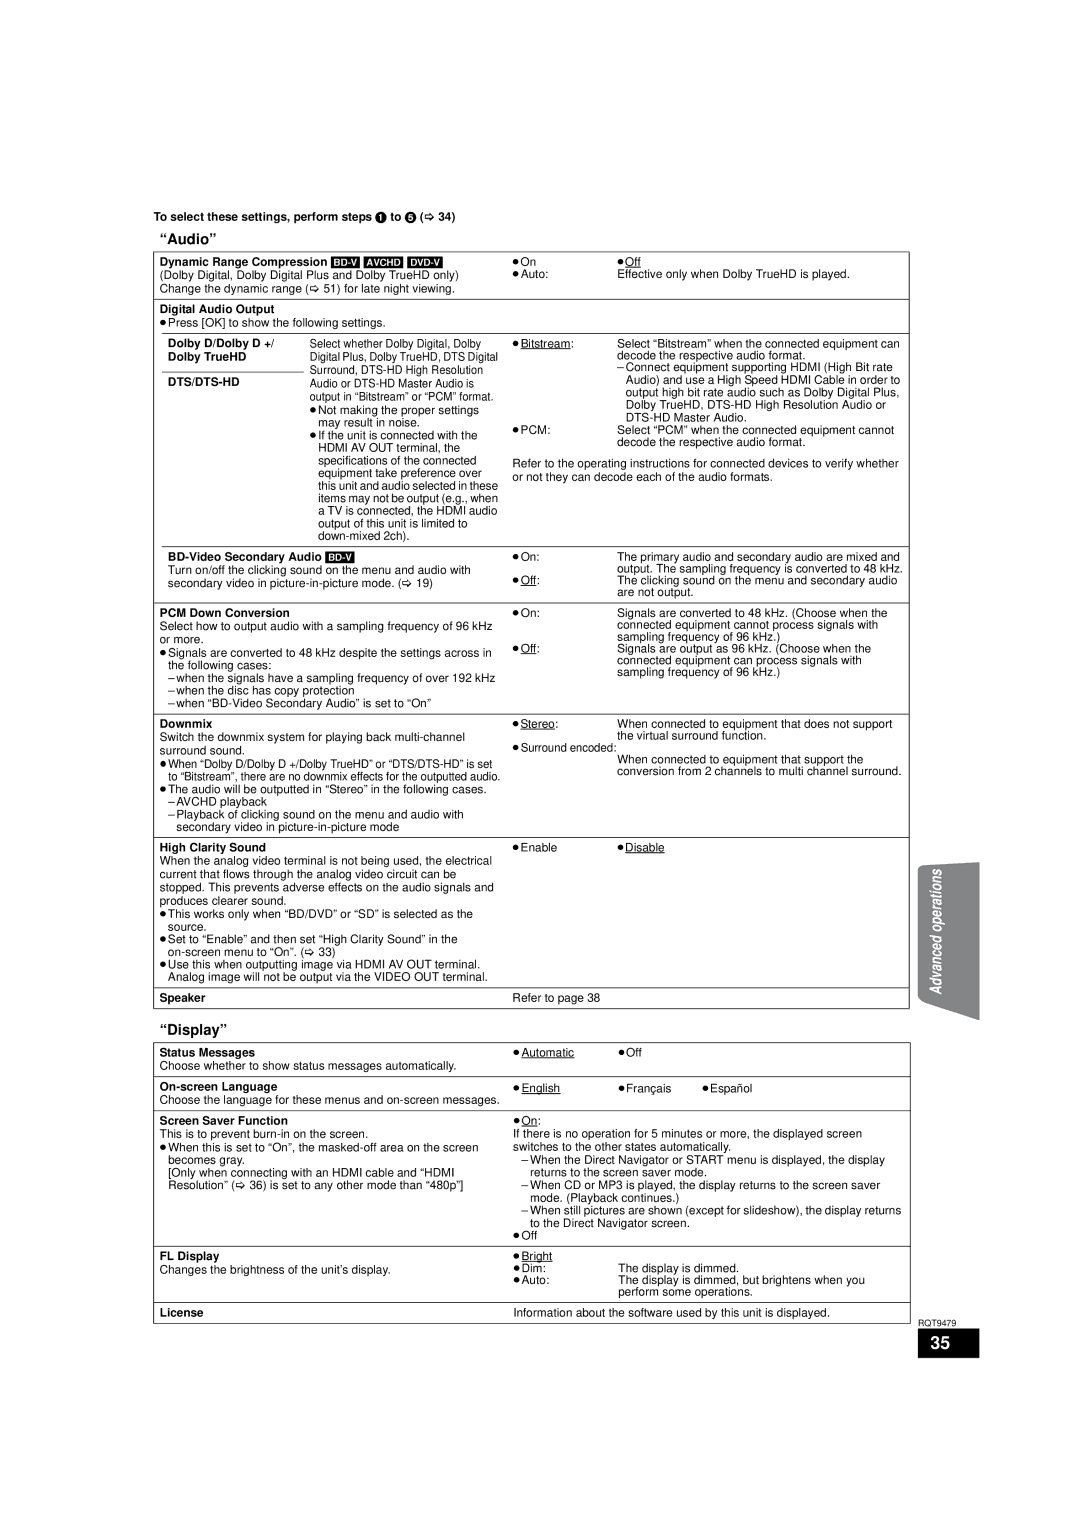
Panasonic SC-BTX70, SA-BTX70 warranty “Audio”, “Display”

Models: SC-BTX70 SA-BTX70

1 56
Download 56 pages 42.5 Kb
Page 35
Image 35
“Audio”

To select these settings, perform steps 1 to 5 (> 34)

“Audio”

Dynamic Range Compression [BD-V] [AVCHD] [DVD-V]

≥On

Off


(Dolby Digital, Dolby Digital Plus and Dolby TrueHD only)

≥Auto:

Effective only when Dolby TrueHD is played.


Change the dynamic range (> 51) for late night viewing.


Digital Audio Output


≥Press [OK] to show the following settings.


Dolby D/Dolby D +/

Select whether Dolby Digital, Dolby

Bitstream:

Select “Bitstream” when the connected equipment can


Dolby TrueHD

Digital Plus, Dolby TrueHD, DTS Digital


decode the respective audio format.


Surround, DTS-HD High Resolution


– Connect equipment supporting HDMI (High Bit rate


DTS/DTS-HD

Audio or DTS-HD Master Audio is


Audio) and use a High Speed HDMI Cable in order to


output in “Bitstream” or “PCM” format.


output high bit rate audio such as Dolby Digital Plus,


Dolby TrueHD, DTS-HD High Resolution Audio or


≥Not making the proper settings


DTS-HD Master Audio.


may result in noise.


≥PCM:

Select “PCM” when the connected equipment cannot


≥If the unit is connected with the


decode the respective audio format.


HDMI AV OUT terminal, the


specifications of the connected

Refer to the operating instructions for connected devices to verify whether


equipment take preference over

or not they can decode each of the audio formats.


this unit and audio selected in these


items may not be output (e.g., when


a TV is connected, the HDMI audio


output of this unit is limited to


down-mixed 2ch).


BD-Video Secondary Audio [BD-V]

≥On:

The primary audio and secondary audio are mixed and


Turn on/off the clicking sound on the menu and audio with


output. The sampling frequency is converted to 48 kHz.


secondary video in picture-in-picture mode. (> 19)

Off:

The clicking sound on the menu and secondary audio


are not output.


PCM Down Conversion


≥On:

Signals are converted to 48 kHz. (Choose when the


Select how to output audio with a sampling frequency of 96 kHz


connected equipment cannot process signals with


or more.


Off:

sampling frequency of 96 kHz.)


≥Signals are converted to 48 kHz despite the settings across in

Signals are output as 96 kHz. (Choose when the


the following cases:


connected equipment can process signals with


sampling frequency of 96 kHz.)


– when the signals have a sampling frequency of over 192 kHz


– when the disc has copy protection


– when “BD-Video Secondary Audio” is set to “On”


Downmix


Stereo:

When connected to equipment that does not support


Switch the downmix system for playing back multi-channel

≥Surround encoded:

the virtual surround function.


surround sound.


When connected to equipment that support the


≥When “Dolby D/Dolby D +/Dolby TrueHD” or “DTS/DTS-HD” is set


conversion from 2 channels to multi channel surround.


to “Bitstream”, there are no downmix effects for the outputted audio.


≥The audio will be outputted in “Stereo” in the following cases.


– AVCHD playback


– Playback of clicking sound on the menu and audio with


secondary video in picture-in-picture mode


High Clarity Sound


≥Enable

Disable


When the analog video terminal is not being used, the electrical


operations

current that flows through the analog video circuit can be


source.


stopped. This prevents adverse effects on the audio signals and


produces clearer sound.


≥This works only when “BD/DVD” or “SD” is selected as the


≥Set to “Enable” and then set “High Clarity Sound” in the


Advanced


on-screen menu to “On”. (> 33)


≥Use this when outputting image via HDMI AV OUT terminal.


Analog image will not be output via the VIDEO OUT terminal.


Speaker


Refer to page 38


“Display”

Status Messages

Automatic

≥Off


Choose whether to show status messages automatically.


On-screen Language

English

≥Français

≥Español

Choose the language for these menus and on-screen messages.


Screen Saver Function

On:


This is to prevent burn-in on the screen.

If there is no operation for 5 minutes or more, the displayed screen

≥When this is set to “On”, the masked-off area on the screen

switches to the other states automatically.

becomes gray.

– When the Direct Navigator or START menu is displayed, the display

[Only when connecting with an HDMI cable and “HDMI

returns to the screen saver mode.

Resolution” (> 36) is set to any other mode than “480p”]

– When CD or MP3 is played, the display returns to the screen saver


mode. (Playback continues.)


– When still pictures are shown (except for slideshow), the display returns


to the Direct Navigator screen.


≥Off


FL Display

Bright


Changes the brightness of the unit’s display.

≥Dim:

The display is dimmed.


≥Auto:

The display is dimmed, but brightens when you


perform some operations.

License

Information about the software used by this unit is displayed.

RQT9479

35

Page 35
Image 35
Panasonic SC-BTX70, SA-BTX70 warranty “Audio”, “Display”