(continued)
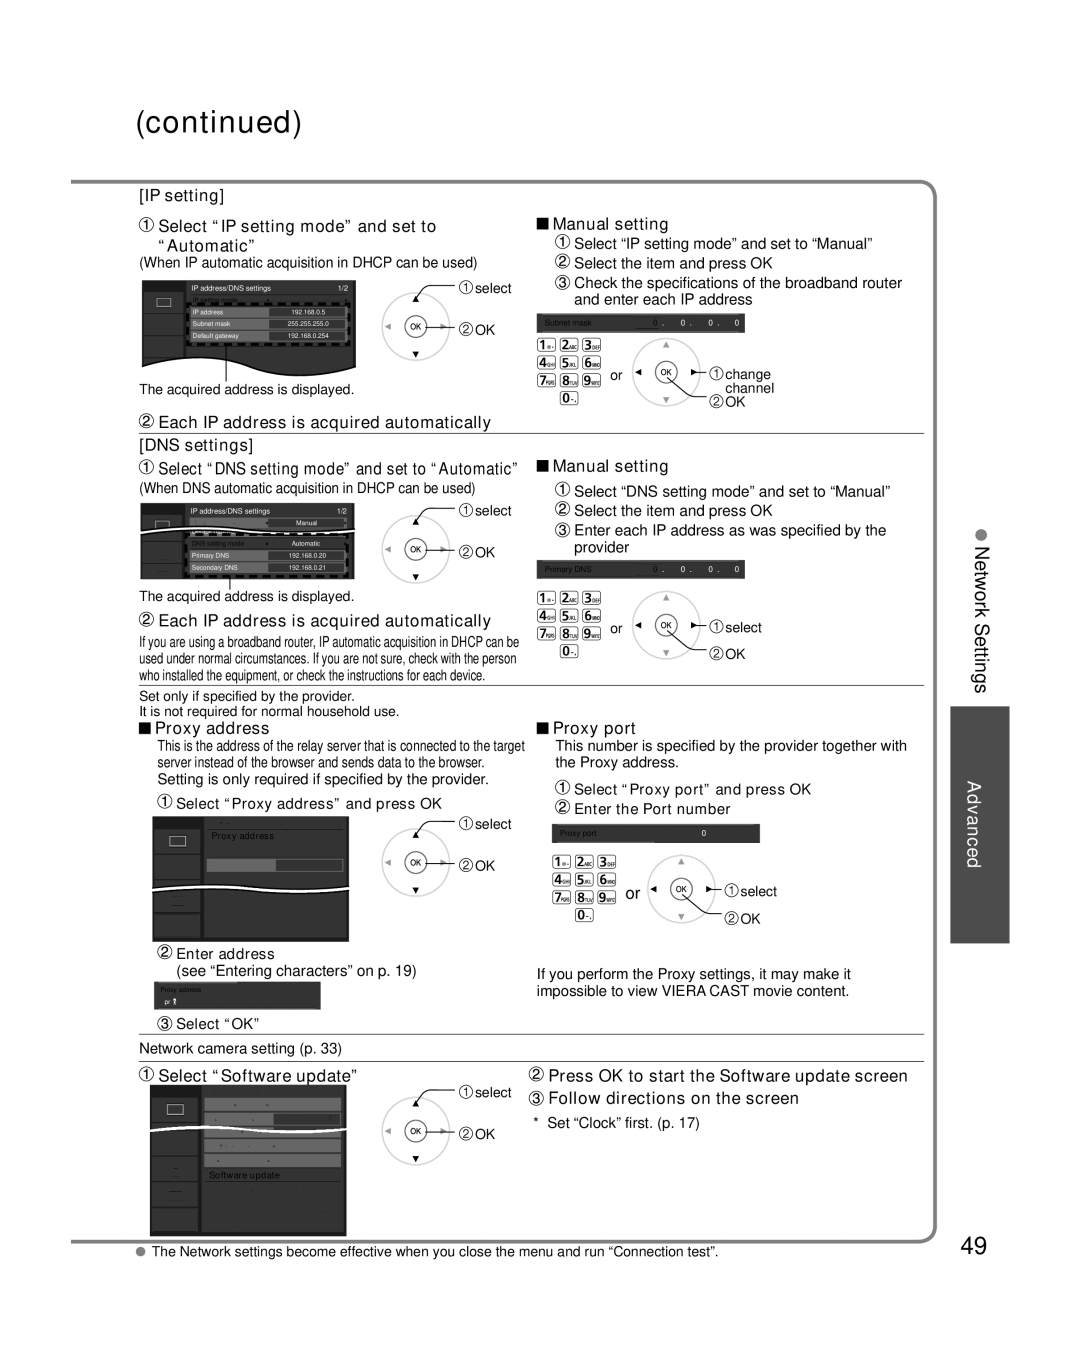
[IP setting] |
|
|
Select “IP setting mode” and set to |
| Manual setting |
| ||
| ||
“Automatic” |
| Select “IP setting mode” and set to “Manual” |
(When IP automatic acquisition in DHCP can be used) |
| Select the item and press OK |
Menu | IP address/DNS settings | 1/2 | select |
| IP setting mode | Automatic |
|
| IP address | 192.168.0.5 |
|
| Subnet mask | 255.255.255.0 | OK |
| Default gateway | 192.168.0.254 |
The acquired address is displayed.
![]() Check the specifications of the broadband router and enter each IP address
Check the specifications of the broadband router and enter each IP address
Subnet mask | 0 | . | 0 . | 0 . | 0 |
|
|
|
|
|
|
|
|
or ![]()
![]()
![]() change channel
change channel
![]() OK
OK
![]() Each IP address is acquired automatically
Each IP address is acquired automatically
[DNS settings] |
| Manual setting |
Select “DNS setting mode” and set to “Automatic” |
| |
| ||
| ||
(When DNS automatic acquisition in DHCP can be used) |
| Select “DNS setting mode” and set to “Manual” |
Menu | IP address/DNS settings | 1/2 | select | Select the item and press OK | ||||
| IP setting mode | Manual |
| Enter each IP address as was specified by the | ||||
| Default gateway | 192.168.0.254 |
| |||||
| DNS setting mode | Automatic | OK | provider |
|
|
|
|
|
|
|
|
|
| |||
| Primary DNS | 192.168.0.20 |
|
|
|
|
| |
| Secondary DNS | 192.168.0.21 |
| Primary DNS | 0 . | 0 . | 0 . | 0 |
The acquired address is displayed.
|
| Each IP address is acquired automatically |
|
| or | select | ||||||||||||
If you are using a broadband router, IP automatic acquisition in DHCP can be |
|
|
|
|
| OK | ||||||||||||
used under normal circumstances. If you are not sure, check with the person |
|
|
|
|
| |||||||||||||
who installed the equipment, or check the instructions for each device. |
|
|
|
|
|
|
|
|
| |||||||||
Set only if specified by the provider. |
|
|
|
|
|
|
|
|
|
| ||||||||
It is not required for normal household use. |
|
|
|
|
|
|
|
|
|
| ||||||||
|
| Proxy address |
|
|
|
|
| Proxy port |
|
|
|
| ||||||
|
|
|
|
|
|
|
|
| ||||||||||
|
| This is the address of the relay server that is connected to the target |
|
| This number is specified by the provider together with | |||||||||||||
|
| server instead of the browser and sends data to the browser. |
|
| the Proxy address. |
|
|
|
| |||||||||
|
| Setting is only required if specified by the provider. |
|
| Select “Proxy port” and press OK | |||||||||||||
|
| Select “Proxy address” and press OK |
|
|
| |||||||||||||
|
|
|
|
| Enter the Port number | |||||||||||||
|
| Menu VIERA CAST setting |
|
| select |
|
| |||||||||||
|
|
|
|
|
|
|
|
|
|
|
|
| ||||||
|
|
|
| Proxy address |
|
| OK |
|
| Proxy port |
| 0 |
|
|
| |||
|
|
|
|
|
|
|
|
|
|
|
|
|
|
|
|
|
| |
|
|
|
|
|
|
|
|
|
|
|
|
|
|
|
|
|
| |
|
|
|
|
|
|
|
|
|
|
|
|
|
|
|
|
|
| |
|
|
|
| Proxy port |
| 0 |
|
|
|
|
|
|
|
|
|
| ||
|
|
|
|
|
|
|
|
|
|
|
| or | select | |||||
|
|
| Allows manual entry of proxy address for relay |
|
|
|
| |||||||||||
|
|
|
|
|
|
|
|
|
| OK | ||||||||
|
|
| server. (normally not required) |
|
|
|
|
|
|
|
| |||||||
|
|
|
|
|
|
|
|
|
|
|
|
|
|
|
|
|
|
|
|
| Enter address |
|
|
|
|
|
|
|
|
|
|
|
| ||||
|
| (see “Entering characters” on p. 19) |
| If you perform the Proxy settings, it may make it | ||||||||||||||
|
| Proxy address |
|
|
|
| impossible to view VIERA CAST movie content. | |||||||||||
|
|
|
|
|
|
|
|
|
|
|
|
|
| |||||
prIo
![]() Select “OK”
Select “OK”
Network camera setting (p. 33)
Network Settings
Advanced
 Select “Software update”
| Menu |
|
| Network settings |
| ||||
|
|
|
|
|
| Connection test |
|
| |
|
|
|
|
|
|
| |||
|
|
|
|
|
|
|
|
|
|
|
|
|
|
|
| Network connection | Wireless (WiFi) |
|
|
|
|
|
|
|
| IP address/DNS | settings |
|
|
|
|
|
|
|
|
|
| ||
|
|
|
|
|
| VIERA CAST setting |
| ||
|
|
|
|
|
| Network cameras list |
| ||
|
|
|
| ||||||
|
|
|
|
|
| Software update |
| ||
|
|
|
|
|
| Mac address |
| ||
|
|
|
|
| Check if software update for the TV is |
| |||
|
|
|
|
|
| ||||
|
|
|
|
| available |
|
|
| |
select |
| Press OK to start the Software update screen |
| Follow directions on the screen | |
OK | * | Set “Clock” first. (p. 17) |
|
|
The Network settings become effective when you close the menu and run “Connection test”. | 49 |