Lenses you can use
For Using Your Camera Safely
Precautions for Battery Usage
Care to be Taken During Handling
Precautions for Battery Charger Usage
Precautions for D-LI50 Battery Usage
Memo
Getting Started
Contents
Before Using Your Camera
Shooting Functions
Basic Operations
Playback Functions
Using the Flash
Shooting Settings
Printing from the Camera
Camera Settings
Processing Images
Appendix
Resetting to Default Settings
Composition of the Operating Manual
Shows useful information
Shows precautions to take when operating the camera
Shows reference page number explaining a related operation
Before Using Your Camera
Camera Characteristics
Cmos sensor 23.4×15.6 mm
Shake Reduction SR
Checking the Contents of the Package
Camera
Names and Functions of Working Parts
Green button Main switch
Capture Mode
Shutter release button
Front e-dial
Mode dial
Focus mode lever
Metering mode lever
Shake Reduction switch
Playback Mode
Green button
At Start-up or when Operating the Mode Dial
Display Indicators
Flash mode Shake Reduction p.65 Active mode appears p.61
Monitor
Detailed information display p.1
Capture Mode
Detailed information display p.2
Detailed information display
Playback Mode
RGB
Histogram Display
11 12
Viewfinder
Before Using Your Camera
LCD Panel
Displaying the Menu screen Press the 3button Capture mode
How to Operate the Menu
A Rec. Mode menu appears on the monitor
Press the four-way controller
Turn the front e-dial to navigate the menu a page at a time
Selecting and Setting a Menu Item
Use the four-way controller 23 to choose an item
Lets you capture images with settings that you set
Using the Mode Dial
Function
Priority
Getting Started
Attaching the Strap
Charging the Battery
Using the Battery
Open the battery cover
Inserting/Removing the Battery
Stow the battery cover unlock lever when finished closing
Battery Level Indicator
Using the AC Adapter Optional
Lift the card cover unlock lever 1 and turn it towards Open
Inserting/Removing the SD Memory Card
Close the card cover
Push the SD Memory Card in once to remove
Precautions When Using the SD Memory Card
Recorded Pixels and Quality Level
When the File Format is Jpeg
When the File Format is RAW
Turning the Camera On and Off
Move the main switch to on position
Default setting is English
Initial Settings
Setting the Display Language
Press the 4button twice
Press the 4button
Press the four-way controller 5 twice
When an Incorrect Language is Set
Press the 3button once
Use the four-way controller 23 to choose the date style
Setting the Date and Time
Frame moves to mm/dd/yy
Frame returns to Date Style
Frame moves to the month
Use the four-way controller 23 to set the month
Set the day and year in the same manner
Next, set the time Depending on the time
Attaching the Lens
GettingStarted
Adjusting the Viewfinder Diopter
Basic Operations
Holding the Camera
Basic Shooting Operation
Set the focus mode lever to l
Letting the Camera Choose the Optimal Settings
Set the mode dial to B
Picture is taken
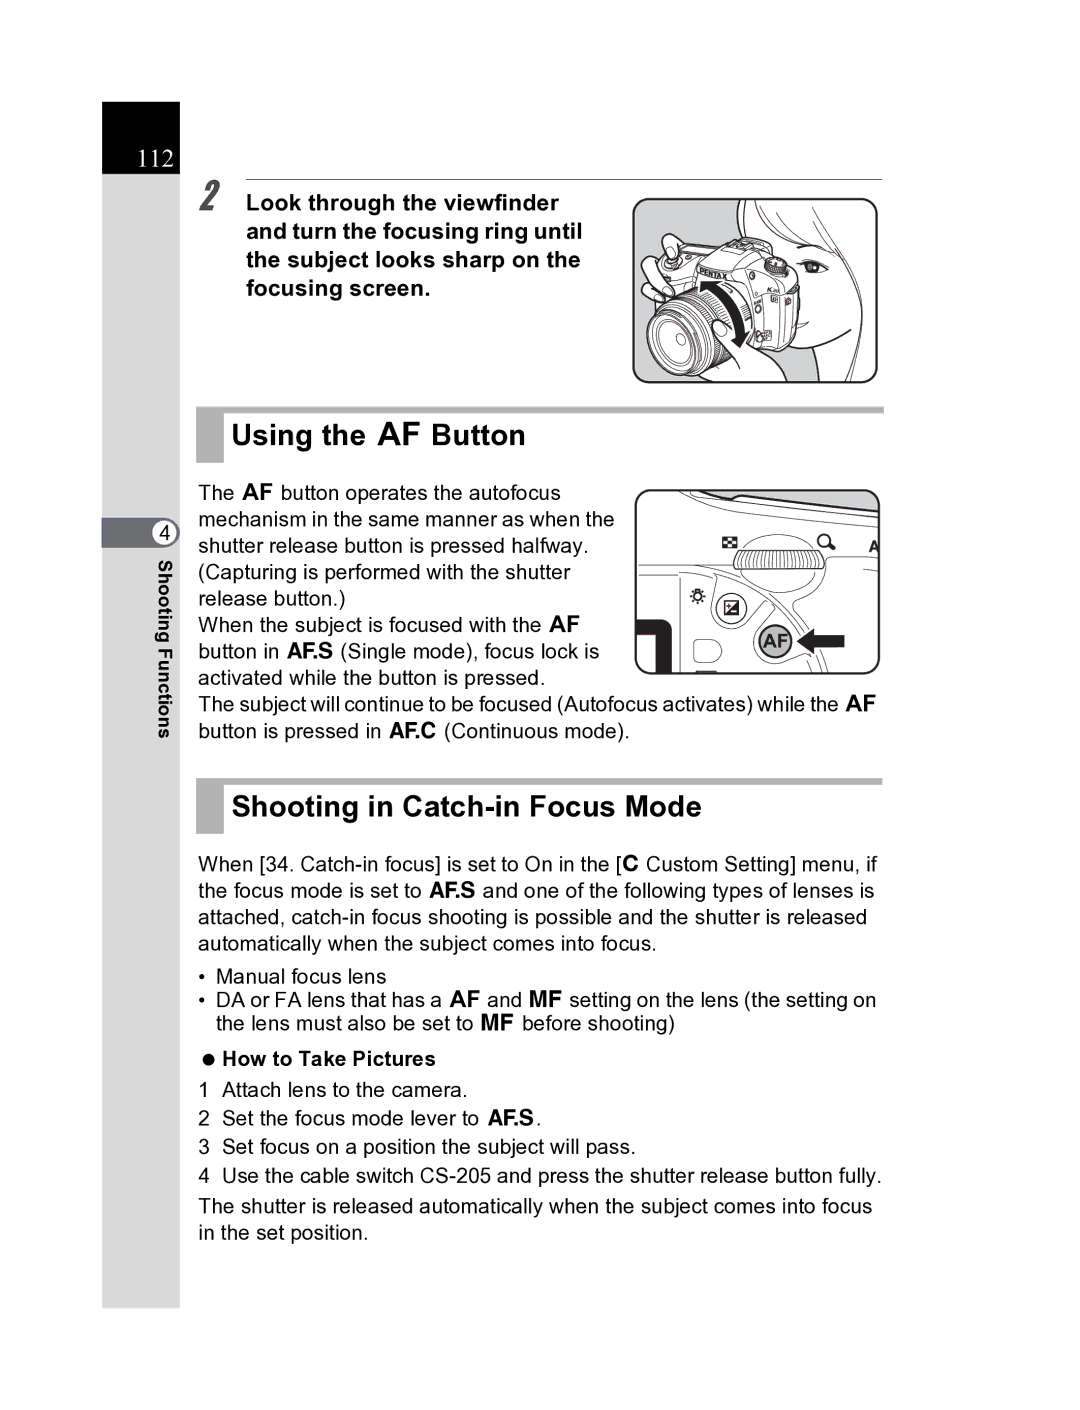
Look through the viewfinder to view the subject
Press the shutter release button fully
Histogram Display p.227
Operating the shutter release button
Review the captured image on the monitor
Subjects that are Difficult to Focus on
Turn the zoom ring to the right or left
Using a Zoom Lens
Compatibility of built-in flash and lens
Using the Built-in Flash
Fn menu appears
Selecting Flash Mode Press the button
Camera is ready to take a picture
Use the four-way controller 45 to choose a flash mode
Flash options screen appears
Press the shutter release button halfway
Using Built-in Flash Press the Kbutton
Focus indicator appears in the viewfinder when focused
Taking pictures Hyper-program
Using Red-eye Reduction Flash
Daylight-Sync Shooting
Shake Reduction Function and Lens Focal Length
Taking Pictures Using the Shake Reduction Function
Shake Reduction
Turning On the Shake Reduction Function
Turn on the Shake Reduction switch
120
Setting the Shake Reduction Function
Press the Q button after taking a picture
Playing Back Still Pictures
Playing Back Images
Previous image appears Next image appears
Use the four-way controller 23 to select Delete
Deleting Images
Deleting a Single Image
Shooting Functions
Rec. Mode Menu Setting Items
How to Operate the Shooting Menus
ACustom Setting Menu Setting Items
Turned to the preview position
Shooting Fn Menu Setting Items
Using slower shutter speed
Setting the Exposure
Using faster shutter speed
Effect of Aperture and Shutter Speed
Effect of Aperture
Depth of Field
Opening the aperture reduce the aperture value
Closing the aperture increase the aperture value
Setting the Range of Automatic Correction in Auto
Setting the Sensitivity
Expanding the Dynamic Range
Changing the Sensitivity in Capture Mode
Exposure EV Com Change Sen Description Shutter Mode
Changing the Exposure Mode
Noise Reduction
Slow Shutter Speed NR
Aperture to the proper Yes
Exposure Description EV Com Change Sen Shutter Mode
Priority Exposure according to
Lets you set shutter
About Program Line
Using the B Green Mode
Set the mode dial to e
Using the e Hyper-program Mode
Set the mode dial to K
Using the K Sensitivity Priority Mode
Hyper-program
To change the shutter speed
Turn the rear e-dial and adjust the sensitivity
Using the b Shutter Priority Mode
Exposure Warning
Using the c Aperture Priority Mode
Exposure Warning
Using the L Shutter & Aperture Priority Mode
About the Green Button
Set the mode dial to a Press the Green button
Using a Hyper-manual Mode
EV Bar
Combining with L
Set the mode dial to p
Using the p Bulb Mode
Set the mode dial to M
Using the MFlash X-Sync Speed Mode
Selecting the Metering Method
Using the Multi-Segment Metering
Center and determines the exposure
Measures only the center of the viewfinder
Using the Center-Weighted Metering
Setting the Meter Operating Time
Using the Spot Metering
Linking AF Point and AE During Multi-Segment Metering
100
Adjusting the Exposure
Changing the Exposure Steps
101
EV Compensation for a Hyper-manual and M Flash X-sync speed
Press the Lbutton
102
Recording the Exposure Before Shooting AE Lock
103
Shooting in Multi-exposure Mode
Use the four-way controller 5 to select the number of shots
Take the picture
Set the focus mode lever to l or k
Focusing
Using the Autofocus
105
106
AF Adjustment
Sets the focusing area to one of the eleven points
Selecting the Focusing Area AF Point
Sets the focusing area to the center
107
108
Fixing the Focus Focus Lock
Lock the focus
109
Locking Exposure when Focus is Locked
Adjusting the Focus Manually Manual Focus
Using the Focus Indicator
Set the focus mode lever to
111
Using the Viewfinder Matte Field
Shooting in Catch-in Focus Mode
Using the =Button
How to Take Pictures
112
Selecting the Preview Method
Checking the Composition, Exposure
Focus Before Shooting
Displaying the Preview
Focus on the subject, and then turn the main switch to
114
Displaying the Live View
115
116
Use the four-way controller 45 to select g
Continuous Shooting
117
Camera is ready to take pictures continuously
118
Burst Shooting
119
Interval Shooting
Camera is ready to take a series of interval pictures
Focus indicator appears when the subject is in focus
121
Mount the camera onto a tripod Press the button
Self-Timer Shooting
123
124
On the remote control unit is pressed
Remote Control Shooting Remote
Control F Sold Separately
Use the four-way controller 45 to select h
126
127
1Self-Timer Shooting p.122
Using Mirror Up Function to Prevent Camera Shake
Changing the Shooting Conditions
Shooting in Exposure Bracket Mode
129
Set the number of frames
Set the step interval
130
Rec. Mode menu and press
Shooting in Extended Bracket Mode
131
Taking Only Overexposed or Underexposed Pictures
Three frames are saved
132
Press the 4button twice Press the 3button
133
Storing User Settings
Changing the Settings in a Mode
134
Using the Flash
Compensating Flash Output
Turn the rear e-dial to set Flash Mode in the Fn menu p.75
Flash
Allowing Shooting while Charging
Using the Flash in c Aperture Priority Mode
Flash Characteristics in Each Exposure Mode
Using the Flash in b Shutter Priority Mode
Using e/K/c mode
Using the Slow-Speed Sync
Using b/L/amode
139
140
Using Trailing Curtain Sync
Built-in Flash
Distance and Aperture when Using
Calculating Shooting Distance from Aperture Value
Calculating Aperture Value from Shooting Distance
Available depending on other factors
Unavailable due to vignetting
Lens Name
Lens Name Compatibility
143
Using an External Flash Optional
About the LCD Panel Display for AF360FGZ
Using P-TTL Auto Mode
144
Attaching and Using the AF540FGZ or AF360FGZ on the Camera
Using High-Speed Flash Sync Mode
Using in Wireless Mode
145
Using the Built-in Flash Wirelessly
Setting the Channel for the External Flash on the Camera
146
Changing the Built-in Flash Discharge Method
Using a Combination of External Flash Units
Wireless Shooting
147
Flash connected to another flash unit
148
Wireless Flash Control P-TTL Flash Mode
Red-Eye Reduction
Trailing Curtain Sync
Discharging Multiple Flashes
Using the Built-in Flash with the External Flash
149
Contrast-Control-Sync Flash
150
Sync Socket
151
152
Mode Custom Image 154 Setting the File Format 156
Setting the Image Processing Method in Capture
Green, Yellow, Orange, Red, Magenta, Blue
Press the button in Capture mode
Cyan, Infrared Color
Shooting Fn menu appears
Use the four-way controller 45 to choose the Image Tone
Use the four-way controller 45 to change the setting
155
Setting the Jpeg Recorded Pixels
Setting the File Format
157
Setting the Jpeg Quality Level
158
Setting the File Format
Select Button in the a Rec. Mode menu
Setting the RAW Button Function
Camera returns to the Capture or Playback mode
159
160
Setting the White Balance
White Balance screen appears
161
Press the four-way controller 23 and set
162
Fine-Tuning the White Balance
Use the four-way controller 2345 to fine tune White Balance
White Balance fine tune screen appears
Use the four-way controller 3 to select K Manual
Adjusting the White Balance Manually
163
164
White Balance fine-tuning screen
Appears when measuring is completed
165
Adjusting the White Balance with Color Temperature
Screen to enter the color temperature appears
166
Color Temperature
Adjust the Color Temperature with the front and rear e-dial
167
Setting the Color Space
Color Space
SRGB Sets to sRGB color space
168
Playback Functions
Playback Menu Setting Items
How to Operate the Menus During Playback
171
Playback Fn Menu Setting Items
Image rotation information is saved
Rotating Images
Press the Q button
173
Enlarging Playback Images
Turn the rear e-dial to the right toward y
174
Image enlarges at each calibration 1.2 times* to 32 times
Four-way controller Moves area to enlarge
175
Displaying Multiple Images
Turn the rear e-dial to the left toward f
Multi-image display screen appears
Full screen display of the selected image appears
176
Multi-image options screen appears
Images Camera returns to the multi-image display screen
177
Displaying a Folder
Turn the rear e-dial to the left
Multi-image display screen
Comparing Images
179
Slideshow
Start screen is displayed and slideshow Begins
180
Stop the slideshow
181
Setting the Slideshow Display Interval
Select Slideshow in the Q Playback menu
To select the image display
Adjusting the Exposure p.100
Using the Histogram
Changing Playback Display Method
Histogram Display p.26
Understanding Brightness
183
Understanding Contrast
Understanding Color Balance
Camera is ready to take or play back images
Setting the Playback Display
184
Deleting All Images
Deleting Multiple Images
185
Press the Q button Press the i button twice
186
Deleting Selected Images from Multi-image Display
Use the four-way controller To select Select&Delete
187
Appears on the images
Selected images are deleted
Deleting a Folder
Toward f in Playback mode to Display the folders
188
Use the four-way controller 2 to select Delete
Protect
Protecting Images from Deletion
Use the four-way controller 23 to select Protect
Protect screen appears
All images saved in the SD Memory Card are protected
190
Protect all images screen appears
Equipment
Connecting the Camera to AV
192
Processing Images
Screen for selecting the filter appears
Press the button in Playback mode
Processing Images with Digital Filters
195
Adjust with the front e-dial and rear e-dial
Use the four-way controller 23 to select Save as
196
197
Editing RAW Images
Editing One RAW Image
198
Editing All RAW Images
Press the four-way controller Press the button
Edited image is saved under a different name
All selected RAW images are edited and saved in a new folder
199
Specifying the Parameters
Parameter setting screen appears
200
Contrast/Sharpness
Use the four-way controller 45 to change the parameter
201
Select Save as and press the 4button
RAW image is edited and saved as a new image
202
Printing from the Camera
Printing Single Images
Setting the Printing Service Dpof
205
Settings for All Images
Dpof screen appears
Screen for making Dpof settings for all images appears
206
207
Printing Using PictBridge
208
Setting Transfer Mode
PictBridge menu appears
Connecting the Camera to the Printer
209
Use the four-way controller 45 to choose an image to print
210
Print single image screen appears
You can print up to 99 copies
211
Screen for changing print settings appears
Select Paper Size and press the four-way controller
Use the four-way controller 2345 to choose the paper size
Printing All Images
Press the 4button on the print settings confirmation screen
212
Print all images screen appears
Disconnecting the USB Cable
Printing Images Using the Dpof Settings
213
Turn off the camera
214
10Camera Settings
Storing images
How to Operate the RSet-up Menu
RSet-up Menu Setting Items
217
Function Sensor Cleaning
Use the four-way controller 23 to select Format
Time, and Display Language
Setting the Beep Setting, Date
Turning the Beep On and Off
Select Beep in the R Set-up
220
Changing the Date and Time and the Display Style
221
Setting the World Time
Selection frame moves to X Destination setting
222
World Time setting is saved
List of World Time Cities
223
224
Setting the Text Size
Adjusting the Monitor and the Menu
Setting the Guide Display Time
Display
226
Adjusting the Brightness of the Monitor
Adjusting the Color of the Monitor LCD Color Tuning
Press the 4button
Setting the Instant Review
227
Select Live View in the Q Playback menu
Setting the Live View
228
229
Setting the Digital Preview
Selecting the Folder Name
Setting the Image File Naming Convention
Selecting the File Number Setting
231
Setting the File Name
Text is changed
232
After entering the desired characters, press the button
Setting Auto Power Off
Power Settings
Selecting the Video Output Format
Selecting the Video Output Format
Press the 4button Press the 3button twice
Selecting a Battery
234
Defective pixels are mapped and corrected
Using Pixel Mapping
235
Memory screen appears
Selecting Capture Mode Settings to Save in the Camera
Resets the camera settings
11Resetting to Default Settings
Resetting Rec. Mode/Playback/Set- up Menu
Resetting the Custom Function Menu
Resetting Saved User Settings
Resetting Other Settings
241
Resetting the File Name
File name is reset
242
280
12Appendix
Rec. Mode Menu
Default Settings
Reset Setting
Set-up Menu
245
Playback Menu
246
ACustom Setting Menu
247
Fn Menu
248
Lenses that can be used with this camera
Functions Available with Various
Lens Combinations
Lens and Built-in Flash
250
Lens names and mount names
Aperture Ring Use
Exposure error may occur.
251
Detecting Dust on the Cmos Sensor Dust Alert
Cleaning the Cmos Sensor
Removing Dust by Shaking the Cmos Sensor
Image is saved and Dust Alert is exited
253
Select Dust Alert in the R Set- up menu
254
Removing Dust with a Blower
Use the four-way controller 23 to select Mirror Up
Sensor Cleaning screen appears
255
Battery Grip D-BG2
Optional Accessories
Power Supply Accessories
AC Adapter D-AC50
257
Flash Accessories
Auto Flash AF540FGZ Auto Flash AF360FGZ
Auto Flash AF200FG
For Viewfinder
258
Cable Switch CS-205
Interchangeable Focusing Screen
Remote Control F
259
260
Imagesensor Cleaning Kit O-ICK1
Camera Case/Strap
Others
261
Error Messages
262
263
Data error has occurred during printing
Printer has run out of ink. Replace ink and print
Paper is jammed in the printer. Remove paper
Troubleshooting
265
512MB 256MB 128MB
Main Specifications
Capacity Pixels
267
268
NTSC/PAL
269
Glossary
271
272
273
SRGB standard RGB
274
Vignetting
White Balance
275
Symbols
Index
276
277
278
279
Warranty Policy
281
For customers in USA
282
For customers in Canada
Pour les utilisateurs au Canada
Declaration of Conformity
Information on disposal for users
Memo

 Using the =Button
 Shooting in