These Operations are accessible by Remote Control.
Some may also be accessible by the Main Unit's Control Panel.
Initial Setup
This section will guide you through the Unit’s Initial setting which includes selecting a Language for your
Before you begin:
Make sure the Unit is connected to an Antenna or Cable.
1After making All the Necessary Connections, press B to Turn On the Unit.
●It may take a few moments to Turn On the Unit for the first time.
●Initial setup menu appears Automatically after the Unit is Turned
On.
2Use H I to select the
●You must set Home in location setting. Otherwise, Picture and Sound settings you adjusted will not be memorized after the Unit
goes into Standby mode.
3Use H I to select the signal type.
●If the TV is connected to a Cable or Satellite
To set up a TV signal from a cable TV | Select |
wall jack or a standard TV antenna. |
|
To set up a TV signal from a cable TV | Select |
box or satellite TV receiver. |
|
4Use H I to select Antenna for TV channels or Cable for CATV channels, then press OK.
Make sure that you have | Antenna |
attached your antenna or cable | |
signal into the jack on the back | Cable |
of your TV labeled "ANTENNA IN". | |
Now select either Antenna or | Skip |
Cable, using up/down key of the |
|
remote control. Once you have |
|
made your selection, press the |
|
OK button to proceed. |
|
–When Antenna is selected, the TV detects Antenna signals. It searches for DTV and Analog TV channels available in your area.
–When Cable is selected, the TV detects signals supplied by cable. It searches for DTV, Analog TV and Cable channels available in your area.
●Autoprogram will begin.
20 .English
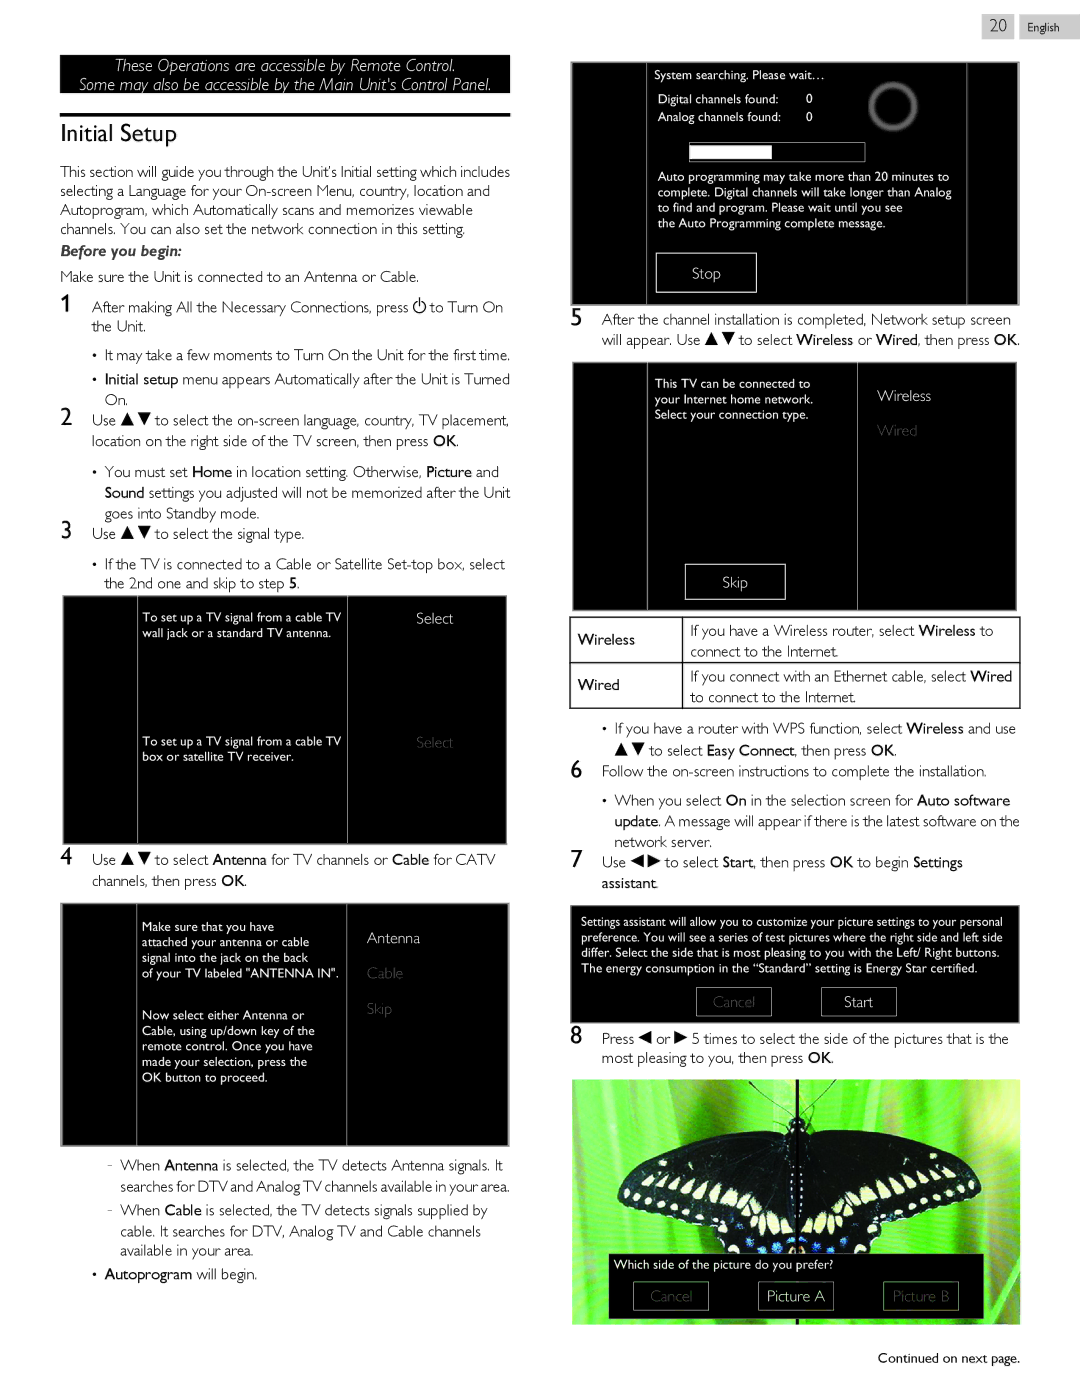
System searching. Please wait…
Digital channels found: | 0 | ||
Analog channels found: | 0 | ||
|
|
|
|
|
|
|
|
Auto programming may take more than 20 minutes to complete. Digital channels will take longer than Analog to find and program. Please wait until you see
the Auto Programming complete message.
Stop
5After the channel installation is completed, Network setup screen will appear. Use H I to select Wireless or Wired, then press OK.
This TV can be connected to | Wireless |
your Internet home network. | |
Select your connection type. | Wired |
|
Skip
Wireless | If you have a Wireless router, select Wireless to | |
connect to the Internet. | ||
| ||
Wired | If you connect with an Ethernet cable, select Wired | |
to connect to the Internet. | ||
|
●If you have a router with WPS function, select Wireless and use
H I to select Easy Connect, then press OK.
6Follow the
●When you select On in the selection screen for Auto software update. A message will appear if there is the latest software on the
network server.
7Use J K to select Start, then press OK to begin Settings assistant.
Settings assistant will allow you to customize your picture settings to your personal preference. You will see a series of test pictures where the right side and left side differ. Select the side that is most pleasing to you with the Left/ Right buttons. The energy consumption in the “Standard” setting is Energy Star certified.
Cancel | Start |
8Press J or K 5 times to select the side of the pictures that is the most pleasing to you, then press OK.
Which side of the picture do you prefer?
Cancel | Picture A | Picture B |
|
|
|
Continued on next page.