CONTROLS AND CONNECTIONS
FRONT VIEW
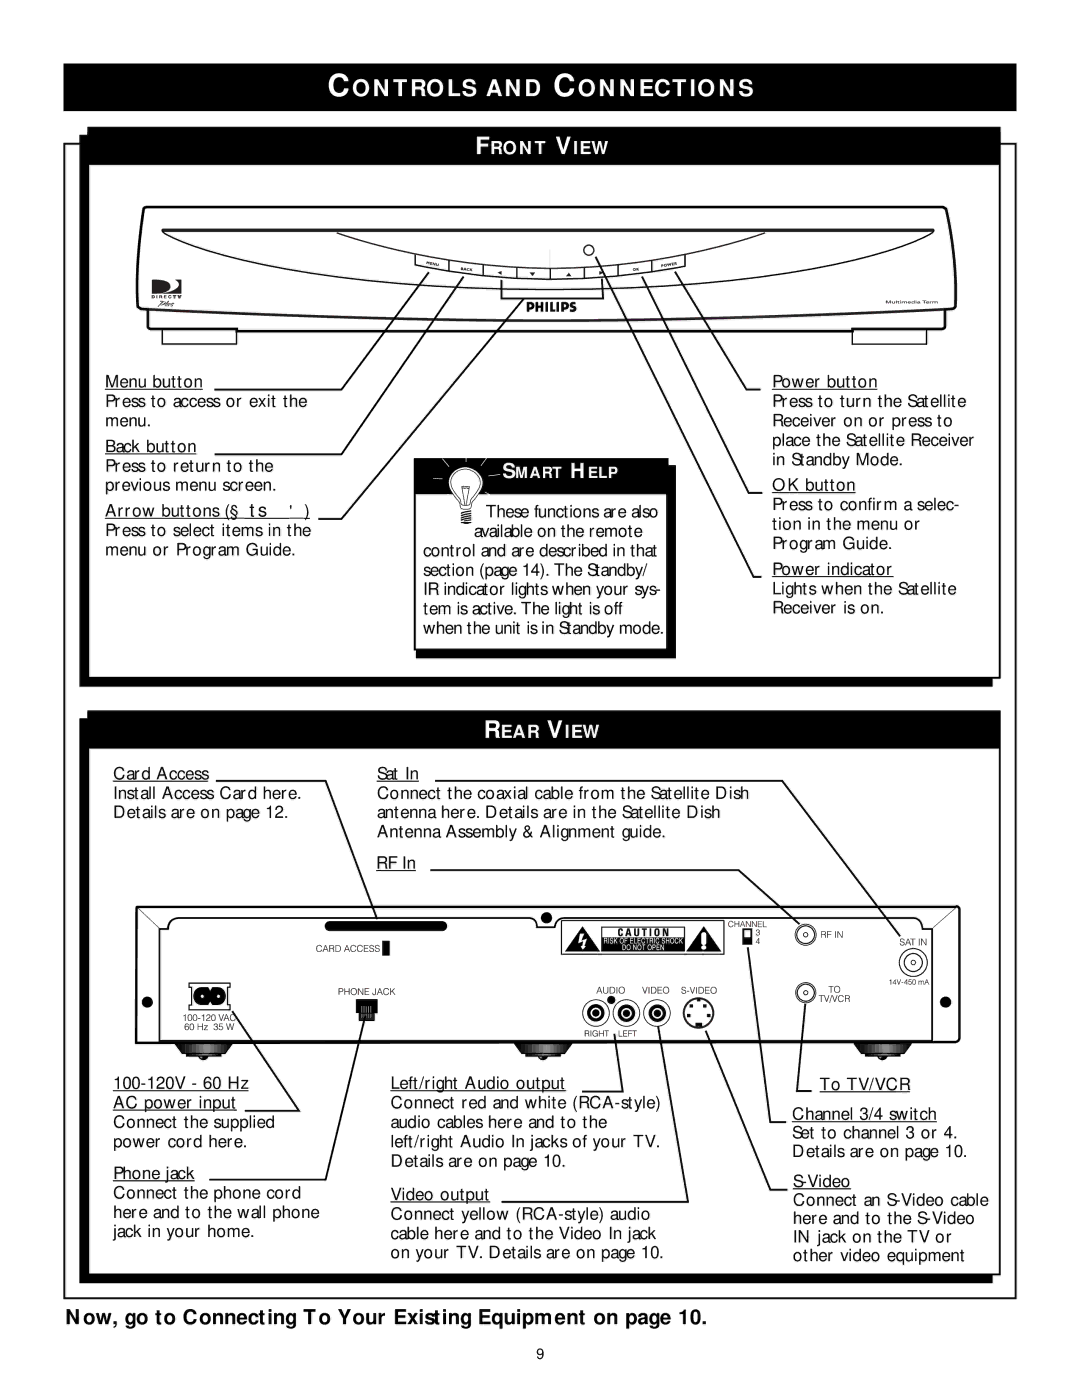
Menu button
Press to access or exit the menu.
Back button
Press to return to the previous menu screen.
Arrow buttons (◀ ▼ ▲ ▶) Press to select items in the menu or Program Guide.
SMART HELP
 These functions are also available on the remote
control and are described in that section (page 14). The Standby/ IR indicator lights when your sys- tem is active. The light is off when the unit is in Standby mode.
Power button
Press to turn the Satellite Receiver on or press to place the Satellite Receiver in Standby Mode.
OK button
Press to confirm a selec- tion in the menu or Program Guide.
Power indicator
Lights when the Satellite Receiver is on.
|
|
|
|
|
|
| REAR VIEW | |||||||||||
Card Access |
| Sat In | ||||||||||||||||
Install Access Card here. |
| Connect the coaxial cable from the Satellite Dish | ||||||||||||||||
Details are on page 12. |
| antenna here. Details are in the Satellite Dish | ||||||||||||||||
|
|
|
|
| Antenna Assembly & Alignment guide. | |||||||||||||
|
|
|
|
| RF In | |||||||||||||
|
|
|
|
|
|
|
|
|
|
|
|
|
|
|
|
|
|
|
|
|
|
|
|
|
|
|
|
|
|
|
|
|
|
|
|
|
|
|
|
|
|
|
|
|
|
|
|
|
|
|
|
|
|
|
|
|
|
|
|
|
|
|
|
|
|
|
|
|
|
|
|
|
|
|
|
|
|
|
|
|
|
|
|
|
|
|
|
|
|
|
|
|
|
|
|
|
|
|
|
|
|
|
|
|
|
|
|
|
|
|
|
|
|
|
|
|
|
|
|
|
|
|
|
|
|
|
|
|
|
|
|
|
|
|
|
|
|
|
|
|
|
|
|
|
|
|
|
|
|
|
|
|
|
|
|
|
|
|
|
|
|
|
|
|
|
|
|
|
|
|
|
|
|
|
|
|
|
|
|
|
|
|
|
|
|
|
|
|
|
|
|
|
|
|
|
|
|
|
|
|
|
|
|
|
|
|
|
|
|
|
|
|
|
|
|
|
|
|
|
|
|
|
|
|
|
|
|
|
|
|
|
|
|
|
|
|
|
|
|
|
|
|
|
|
|
|
|
|
|
|
|
|
|
|
|
|
|
|
|
|
|
|
|
|
|
| Left/right Audio output | ||
AC power input |
| Connect red and white | |
Connect the supplied |
| audio cables here and to the | |
power cord here. |
| left/right Audio In jacks of your TV. | |
|
| Details are on page 10. | |
Phone jack | |||
| |||
Connect the phone cord | Video output | ||
here and to the wall phone | Connect yellow | ||
jack in your home. | cable here and to the Video In jack | ||
|
| on your TV. Details are on page 10. | |
To TV/VCR
Channel 3/4 switch Set to channel 3 or 4. Details are on page 10.
S-Video
Connect an
Now, go to Connecting To Your Existing Equipment on page 10.
9
