VR810BPH
Dear Philips product owner
For Customer Use
Introduction
Features
Safety Precautions
Picture Quality
Table of Contents
Using the Remote Control
Before Using Your VCR
Putting Batteries in the Remote Control
VCR Maintenance/Video Head Cleaning
Hookups without a Cable Box
Disconnect the antenna or cable from your TV
Hookups without a Cable Box cont’d
Antenna Or Cable
Connections
Cable signal RF coaxial cable
Hookups with a Cable Box/Direct Broadcast System
Recording/Viewing Any Channel
2RF coaxial cable
Recording One Channel/Watching Another
With this connection
TV’s
Menu shown below will appear
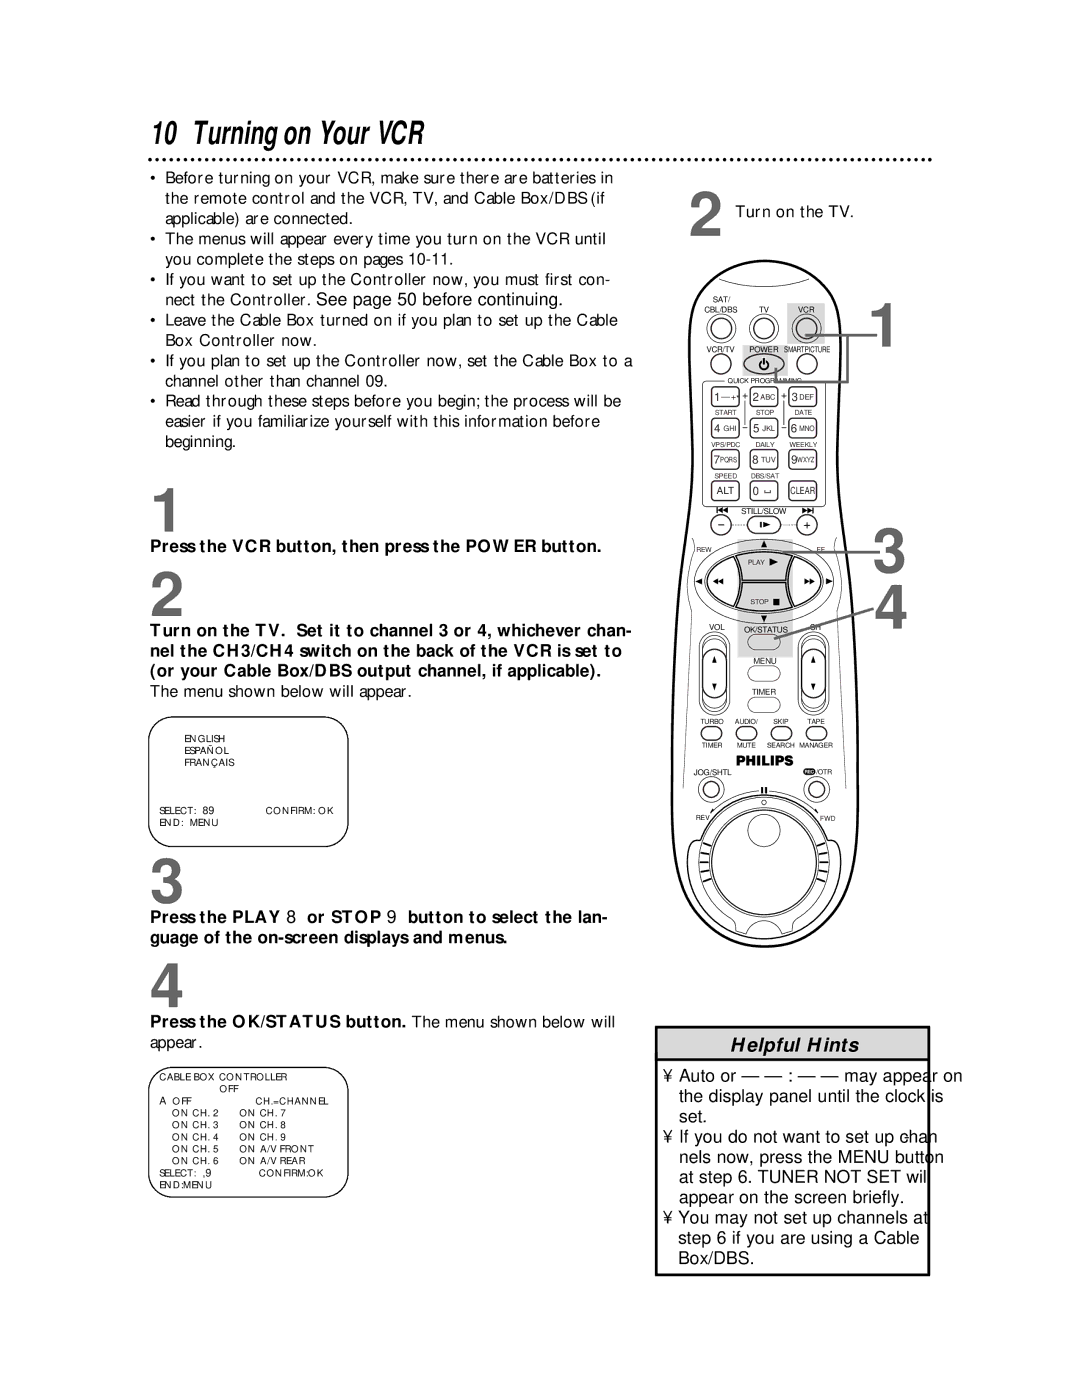
Turning on Your VCR
Turn on the TV
Turning on Your VCR cont’d
Automatic Channel Setup
Press the VCR button, then press the Menu button
Adding/Deleting Channels
Automatic Channel Setup cont’d
Selected channel
Channels are set up. Details are on
Setting the Clock
Manual Clock Setting
To make corrections, follow steps
Setting the Clock cont’d
Setting the Clock cont’d
Time Zone Selection
Manual PBS Channel Selection
Automatic PBS Channel Selection
CBL/DBS VCR VCR/TV Power
Daylight-Savings Time
Press the Play 8 or Stop 9 button to select LAN
Language Selection
Press the Menu button
Turbo Timer indicators
VCR Display Panel VHS Indicator VR1010BP only
Tape Speed Timer Light Lights
Line Input Mode Remaining Tape Time Indicator
Front Panel
Rear Panel
Remote Control Buttons
SAT/CBL/DBS Button
Turbo Timer Button
Timer Button
ALTernate Channel
Setting the Remote Control to Operate a TV
Repeat step
Turn on your Satellite Receiver/Cable Box/DBS
Find the code for your
If on Screen Mode is set to on or
Press the Play 8 or Stop 9 button to select on
Playing
Playback options and features are on pages
When you insert a tape, tape manag
Read and follow the steps below to play a tape
Press the VCR button
VCR records in a preset volume
Recording
Appear on the display panel
VHS Recording VR1010BP only
VHS ET VR1010BP only
Recording One Channel/Watching Another
VCR light will disappear from the display panel
One-Touch Recording
Channels are set up. Details are on pages
Starting an OTR
Record Link
Channels
Setting Up the VCR Plus+ Programming System
Call Letters
Examine the lists
2on
Timer Recording with the VCR Plus+ Programming System
To check your timer recordings, see
If you forget to turn off the VCR
Quick Programming
Channels are programmed. Details are on pages
Instructions continue on
Tape Speeds
Quick Programming cont’d
Helpful Hint
Current channel number will appear on the display panel. To
Turbo Timer
1Insert a tape into the VCR
Indicates a Weekly recording
Checking, Editing, or Clearing Timer Recordings
Program Review
Indicates a Daily recording
Press the OK/STATUS button to select the program
Or, to cancel the timer recording, press the Clear button
Program Overlap Warning
Information about the chosen program will appear
Timer Recording Speed Setting
Follow the steps below to set Timer REC Speed to Auto
Rerecording Tape Duplication
VCR 1 will play your tape. Insert a prerecorded tape in VCR
Audio equipment CD player etc
Audio cable
Blinks and appears on the VCR display panel
Make sure the video tape’s record tab is intact
Connect the Cable signal to
Connecting the Controller
Cable Box/DBS Controller Connect the Controller
Setting the Controller to Operate a Cable Box
Make sure the clock is set. You must set the clock manually
Setting the Controller to Operate a Cable Box cont’d
Wait for a few seconds
Channel other than
Setting the Controller to Operate a DBS
Will learn your DBS code
Setting the Controller to Operate a DBS cont’d
7Wait for a few seconds
Receiving a Stereo Broadcast
Multi-Channel Television Sound System
Receiving a Second Audio Program
Multi-Channel Television Sound System cont’d
Record the program as usual. Details are on
Hi-Fi Stereo Tape Playback
Video Stabilizer
Or special effects playback
SmartPicture
To provide the highest possible picture quality
Digital Studio Picture Control
To set Dspc to on or OFF, follow these steps
Index Search
Press the Stop 9 button to cancel a Skip Search
Search Options
Skip Search
Viewing a Still Picture
Playback Options
Forward and Reverse Searching
Viewing a Slow Motion Picture
Viewing a Picture in Slow to Fast Motion
Will light
Insert a tape that was recorded with this VCR
Tape Manager
Find a Title
Press the VCR button, then press the Tape
Press the Play 8 or Stop 9 button to select Check
Tape Manager cont’d
Check Memory
Check Memory screen appears
If you don’t see the tape title or pro
Edit Title
Tape titles may have up to 10 characters
Entering Characters
Selected program
Sorting by Tape Number
Football
Sorting by Date
Sorting by Category
As follows, for example
Find Blank Space
Review the tape portion to make sure it is blank
Deleting Tape or Program Information
If you want to erase more information, repeat steps
You can disable the Tape Manager if you don’t want to use it
CL will blink intermittently on the display panel
When Child Lock is activated
Child Lock
CL will disappear from the display panel
Blue Background
To set Blue Background to on or OFF, follow these steps
Automatic Operation Features
Glossary
Helpful Hints
Helpful Hints cont’d
Limited Warranty
Video Cassette Recorder or Player
Payment Amount
Limited Warranty cont’d
To obtain a replacement product from Philips
Check or money order Account number
Specifications
Automatic
Remote control
Timer
Cable box
Supplied Accessories

