CONNECTIONS

CONNECTIONS

CONNECTION PANEL

Rear panel


1

2


3


4


5


6


MONO

STEREO


MIC2


MIC1


POWER


AUX(R)


AUX(L)


MIC


AUX


OFF

ON


AC IN


PHONO

CD


PHONO

CD


1

2


LINE


LINE


MASTER


SIGNAL


OUT

L


L


L


GND


LINE PHONO


LINE PHONO


R


R


R


CONTROL


CONTROL


17

16

15

14

13


12

11

10

9

8

7

Front panel

18

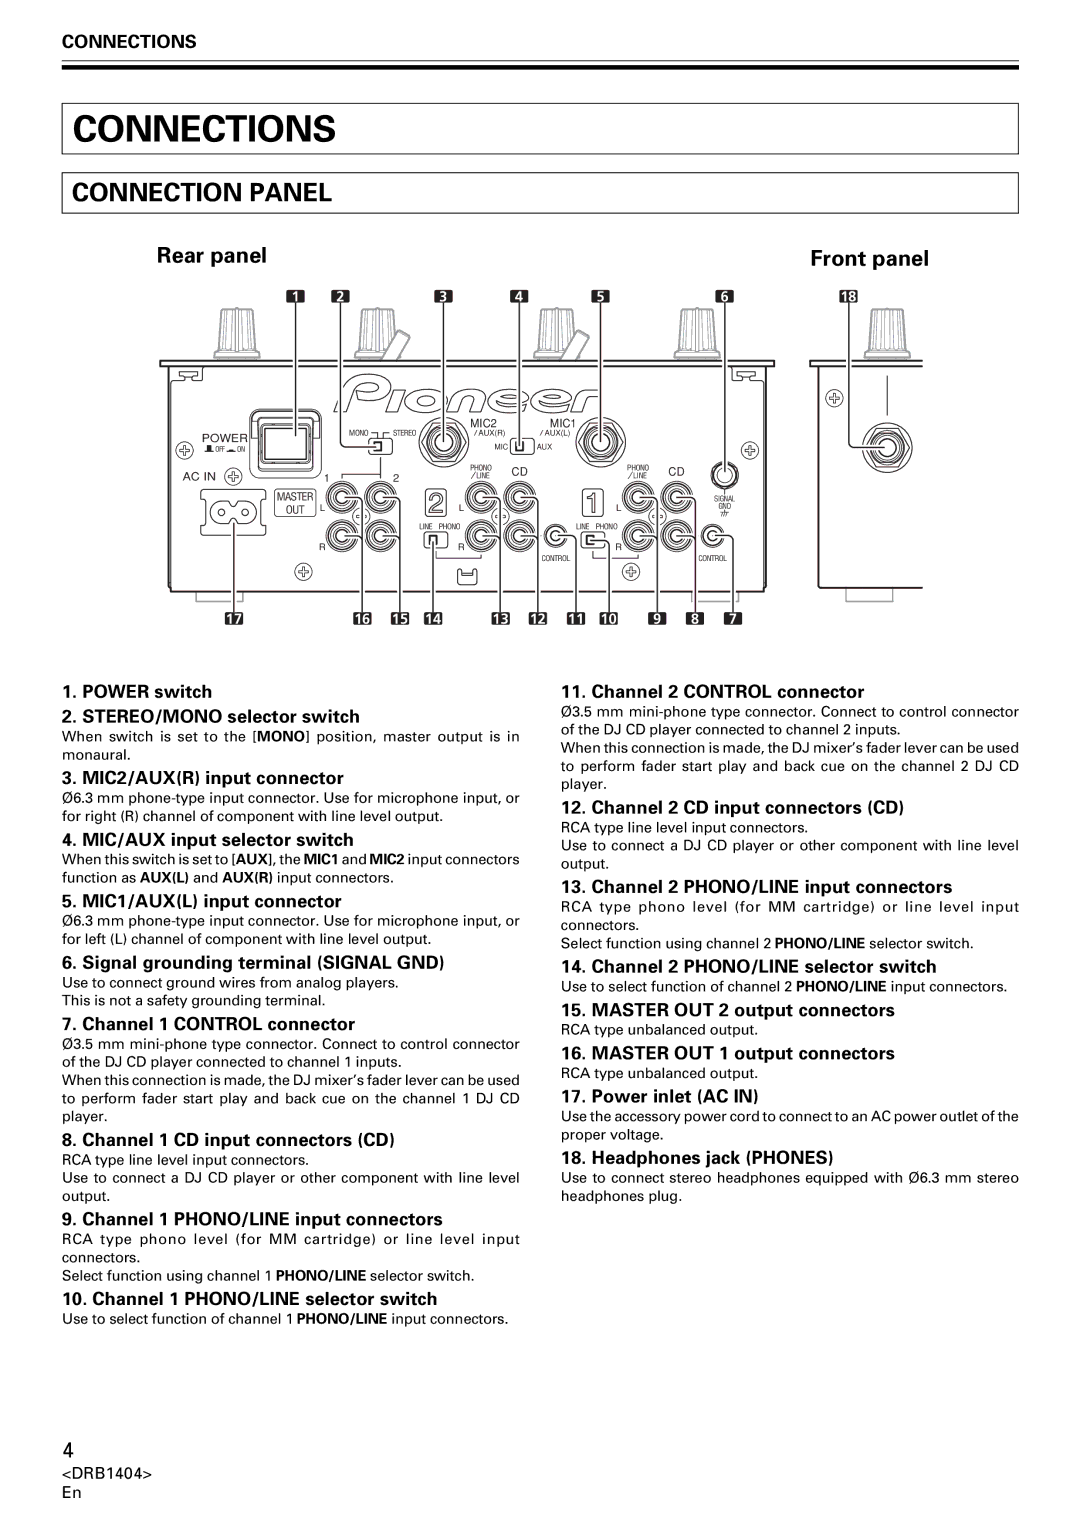
1.POWER switch

2.STEREO/MONO selector switch

When switch is set to the [MONO] position, master output is in

monaural.

3. MIC2/AUX(R) input connector

Ø6.3 mm phone-type input connector. Use for microphone input, or for right (R) channel of component with line level output.

4. MIC/AUX input selector switch

When this switch is set to [AUX], the MIC1 and MIC2 input connectors function as AUX(L) and AUX(R) input connectors.

5. MIC1/AUX(L) input connector

Ø6.3 mm phone-type input connector. Use for microphone input, or for left (L) channel of component with line level output.

11. Channel 2 CONTROL connector

Ø3.5 mm mini-phone type connector. Connect to control connector of the DJ CD player connected to channel 2 inputs.

When this connection is made, the DJ mixer’s fader lever can be used to perform fader start play and back cue on the channel 2 DJ CD player.

12. Channel 2 CD input connectors (CD)

RCA type line level input connectors.

Use to connect a DJ CD player or other component with line level output.

13. Channel 2 PHONO/LINE input connectors

RCA type phono level (for MM cartridge) or line level input connectors.

Select function using channel 2 PHONO/LINE selector switch.

6. Signal grounding terminal (SIGNAL GND)

Use to connect ground wires from analog players.

This is not a safety grounding terminal.

7. Channel 1 CONTROL connector

Ø3.5 mm mini-phone type connector. Connect to control connector of the DJ CD player connected to channel 1 inputs.

When this connection is made, the DJ mixer’s fader lever can be used to perform fader start play and back cue on the channel 1 DJ CD player.

8. Channel 1 CD input connectors (CD)

RCA type line level input connectors.

Use to connect a DJ CD player or other component with line level output.

14. Channel 2 PHONO/LINE selector switch

Use to select function of channel 2 PHONO/LINE input connectors.

15. MASTER OUT 2 output connectors

RCA type unbalanced output.

16. MASTER OUT 1 output connectors

RCA type unbalanced output.

17. Power inlet (AC IN)

Use the accessory power cord to connect to an AC power outlet of the proper voltage.

18. Headphones jack (PHONES)

Use to connect stereo headphones equipped with Ø6.3 mm stereo headphones plug.

9. Channel 1 PHONO/LINE input connectors

RCA type phono level (for MM cartridge) or line level input connectors.

Select function using channel 1 PHONO/LINE selector switch.

10. Channel 1 PHONO/LINE selector switch

Use to select function of channel 1 PHONO/LINE input connectors.

4

<DRB1404> En

Page 4
Image 4
Pioneer DJM-400 operating instructions Connections, Connection Panel, Rear panel, Front panel

DJM-400 specifications

The Pioneer DJM-400 mixer is a compact yet powerful addition to any DJ's setup, designed to blend professional capabilities with ease of use. As a two-channel mixer, it provides a perfect balance between features and simplicity, making it ideal for both beginner and experienced DJs.

One of the standout features of the DJM-400 is its high-quality sound output. The mixer is equipped with 48 kHz/24-bit digital signal processing, ensuring crystal-clear audio quality. This level of fidelity is crucial for DJs who want to deliver a party experience that is both immersive and engaging.

The DJM-400 includes a built-in sound card for seamless digital connectivity. This allows DJs to connect to a computer or laptop easily, enabling them to use software like Serato or Traktor. The mixer supports multiple formats and offers USB connectivity, which means it can also be used with a wide variety of devices. Its plug-and-play design minimizes setup time, letting DJs focus on their performance rather than technical issues.

Another noteworthy characteristic is the integrated digital effects processor. The DJM-400 features a range of built-in effects, including delay, echo, and flanger, which can be applied to individual channels, allowing DJs to add depth and dimension to their mixes. The effects can be manipulated using intuitive controls, making it easy to create unique sounds on the fly.

The layout of the DJM-400 has been thoughtfully designed to facilitate quick and easy adjustments. The EQ section features three-band equalizers for each channel, allowing precise control over bass, midrange, and treble frequencies. This empowers DJs to tailor their sound according to the venue and crowd.

Moreover, the DJM-400 comes with a crossfader that is exceptionally smooth, enabling seamless transitions between tracks. The fader is also replaceable, ensuring longevity and catering to individual preferences in performance style.

In summary, the Pioneer DJM-400 is a highly capable mixer that combines excellent sound quality, advanced technology, and user-friendly design. The inclusion of a built-in sound card, a suite of digital effects, and an intuitive layout makes it a versatile choice for DJs of all skill levels. Whether you're just starting your DJ journey or you're a seasoned professional, the DJM-400 delivers the features needed to elevate your performances and connect with your audience.